

We’re making some changes to the way First2Host take and manages backups of cPanel accounts on F2HCloud High Availability Web Hosting. Previously, we took a daily backup of each site on the F2HCloud. These backups would be available to restore using JetBackup from cPanel. Daily backups are stored off-site in Germany.
3-2-1 Backup Strategy
We’re aligning our Hosting service with the industry standard 3-2-1 backup strategy. The concept of the 3-2-1 backup strategy is that you always have three backups of your data in three locations. These are;
3) Backups on the server.
2) Backups on a different server.
1) Backups in a different location.
When restoring a website you would first choose the backups on the server (3). If, for any reason, you cannot use these, you would next choose backups from a different server (2). And, if all else fails, you have backups in an external location (1).
Hourly, Daily, Weekly & Monthly Backups
We’re introducing Hourly, Daily, Weekly and Monthly backups of accounts in replacement of the previous 7-daily backups on all High Availability Web Hosting Plans.
Hourly Backups (Stored on-premise) (Enterprise Plan Only)
- Restore any of the previous 24 hourly backups.
Daily Backups (Stored off-premise)
- Restore any of the 7 previous daily backups.
Weekly Backups (Stored off-premise)
- Restore any of the previous 4 weeks of backups.
Monthly Backups (Stored on-premise)
- Restore last month’s backup.
Backup Schedules
Customers on the following plans will subscribe to the following backup schedules. For Basic, Standard and Pro plans. Instead of the default 7 backups, customers will now have access to 12 backups spread over multiple locations. Enterprise users have access to 36 backups.
Basic, Standard & Professional Web Hosting Plan
- Monthly backups (1 backup)
- Weekly backups (4 backups)
- Daily backups (7 backups)
Enterprise Web Hosting Plan
- Monthly backups (1 backup)
- Weekly backups (4 backups)
- Daily backups (7 backups)
- Hourly backups (24 backups)
There is an option for customers on our Basic, Standard and Professional plans to upgrade to Hourly backups for £2/month. You can add this addon from your client area. Data redundancy is improved due to the addition of on-premise and off-premise backups.
Jetbackup cPanel Backups
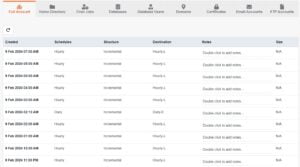
We’re introducing the new backup system gradually over the next couple of weeks. Enterprise customers and Professional customers are already benefiting from the new system. You can see a list of backups in cPanel > Jetbackup.
When restoring data please now note the “Destination” field. This will either be Hourly-L, Daily-E, Weekly-E or Monthly-L. The E represents External or off-premise backups. The L represents Local or on-premise backups. Local backups will always be the fastest to restore.