


The last article was a lot to take in. In Part 7 – Configure PostFixAdmin and RoundCube High Availability Email Servers we made some extensive changes to the PostFix and Dovecot configuration. We introduced NAS storage and migrated our mailboxes to be served from the shared storage. That storage is mounted in both m1.relay.gb.net and m2.relay.gb.net. We’re now very close to having two Postfix email servers configured for High Availability. At the moment on m1.relay.gb.net, we can send and receive mail fine. The set-up in that Postfix server is completed. In m2.relay.gb.net we can send mail from both Webmail and using a client like Thunderbird. We cannot yet receive email. That’s because we need to properly configure SPF and the SPF policy agent. Plus we need to configure DKIM in our second Postfix server.
Articles In This Series
- Part 1 – Install Postfix in Ubuntu Servers
- Part 2 – Install Dovecot IMAP/POP3 with SSL/TLS
- Part 3 – Configure Postfix DKIM & SPF Records
- Part 4 – Install Postfixadmin on Postfix Ubuntu Servers
- Part 5 – Install RoundCube Webmail on Ubuntu Postfix servers
- Part 6 – Configure Multiple Email Domains in Postfix Email Server
- Part 7 – Configure PostFixAdmin and RoundCube High Availability Email Servers
- Part 8 – Configure DKIM, SPF and DMARC on Second (multiple) Postfix Email Servers (This Article)
- Part 9 – Load Balance PostFixAdmin, RoundCube and Postfix Email
Reconfigure SPF Record
As we found out in the last article. Our emails are currently being flagged as spam. Our SPF record doesn’t reflect the IP of m2.relay.gb.net, we don’t have an rDNS entry for m2.relay.gb.net and DKIM is not configured. Here are the headers from our test email being sent via Thunderbird through m2.relay.gb.net.
From: Dev <s2@relay.gb.net>
Content-Type: text/plain; charset=UTF-8; format=flowed
Content-Transfer-Encoding: 7bit
X-Spam-Status: Yes, score=8.0
X-Spam-Score: 80
X-Spam-Bar: ++++++++
X-Spam-Report: Spam detection software, running on the system "litespeed.xxxx.com",
 has identified this incoming email as possible spam.  The original
 message has been attached to this so you can view it or label
 similar future email.  If you have any questions, see
 root\@localhost for details.
 Content preview:  test
 Content analysis details:   (8.0 points, 4.0 required)
  pts rule name              description
 ---- ---------------------- --------------------------------------------------
  4.0 SPF_FAIL               SPF: sender does not match SPF record (fail)
 [SPF failed: Please see http://www.openspf.org/Why?s=mfrom;id=s2%40relay.gb.net;ip=51.89.170.247;r=litespeed.xxxxx.com]
  2.0 PYZOR_CHECK            Listed in Pyzor
                             (https://pyzor.readthedocs.io/en/latest/)
  2.0 RDNS_NONE              Delivered to internal network by a host with no rDNS
  0.0 KAM_DMARC_STATUS       Test Rule for DKIM or SPF Failure with Strict
                             Alignment
X-Spam-Flag: YES
Subject:  ***SPAM***  test
So first, update your SPF record and add the IP of your second Postfix NVMe VPS Server.
v=spf1 ip4:151.80.124.86 ip4:51.89.170.247 a mx -allConfigure Postfix SPF Checks
For a full explanation of SPF Checks, see Part 3 – Configure Postfix DKIM & SPF Records.
apt install postfix-policyd-spf-python && nano /etc/postfix/master.cf
Next, in the current open file. Add the below line to tell Postfix to start the policy agent when Postifx starts, add this to the end of the file. Save and close the file.
policyd-spf  unix  -       n       n       -       0       spawn
    user=policyd-spf argv=/usr/bin/policyd-spf
So now open up the /etc/postfix/main.cf file and append the below code block to the end of the file.
nano /etc/postfix/main.cf

policyd-spf_time_limit = 3200
smtpd_recipient_restrictions =
   permit_mynetworks,
   permit_sasl_authenticated,
   reject_unauth_destination,
   check_policy_service unix:private/policyd-spf
Finally, restart the Postfix on the second Postfix email server.
systemctl restart postfixRemember, for a full explanation of SPF, see Part 3 – Configure Postfix DKIM & SPF Records.
Configure DKIM on the Second Postfix Server
DKIM on a second PostFix VPS Server is a bit more tricky. We need to ensure the signing of emails matches the keys used in both m1 and m2. Install OpenDKIM on the second Postfix server.
apt install opendkim opendkim-tools && gpasswd -a postfix opendkim && nano /etc/opendkim.confIn the open file, add the below code blocks. Remember to comment any duplicate blocks out in the file with a #
Logwhy               yes
#Canonicalization   simple
#Mode               sv
#SubDomains         no

# Add the code block below #SubDomains

Canonicalization   simple/relaxed
Mode               sv
SubDomains         no
#ADSPAction continue
AutoRestart         yes
AutoRestartRate     10/1M
Background          yes
DNSTimeout          5
SignatureAlgorithm  rsa-sha256

# Specify OpenDKIM user

UserID             opendkim

# Map domains in From addresses to keys

KeyTable           refile:/etc/opendkim/key.table
SigningTable       refile:/etc/opendkim/signing.table

# Ignore list
ExternalIgnoreList  /etc/opendkim/trusted.hosts

# Internal hosts whose mail should be signed
InternalHosts       /etc/opendkim/trusted.hosts
DKIM Tables and Hosts Files
In Part 3 – Configure Postfix DKIM & SPF Records we configured DKIM on our first server. Then, in Part 6 – Configure Multiple Email Domains in Postfix Email Server we configured additional domains to work with OpenDKIM. We need to copy all of the files from our first server m1.relay.gb.net to m2.relay.gb.net. But first, create the required folders.
mkdir /etc/opendkim && mkdir /etc/opendkim/keys && chown -R opendkim:opendkim /etc/opendkim && chmod go-rw /etc/opendkim/keysYou need to copy the following files and folders from the first email server.
/etc/opendkim/signing.table
/etc/opendkim/key.table
/etc/opendkim/trusted.hosts
/etc/opendkim/keys
The fastest way is to copy the entire /etc/opendkim folder and SCP the .zip to the second server. However, it’s likely best to take a Snapshot or Backup just in case.
scp dkim.zip root@m2.relay.gb.net:/And unzip the file on the new server.
cd / && unzip dkim.zip && ls /etc/opendkimAnd now correct the permissions.
chown -R opendkim:opendkim /etc/opendkim/

chmod 600 /etc/opendkim/keys/relay.gb.net/default.private
Allow Postfix to talk to OpenDKIM
So to allow communication between Postfix and OpenDKIM we must create a socket.
mkdir /var/spool/postfix/opendkim && chown opendkim:postfix /var/spool/postfix/opendkim && nano /etc/opendkim.confIn the console the opendkim.conf will now be open. Locate the below line.
Socket local:/run/opendkim/opendkim.sockComment (#) that line and replace with the below line.
Socket local:/var/spool/postfix/opendkim/opendkim.sockNext in the /etc/default/opendkim file find the below line.
SOCKET=local:$RUNDIR/opendkim.sockComment that (#) to disable it and replace it with the below line.
SOCKET="local:/var/spool/postfix/opendkim/opendkim.sock"Next, it’s on to the Postfix configuration file. Open the file.
nano /etc/postfix/main.cfAppend the below code block to the end of the file. However, this might already be in the file. You can skip this if that’s the case.
milter_default_action = accept
milter_protocol = 6
smtpd_milters = local:opendkim/opendkim.sock
non_smtpd_milters = $smtpd_milters
Save and close the file then restart Postfix.
systemctl restart postfixI’ve abbreviated a lot here to save time. We don’t need to go over old ground. If you’re confused, see Part 3 – Configure Postfix DKIM & SPF Records.
Test Second Postfix Server
Right about now, the second Postfix email server should accept mail. Assuming you still have your MX entry pointing to the second Postfix server. Send an email to your test account. It should now be received. Also, if you now send an email to an external email server you should see that SPF is configured correctly and you have an rDNS entry. Here’s our email headers now after the edits.
Delivery-date: Wed, 03 Apr 2024 01:55:34 +0100
Received: from m2.relay.gb.net ([51.89.170.247]:44202)
	by litespeed.xxxxxxx.com with esmtps  (TLS1.3) tls TLS_AES_256_GCM_SHA384
	(Exim 4.96.2)
	(envelope-from <s2@relay.gb.net>)
	id 1rroub-00GDFn-31
	for xxxxxxxx;
	Wed, 03 Apr 2024 01:55:34 +0100
Received: from [10.8.0.3] (unknown [xxxxxx])
	by m2.relay.gb.net (Postfix) with ESMTPSA id 50899479E5
	for <xxxxxxx>; Wed,  3 Apr 2024 00:54:52 +0000 (UTC)
Message-ID: <1e2c8ba0-a36c-4864-b840-2779762dc001@relay.gb.net>
Date: Wed, 3 Apr 2024 01:54:51 +0100
MIME-Version: 1.0
User-Agent: Mozilla Thunderbird
Content-Language: en-US
To: xxxxxxxxxx
From: xxxxxxxxx <s2@relay.gb.net>
Subject: Test
Content-Type: text/plain; charset=UTF-8; format=flowed
Content-Transfer-Encoding: 7bit
X-Spam-Status: No, score=0.0
X-Spam-Score: 0
X-Spam-Bar: /
X-Ham-Report: Spam detection software, running on the system "litespeed.xxxxxx.com",
 has NOT identified this incoming email as spam.  The original
 message has been attached to this so you can view it or label
 similar future email.  If you have any questions, see
 root\@localhost for details.
 Content preview:  Test new SPF and RDNS entry
 Content analysis details:   (0.0 points, 4.0 required)
  pts rule name              description
 ---- ---------------------- --------------------------------------------------
 -0.0 SPF_PASS               SPF: sender matches SPF record
  0.0 KAM_DMARC_STATUS       Test Rule for DKIM or SPF Failure with Strict
                             Alignment
X-Spam-Flag: NO
MAGIC. Now we have made these edits we can send and receive on our second Postfix server and our emails are not being flagged anymore.
Test DKIM on the Second Postfix Server
Send an email to [email protected] from your test mail account. It should still be configured with the MX record of our second PostFix Server. Inspect the returned report. We can see that our second PostFix server is signing our messages with the correct key. MAGIC.
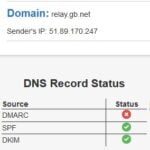
Configure DMARC
That red icon is sending my OCD through the roof! Let’s configure DMARC whilst we are at this. Create the email account [email protected] in PostFixAdmin. Modifying this for your domain of course. Then create a TXT record in your DNS.
v=DMARC1; p=reject; pct=100; rua=mailto:dmarc-reports@relay.gb.netNow send another email to [email protected]. All should now be green.
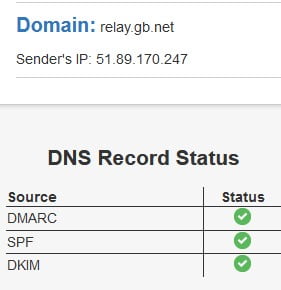
So that’s about it. We now have two functioning Postfix Email Servers. Both have PostFixAdmin installed together with RoundCube. DKIM, SPF and DMARC are working on both servers. In the final guide, we will start to Load Balance email connections together with connections to PostFixAdmin and RoundCube. By the end of the next article, we will have a fully functional High Availability PostfixAdmin Email Cluster. See you on the other side.
Things To Consider
As a side note. If you plan to use multiple domains on your Postfix servers you must ensure when configuring DKIM for the new domains that the DKIM configuration is updated for both servers. We would suggest configuring DKIM to serve the below files from the NAS on both VPS Servers. However, if you don’t want to modify the DKIM configuration, each time you add a new domain, sync the below files between each Postfix server.
/etc/opendkim/signing.table
/etc/opendkim/key.table
/etc/opendkim/trusted.hosts
/etc/opendkim/keys