


In this final article in the Postfix High Availability email series, we are going to put all of our work together. Here we will use HAProxy to Load Balance connections to our PostFixAdmin email servers. But we will also Load Balance Roundcube Webmail over our two PostFix email servers. If one Postfix server ever goes down we won’t notice this because all connections will be routed to the online server. Received mail included. Really cool! If you have followed all of this series then guess what? You already have High Availability email.
Articles In This Series
- Part 1 – Install Postfix on Ubuntu Servers
- Part 2 – Install Dovecot IMAP/POP3 with SSL/TLS
- Part 3 – Configure Postfix DKIM & SPF Records
- Part 4 – Install Postfixadmin on Postfix Ubuntu Servers
- Part 5 – Install RoundCube Webmail on Ubuntu Postfix servers
- Part 6 – Configure Multiple Email Domains in Postfix Email Server
- Part 7 – Configure PostFixAdmin and RoundCube High Availability Email Servers
- Part 8 – Configure DKIM, SPF and DMARC on Second (multiple) Postfix Email Servers
- Part 9 – Load Balance PostFixAdmin, RoundCube and Postfix Email (This Article)
If you now add a new MX record to your DNS to reflect the first Postfix server. Email will be delivered by either of your servers. Go ahead and add the MX record. Set the weight on each record to 10. Unless you want one server to be a primary email server. Our records now look like this.

By sending three or four test emails to our test account, we can see emails are coming in via each server. Magic.
Delivered-To: s2@relay.gb.net
Received: from m1.relay.gb.net
	by m1.relay.gb.net with LMTP

	Delivered-To: s2@relay.gb.net
Received: from m2.relay.gb.net
	by m2.relay.gb.net with LMTP
Install SSL Certificate
To prevent warnings we need to install an SSL Certificate. Install Certbot and request a certificate for your balancer’s hostname. Ours is configured on balancer.relay.gb.net. After you have the certificate you must combine the chain and the key into one file.
apt install certbot -y

certbot certonly -d balancer.relay.gb.net
To combine the certificate into a single file move into the Lets Encrypt directory. Cat the files and combine them into a single new file.
cd  /etc/letsencrypt/live/balancer.relay.gb.net

cat fullchain.pem privkey.pem > balancer.relay.gb.net.pem
The combined certificate will now be located at /etc/letsencrypt/live/balancer.relay.gb.net/balancer.relay.gb.net.pem
HAProxy Load Balancing
If you don’t have HAProxy installed go ahead and install it on a High Availability VPS Server. The balancer has to be Highly Available. It’s best to choose a service that can not just move server racks but data centres and countries for maximum resilience. Even a Cloud like Azure or AWS isn’t as resilient as a server that can move data centres and countries.
apt install haproxyCopy the /etc/haproxy/haproxy.cfg file to a safe place in case you need to reference it.
cp /etc/haproxy/haproxy.cfg /rootConfigure HAProxy
There are a number of ways that you can configure HAProxy. You can choose to send connections for specific websites to a specific backend by using ACLs or MAPs. This is where HAproxy gets a bit complicated (and temperamental). For the purpose of this guide, we are just going to configure the basics that will allow us to Load Balance connections to PostFixAdmin, Roundcube Webmail and of course, POP and IMAP. Create and open up a new haproxy.cfg file.
nano /etc/haproxy/haproxy.cfgHAProxy Frontend Block
The frontend block deals with all connections coming into the Load Balancer. Specify the location of the combined SSL Certificate you just created in the step above. Notice how we have just created a frontend for HTTP and MYSQL at the moment.
# Frontend

frontend http_front
   bind :80
   bind :443 ssl crt /etc/letsencrypt/live/balancer.relay.gb.net/balancer.relay.gb.net.pem
   default_backend pfa_ha

frontend mysql-frontend
    bind *:3306
    mode tcp
    default_backend mysql-backend
So next. below the frontend statements define backend statements. They are the mail servers we have created in this series. In our case m1.relay.gb.net and m2.relay.gb.net.
# Specify backend nodes. These are https connections

backend pfa_ha
   balance leastconn
   server M1.relay.gb.net 151.XxX.xXx.86:443 check ssl verify none weight 100
   server M2.relay.gb.net 51.XxX.xXx.247:443 check ssl verify none weight 100

backend mysql-backend
    mode tcp
    balance roundrobin
   server M1 151.XxX.xXx.86:3306 check weight 100
   server M2 51.XxX.xXx.247:3306 check weight 100
And next below this we define default values for the statistics page and other HAproxy options.
global
        log /dev/log    local0
        log /dev/log    local1 notice
#       chroot /var/lib/haproxy
        stats socket /run/haproxy/admin.sock mode 660 level admin
        stats timeout 30s
        user haproxy
        group haproxy

defaults
        log     global
        mode    http
        option  httplog
        option  dontlognull
        timeout connect 5000
        timeout client  50000
        timeout server  50000
        errorfile 400 /etc/haproxy/errors/400.http
        errorfile 403 /etc/haproxy/errors/403.http
        errorfile 408 /etc/haproxy/errors/408.http
        errorfile 500 /etc/haproxy/errors/500.http
        errorfile 502 /etc/haproxy/errors/502.http
        errorfile 503 /etc/haproxy/errors/503.http
        errorfile 504 /etc/haproxy/errors/504.http

listen stats
    bind 57.xXx.xXx.46:1936 ssl crt /etc/letsencrypt/live/balancer.relay.gb.net/balancer.relay.gb.net.pem
    mode http
    stats enable
    stats hide-version
    stats show-node
    stats realm Haproxy\ Statistics
    stats uri /haproxy?stats
    stats admin if TRUE
    stats auth USER:pass
So this is a really basic way to balance HTTPS connections over our email cluster. At the moment we are only checking the backends in relation to MySQL. In this configuration, it’s possible MySQL could fail on a backend server and the user would see an outage. So we need to LoadBalance the MySQL connections for applications like RoundCube.
LoadBalance MySQL Connections
In our current setup, we have configured RoundCube to use “localhost” as the database server. If MySQL fails on these servers HAProxy will still route the HTTPS traffic to a backend, causing an outage. We need to modify RoundCube to connect to our balancer so connections to the database are distributed over our Postfix Cluster. In Part 5. We installed RoundCube to /nas/www/webmail.relay.gb.net. The database details for RoundCube are located in /config/config.inc.php. Open up the file and look for the following block at the top of the file.
/nas/www/webmail.relay.gb.net/config/config.inc.php

// Database connection string (DSN) for read+write operations
// Format (compatible with PEAR MDB2): db_provider://user:password@host/database
// Currently supported db_providers: mysql, pgsql, sqlite, mssql, sqlsrv, oracle
// For examples see http://pear.php.net/manual/en/package.database.mdb2.intro-dsn.php
// NOTE: for SQLite use absolute path (Linux): 'sqlite:////full/path/to/sqlite.db?mode=0646'
//       or (Windows): 'sqlite:///C:/full/path/to/sqlite.db'
$config['db_dsnw'] = 'mysql://rcdatabase:PaSsWoRd@localhost/roundcubedb';
To send connections for the RoundCube database to our balancer we need to remove localhost and replace it with our balancer’s hostname or IPv4 address. Try the IP first.
$config['db_dsnw'] = 'mysql://rcdatabase:[email protected]/roundcubedb';Also, don’t forget to remove localhost from the PostFixAdmin configuration file. Add the balancers IPv4.
/nas/www/pfadmin.relay.gb.net/postfixadmin/config.inc.phpFinally, you need to allow the balancer’s IP address to connect to the databases. Login to MySQL and issue the below command switching the database details for your databases and the balancers IPv4.
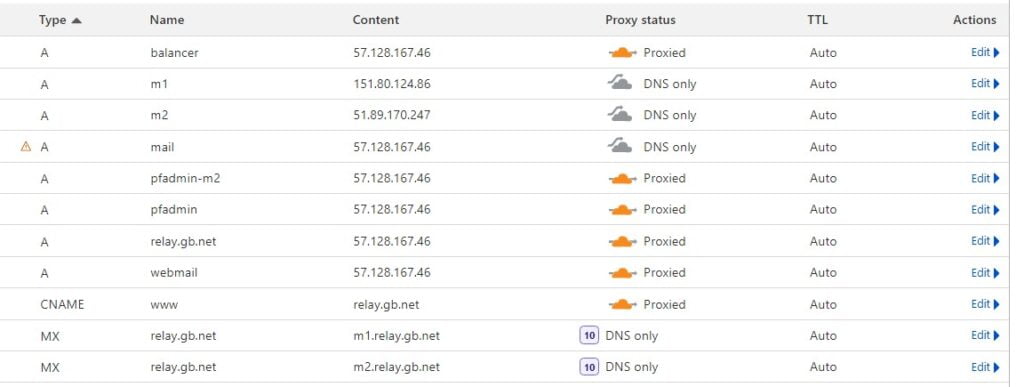
GRANT ALL PRIVILEGES ON DATABASE.* To 'DATABASE-USER'@'BALANCER-IP'IDENTIFIED BY 'PaSsWoRd';Right about now, if we update the A records on our Postfixadmin and RoundCube subdomains to point to the balancer. HAProxy should route the connections over our M1 and M2 email servers. So update the A record to reflect the balancer IPv4. Our DNS records now look like this.

RoundCube Webmail Load Balancing
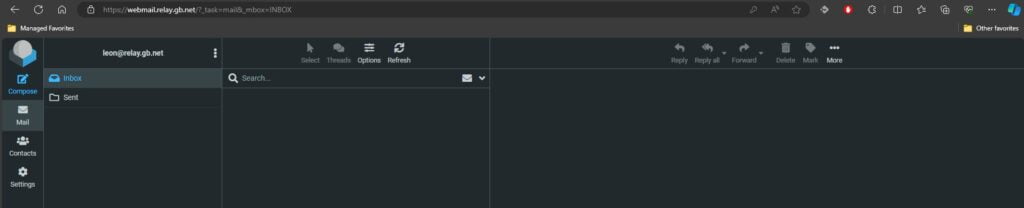
With connections to RoundCube Load Balance in place. When we visit webmail.relay.gb.net we can see no errors and we can log in fine.
Load Balance PostFixAdmin
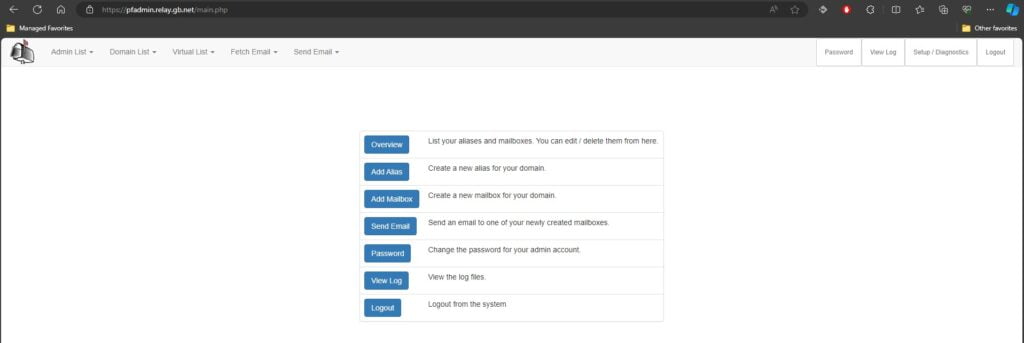
So to check PostFixAdmin we just navigate to our PostFixAdmin subdomain and log in as usual. There should be no errors.
For good measure, we can check the HAProxy stats page and see our connections being spread over the two backend servers.

Finally, we now have a High Availability PostfixAdmin and Roundcube Webmail platform. There is now just the last bit to configure. IMAP and POP3 over our Postfix email cluster. Just like in the Load Balance Exchange Services article, we need to create a front end for each protocol. Use ss -lnpt | grep master to check what ports Dovecot is listening on.
ss -lnpt | grep master
LISTEN 0      100          0.0.0.0:465       0.0.0.0:*    users:(("smtpd",pid=202160,fd=6),("smtpd",pid=202142,fd=6),("master",pid=185968,fd=22))
LISTEN 0      100          0.0.0.0:25        0.0.0.0:*    users:(("master",pid=185968,fd=13))
LISTEN 0      100          0.0.0.0:587       0.0.0.0:*    users:(("master",pid=185968,fd=18))
LISTEN 0      100             [::]:465          [::]:*    users:(("smtpd",pid=202160,fd=7),("smtpd",pid=202142,fd=7),("master",pid=185968,fd=23))
LISTEN 0      100             [::]:25           [::]:*    users:(("master",pid=185968,fd=14))
LISTEN 0      100             [::]:587          [::]:*    users:(("master",pid=185968,fd=19))
Load Balance Postfix IMAP & POP3
So, according to our configuration, we need to Load Balance IMAP and SMTP ports 25, 587 and 465. So let’s configure this last bit in the /etc/haproxy/haproxy.cfg file.
frontend ft_smtp25
  bind :25
  mode tcp
  default_backend bk_smtp25

frontend ft_smtp465
  bind :465
  mode tcp
  default_backend bk_smtp465

frontend ft_smtp587
  bind :587
  mode tcp
  default_backend bk_smtp587

frontend ft_imap143
  bind :143
  mode tcp
  default_backend bk_imap143
Now above we have made frontends for each protocol. You could bind the ports to a single statement if you wanted like like.
frontend ft_smtp25
  bind :25
  bind :465
  bind :587
  mode tcp
  default_backend bk_smtp25
For the backend SMTP and IMAP Load Balancing blocks, we configure this like so. Specifying the port after the Postfix server’s IP address.
backend bk_smtp25
  mode tcp
  balance roundrobin
  server M1.relay.gb.net 151.XxX.XxX.86:25 check
  server M2.relay.gb.net 51.XxX.XxX.247:25 check

backend bk_smtp465
  mode tcp
  balance roundrobin
  server M1.relay.gb.net 151.XxX.XxX.86:465 check
  server M2.relay.gb.net 51.XxX.XxX.247:465 check

backend bk_smtp587
  mode tcp
  balance roundrobin
  server M1.relay.gb.net 151.XxX.XxX.86:587 check
  server M2.relay.gb.net 51.XxX.XxX.247:587 check

backend bk_imap143
  mode tcp
  balance roundrobin
  server M1.relay.gb.net 151.XxX.XxX.86:143 check
  server M2.relay.gb.net 51.XxX.XxX.247:143 check
Update DNS For Postfixadmin Load Balancing
So now it’s the final bit of configuration. Next, we update the A record on our mail.relay.gb.net subdomain to point to the balancer. Don’t forget to restart HAproxy.
systemctl restart haproxyAnd our DNS records now look like this.
So the final test is to remove your test email account from your email client or create a new email address in PostFixAdmin. Add that account back into your email client and you should be able to connect and send mail.
This was a complicated and long series of articles to provide High Availability VPS email servers using PostFix and Dovecot. But the end result is that we have a resilient email platform that can suffer an outage and still be in a working state. For true High Availability, there should ideally be at least three Postfix email servers with connections balanced over the cluster. To add a further Postfix server to your cluster just follow the series from Step 1.