

How To Set up A Proxmox DHCP Server To Assign IPs To Guests

DHCP or Dynamic Host Configuration Protocol is used on networks to assign and manage IPs. A Proxmox DHCP server is useful because you can automate the configuration of the network for guest servers. When a guest server, VM or CT is started, that guest will contact the DHCP server. The DHCP server will respond with a unique IP and other network configuration settings like the gateway and subnet mask.
Whilst this guide focuses on creating a DHCP server for use on a Proxmox network it can be used in other situations too. The settings used here are general settings for use on any setup. For example, you could use this guide to assign internal IPs to containers. The settings used in this guide will work on servers running on the First2Host network.
Install & Configure Proxmox DHCP Server
As Proxmox is based on Debian, you use apt to install programs. Use the command below to install the ISC DHCP Server.
apt install isc-dhcp-server -yNext, open up the configuration file and specify the interface for the DHCP Server to listen on. This is the interface that guests use to connect to the outside world. On default setups it’s vmbr0. Save and close the file.
nano /etc/default/isc-dhcp-server

#On what interfaces should the DHCP server (dhcpd) serve DHCP requests?
#Separate multiple interfaces with spaces, e.g. "eth0 eth1".
INTERFACESv4="vmbr0"
INTERFACESv6=""
#Specify this will be the authoritative server
authoritative;
Configure IP Addresses
Now you have your Proxmox DHCP server installed and partly configured it’s time to tell the DHCP server what IPs to assign to guests. We are going to be assigning fixed IPs to guests because, in a server environment, it would be strange to assign dynamic IPs. We add this information to the /etc/dhcp/dhcpd.conf file. First, take a copy of this file so we can revert back to it in case of any problems.
cp /etc/dhcp/dhcpd.conf /etc/dhcp/dhcpd-bac.confNow, delete the current file and recreate it in the text editor. We will be configuring our own file.
rm /etc/dhcp/dhcpd.conf
nano /etc/dhcp/dhcpd.conf
In this file we will specify the network configuration and the IPs the DHCP server should lease out. We have commented the top section to explain what each line means and what it does.
 #
 # Configuration file for ISC dhcpd. You can leave the subnet and netmask settings
 # below as they are.
 #
 subnet 0.0.0.0 netmask 0.0.0.0 {
 authoritative;
 default-lease-time 21600000;
 max-lease-time 432000000;
 }

# Here we are binding IPs to MAC addresses. Each IP should have a MAC. Contact support
# if you do not have MACs.

 host VM1 {
# MAC Address assigned to the IP
 hardware ethernet 02:00:00:60:75:6e;

# Gateway of the server. This is usually your servers IP but the section is replaced with
# .254
 option routers 51.xXx.66.254;

# Subnet Mask
 option subnet-mask 255.255.255.255;

# Floading IP
 fixed-address 188.xXx.56.150;

# DNS server
 option domain-name-servers 8.8.8.8,8.8.4.4;
 }

 host VM2 {
 hardware ethernet 02:00:00:0a:fa:7d;
 option routers 51.xXx.66.254;
 option subnet-mask 255.255.255.255;
 fixed-address 51.xXx.149.111;
 option domain-name-servers 8.8.8.8,8.8.4.4;
 }

 host VM3 {
 hardware ethernet 02:00:00:8c:2d:5e;
 option routers 51.xXx.66.254;
 option subnet-mask 255.255.255.255;
 fixed-address 188.xXx.56.152;
 option domain-name-servers 8.8.8.8,8.8.4.4;
 }

 host VM4 {
 hardware ethernet 02:00:00:dd:a7:61;
 option routers 51.178.66.254;
 option subnet-mask 255.255.255.255;
 fixed-address 188.165.56.154;
 option domain-name-servers 8.8.8.8,8.8.4.4;
 }
You can add as many VMs to this file as you need. Just duplicate the host VM section to add more IPs to your pool. Next, save and close the file then restart the DHCP server to activate the new configuration.
systemctl restart isc-dhcp-serverCreate VM
Next, we need to test our setup. When we create a VM we specify the MAC address of an IP setup in our Proxmox DHCP server. So the new VM will send the MAC address to the DHCP server and the DHCP server should respond with the IP, Gateway, Subnet Mask and Gateway. Let’s try it. In our setup, the IP 188.165.56.154 is assigned the MAC 02:00:00:dd:a7:61. Let’s create a new VM and use that MAC.
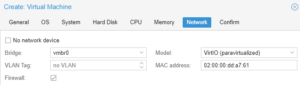
In our test VM, we have used the CentOS 7 ISO to boot this new guest. On the network page we can see that the server is deployed with the correct MAC address but, as the network is turned off the VM has not yet contacted the DHCP server.
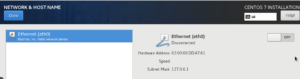
So, switch the slider to the right to turn on the network and get the correct networking details from the DHCP Server. When you do this the guest will pass its MAC to the DHCP Server and the DHCP Server will respond with the network gateway, IP bound to the MAC and the default DNS servers to use.
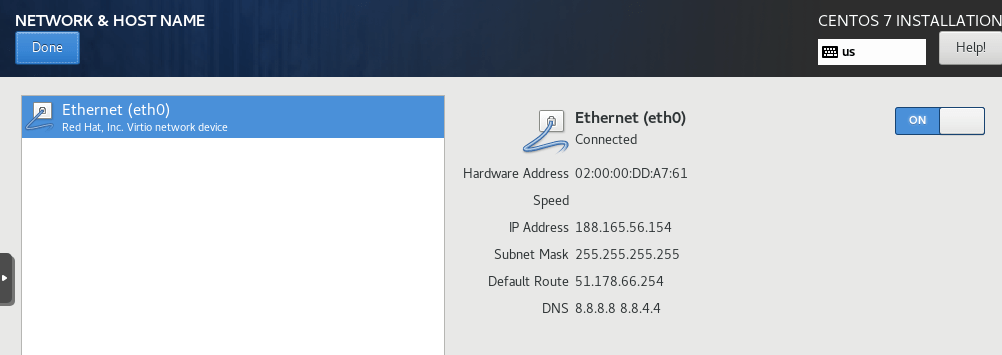
That’s the setup complete. You can now deploy VMs and CTs using a DHCP server to assign the correct IP, Subnet Mask, Gateway and DNS Servers.