


This is part four of our series on how to install a Postfix email server. In part one we installed Postfix to an Ubuntu NVMe VPS Server. In Part Two we installed Dovecot and configured Dovecot to work with IMAP/POP3 with SSL/TLS Authentication. And in part three we configured SPF and DKIM on our Postfix server. So right now you have a working Postfix email server. Now we want to look at how we can install Postfixadmin on our Ubuntu Postfix server. Postfixadmin will allow us to use multiple domains and eventually, High availability. In later articles, we will configure this. So, at the moment to create new accounts, we have configured Postfix to use system accounts. We need to change that to virtual email boxes. We will install Postfixadmin in this article which will manage email boxes and aliases.
Articles In This Series
- Part 1 – Install Postfix in Ubuntu Servers
- Part 2 – Install Dovecot IMAP/POP3 with SSL/TLS
- Part 3 – Configure Postfix DKIM & SPF Records
- Part 4 – Install Postfixadmin on Postfix Ubuntu Servers (This Article)
- Part 5 – Install RoundCube Webmail on Ubuntu Postfix servers
- Part 6 – Configure Multiple Email Domains in Postfix Email Server
- Part 7 – Configure PostFixAdmin and RoundCube High Availability Email Servers
- Part 8 – Configure DKIM, SPF and DMARC on Second (multiple) Postfix Email Servers
- Part 9 – Load Balance PostFixAdmin, RoundCube and Postfix Email
Install Postfixadmin Ubuntu
In this article, we are doing something special. Instead of using a standard MariaDB database or MySQL database, we are using a MariaDB Galera cluster. We have two Postfix servers and eventually, we want them to work together. You do not need two VPS servers to follow this article and install Postfixadmin. If you only have one server just perform the commands on the single server. MariaDB Galera allows databases to be replicated to other servers using a Master-Master replication type. We will use our replicated database to configure High Availability for our Postfix email server in another article. The setup of MariaDB is mostly the same. So you can use a standard MySQL or MariaDB setup if you wish in replacement for the MariaDB Galera cluster. We have made this possible using the instructions below.
Backup your Postfix email servers before you continue
Install MariaDB
m1.relay.gb.net
apt install mariadb-server -ySo MariaDB is now installed in your Postfix server. To replicate databases I’m going to install a MariaDB Galera Cluster. For speed, I am taking the instructions from the article I just liked. See that article for the full process if you want.
Secure MariaDB
On your Postfix server(s) run the mysql_secure_installation script. Use the settings below to secure MariaDB.
Replicated Databases
Switch to unix_socket authentication: N
Change the root password: N
Remove anonymous users: Y
Disallow root login remotely: N
Remove test database and access to it: Y
Reload privilege tables now: Y
Non-Replicated Databases (Standard MySQL/MariaDB)
Switch to unix_socket authentication: N
Change the root password: N
Remove anonymous users: Y
Disallow root login remotely: y
Remove test database and access to it: Y
Reload privilege tables now: Y
Configure MariaDB Galera
Next, it’s time to configure each server for database replication. If you are just using a standard MySQL database you can skip this step and move on to the Firewall Rules section below.
Open up the /etc/mysql/mariadb.conf.d/60-galera.cnf file on the first server.
m1.relay.gb.net
nano /etc/mysql/mariadb.conf.d/60-galera.cnfPaste the code block below to the file.
[galera]
# Mandatory settings
##
## Enable Write-set replication
wsrep_on                 = ON

## Location of wsrep library
wsrep_provider           = /usr/lib/galera/libgalera_smm.so

## Cluster Name
wsrep_cluster_name       = "Postfix HA Database Cluster"

## Cluster Node IPs
wsrep_cluster_address    = gcomm://51.xXx.xX.10,193.Xx.xX.218,51.xXx.xXx.24

## Log Format
binlog_format            = row

## Sotrage Engline
default_storage_engine   = InnoDB

## Galera requires mode 2
innodb_autoinc_lock_mode = 2

## Allow tables without a primary key. (See article)
innodb_force_primary_key = 0

## Double write buffer
innodb_doublewrite       = 1

# Allow server to accept connections on all interfaces.
bind-address = 0.0.0.0

# Optional settings

## Number of threads. Aim for 4x the number of vCores. 4 vCores = 16 Threads.
wsrep_slave_threads = 16

## Write to file once per second. This could cause issues if all nodes go down at the same time
innodb_flush_log_at_trx_commit = 0

## Below settings to identify lines in logs
wsrep_node_name                = FR-N1
wsrep_node_address             = "THIS NODE IPv4"

## Log errors to error_log
log_error = /var/log/mysql/error.log
Edit the following sections to reflect your servers and cluster.
- wsrep_cluster_name
- The name of the cluster
- wsrep_cluster_address
- The IPv4 of the Postfix Servers
- wsrep_node_name
- A unique name for this node
- wsrep_node_address
- The current nodes IPv4
In the settings above we have disabled the innodb_force_primary_key setting. When installing Postfixadmin the setup script attempts to add tables to the database without a primary key. If this option is enabled you will not be able to install Postfixadmin. Primary keys are added to the database tables restrospecivly during install. At the end of this article we will enable this option again.
So next we need to copy this file to the second server, m2.relay.gb.net. Then we can just update the wsrep_node_name and wsrep_node_address sections towards the bottom on m2.relay.gb.net.
scp /etc/mysql/mariadb.conf.d/60-galera.cnf root@m2.relay.gb.net:/etc/mysql/mariadb.conf.d/m2.relay.gb.net
Inside the second server open up the /etc/mysql/mariadb.conf.d/60-galera.cnf file and modify the two lines mentioned below. Do not make any other changes. The cluster name should be exact on both nodes.
wsrep_node_name                = FR-N2
wsrep_node_address             = "THIS NODE IPv4"
Firewall Rules
m1.relay.gb.net & m2.relay.gb.net
Open up the below ports in both servers. Remember to allow each server’s IP. m1 should allow m2’s IPv4 and m2 should allow m1’s IPv4.
# Replication Rules
ufw allow from 51.xXx.xx.10 proto tcp to any port 3306
ufw allow from 51.xXx.xx.10 proto tcp to any port 4444
ufw allow from 51.xXx.xx.10 proto tcp to any port 4567
ufw allow from 51.xXx.xx.10 proto tcp to any port 4568

# You can allow all connections on all ports from specific IPs using the rule below.

ufw insert 1 allow in from xXx.x.xXx.x

# HTTP / HTTPS / SSH / OLS
ufw allow 443
ufw allow 80
ufw allow 22
ufw allow 7080
If you are using a standard non-replicated database. Move on to the Create MariaDB Database & User section below.
So we are ready to start the cluster. But first, stop MariaDB on your second Postfix server,
m2.relay.gb.net
systemctl stop mariadbStart MariaDB Galera Cluster
m1.relay.gb.net
On m1.relay.gb.net, you can now stop the MariaDB service. To start a Galera Cluster for the first time you use a special script called galera_new_cluster. So enter that into the console.
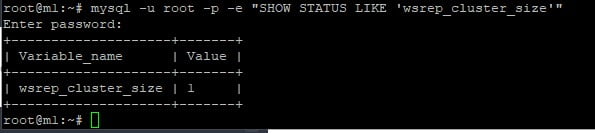
galera_new_clusterThis command produces no output. To confirm it worked use the below command.
mysql -u root -p -e "SHOW STATUS LIKE 'wsrep_cluster_size'"So you should see a 1 in the output indicating just m1.relay.gb.net is in the cluster.
m2.relay.gb.net
So now start MariaDB on the second server. Then check the cluster now shows 2 servers.
systemctl start mariadbThis command might take a while depending on how close your NVMe VPS servers are together.

Magic. We now have a MariaDB Galera Database cluster spread over our Postfix email servers. The cluster will hold our Postfixadmin database which we will install in the next section. But first, create a database. It doesn’t matter what server this is created on. It will be propagated to the other.
Create MariaDB Database & User
m1.relay.gb.net
mysql -u root -p

CREATE DATABASE postfixadmin;

CREATE USER 'pfadmin'@'localhost';

GRANT ALL PRIVILEGES ON postfixadmin.* To 'pfadmin'@'localhost' IDENTIFIED BY '@He7£4()v<g';
If you are using replication. Check on your other Postfix server you should see the database you created on the other server.
m2.relay.gb.net
mysql -u root -p

SHOW DATABASES;

MariaDB [(none)]> SHOW DATABASES;
+--------------------+
| Database           |
+--------------------+
| information_schema |
| mysql              |
| performance_schema |
| postfixadmin       |
| sys                |
+--------------------+
5 rows in set (0.000 sec)
So now we have a database and user for Postfixadmin. Next, install a web server. Many people use Apache, others NGINX. I tend to use OpenLiteSpeed. It’s free and frankly better than Apache and NGINX. It’s also super simple to install with native caching.
Install OpenLiteSpeed
So, install OLS with the one-shot code below. This will install OpenLiteSeed and PHP 8.1
wget https://raw.githubusercontent.com/litespeedtech/ols1clk/master/ols1clk.sh && bash ols1clk.shYou can access the OpenLiteSpeed control panel from https://IPv4:7080. The username is admin and the password is written to the /usr/local/lsws/password file. So now we have a web server. Let’s move on to Postfixadmin.
Install Postfixadmin Ubuntu
First, decide what URL you would like to access Postfixadmin on. We will run a script to automatically create our VHOST. You don’t get that with Apache or NGINX! We are using the subdomain pfadmin.relay.gb.net. You need to run this on both Postfix servers if you plan to load balance Postfixadmin for high availability later on. If you are just going to use it on one server. Just install the VHOST on one.
/bin/bash <( curl -sk https://raw.githubusercontent.com/litespeedtech/ls-cloud-image/master/Setup/vhsetup.sh ) -d pfadmin.relay.gb.netJust to note. If you want to secure Postfixadmin with an SSL and also load balance you will need to use a service like Cloudflare or something like SSL Termination on a balaner. We’re using Cloudflare so that should take care of an SSL for us.
Notice how OLS has created the /var/www folder and your virtual host now has a folder in there. We will place Postfixadmin in this location too.
And now let’s install the latest version of Postfixadmin on our Ubuntu server. Download the latest version of Postfixadmin from Releases · postfixadmin/postfixadmin (github.com).
m1.relay.gb.net
wget -P /var/www https://github.com/postfixadmin/postfixadmin/archive/refs/tags/postfixadmin-3.3.13.tar.gz

# Move to /var/www folder

cd /var/www

# Untar Postfixadmin

tar xvf /var/www/postfixadmin-3.3.13.tar.gz

# Rename Postfixadmin

mv /var/www/postfixadmin-postfixadmin-3.3.13 /var/www/postfixadmin

# Create template cache folder

mkdir -p /var/www/postfixadmin/templates_c

# Install acl

apt install acl

# Set permissions on template cache and Let's Encrypt folder

setfacl -R -m u:www-data:rwx /var/www/postfixadmin/templates_c/

setfacl -R -m u:www-data:rx /etc/letsencrypt/live/ /etc/letsencrypt/archive/

# Add dovecot user to www-data group. To ensure password hashing works

usermod -aG dovecot www-data
For non-replication, you can move on to the next section.
m2.relay.gb.net
wget -P /var/www https://github.com/postfixadmin/postfixadmin/archive/refs/tags/postfixadmin-3.3.13.tar.gz

# Move to /var/www folder

cd /var/www

# Untar Postfixadmin

tar xvf /var/www/postfixadmin-3.3.13.tar.gz

# Rename Postfixadmin

mv /var/www/postfixadmin-postfixadmin-3.3.13 /var/www/postfixadmin

# Create template cache folder

mkdir -p /var/www/postfixadmin/templates_c

# Install acl

apt install acl

# Set permissions on template cache and Let's Encrypt folder

setfacl -R -m u:www-data:rwx /var/www/postfixadmin/templates_c/

setfacl -R -m u:www-data:rx /etc/letsencrypt/live/ /etc/letsencrypt/archive/

# Add dovecot user to www-data group. To ensure password hashing works

usermod -aG dovecot www-data
The rest of the process to install Postfixadmin on Ubuntu is now completed on just one server. We will use our second server in another article to configure High Availability.
Configure Virtual Host
This is where OLS makes the process super easy. With Apache and NGINX you create code blocks and make syntax errors. With OLS there is none of that. Open up the OLS admin area and log in. Your password is in the /usr/local/lsws/password file.
https://IPv4:7080Navigate to Virtual Hosts -> pfadmim.relay.gb.net and open the virtual host. You need to correct the location of the Postfixadmin files. Ours are in/var/www/pfadmin.relay.gb.net/postfixadmin but the default is /var/www/postfixadmin. After correcting the location of the Postfixadmin files. The virtual host will look something like this.

Restart OLS to activate the new configuration.
Configure Postfixadmin
m1.relay.gb.net
So now it’s time to add our database to Postfixadmin. This is completed in the /var/www/pfadmin.relay.gb.net/postfixadmin/config.local.php file. Open the file and specify the database details you created above.
/var/www/pfadmin.relay.gb.net/postfixadmin/config.local.phpAlso in this file add the following lines. Some may already be in the file. Comment them out with //
$CONF['configured'] = true;
$CONF['encrypt'] = 'dovecot:ARGON2I';
$CONF['dovecotpw'] = "/usr/bin/doveadm pw -r 5";
if(@file_exists('/usr/bin/doveadm')) { // @ to silence openbase_dir stuff; see https://github.com/postfixadmin/postfixadmin/issues/171
    $CONF['dovecotpw'] = "/usr/bin/doveadm pw -r 5"; # debian
}
Save and close the file.
PostFixAdmin Setup Hash
So next, access the Postfixadmin setup.php file. It’s located at /setup.php. If you are using Cloudflare notice how your session is using https. Cloudflare is using a self-signed certificate on the server to encrypt data. Really cool!
https://pfadmin.relay.gb.net/setup.phpAnd the initial install of Postfixadmin on Ubuntu using the setup wizard is self-explanatory. First, create a password hash. The hash is displayed on the setup.php page. That hash needs to be pasted to the /var/www/pfadmin.relay.gb.net/postfixadmin/config.local.php file.
nano /var/www/pfadmin.relay.gb.net/postfixadmin/config.local.php
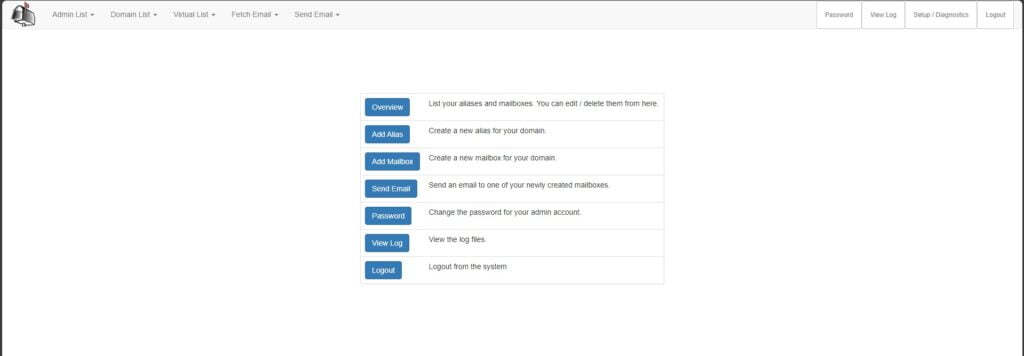
$CONF['setup_password'] = 'PLACE-HASH-HERE';Then create a super administrator account and password. After you have done this login to Postfixadmin at https://your.domain/login.php with your admin account. You are presented with the Postfixadmin home screen.
So far in this article, we have configured a MariaDB Galera Cluster and Openlitesped. We have created a virtual host and then installed Postfixadmin. Next, we need to make Postfixadmin work with our Postfix email servers. In their default form, Postfix delivers mail to system accounts. We need to deliver mail to virtual mailboxes and to ensure Postfix uses our new replicated database for a true Postfix high availability platform.
Configure Postfix to use MariaDB Galera Cluster
Snapshot or backup your Postfix servers before you continue. Once these edits are made you will no longer be able to use system accounts for email.
For this to work we need to add MySQL MAP support to our cluster/Mysql/MariaDB server. On both servers install the Postfix MySQL module. Ensure the following edits are made on ALL Postfix email servers in your cluster.
apt install postfix-mysqlNext, open up the /etc/postfix/main.cf file on both servers and add the below code block to the bottom of the file.
nano /etc/postfix/main.cfvirtual_mailbox_domains = proxy:mysql:/etc/postfix/sql/mysql_virtual_domains_maps.cf
virtual_mailbox_maps =
proxy:mysql:/etc/postfix/sql/mysql_virtual_mailbox_maps.cf,
proxy:mysql:/etc/postfix/sql/mysql_virtual_alias_domain_mailbox_maps.cf
virtual_alias_maps =
proxy:mysql:/etc/postfix/sql/mysql_virtual_alias_maps.cf,
proxy:mysql:/etc/postfix/sql/mysql_virtual_alias_domain_maps.cf,
proxy:mysql:/etc/postfix/sql/mysql_virtual_alias_domain_catchall_maps.cf
virtual_transport = lmtp:unix:private/dovecot-lmtp
Explanation
- virtual_mailbox_domains -> Tells Postfix how to look up information in the database.
- virtual_mailbox_maps -> Tells Postfix how to look up email addresses in the database.
- virtual_alias_maps -> Tells Postfix how to look up Aliases from the database
- virtual_transport -> Tells Dovecot to deliver incoming email to virtual users
Save and close the file. So next we need to create some files and folders manually. You can either made these edits manually on each Postfix server in your cluster or make them on one server then SCP the files to the other server.
Create a SQL folder that will hold the mysql_virtual_domains_maps.cf file. This file contains our replicated database details.
mkdir /etc/postfix/sql/ && nano /etc/postfix/sql/mysql_virtual_domains_maps.cfInside the file add the following code block and enter your database details.
hosts = localhost
user = pfadmin
password = password
dbname = postfixadmin
query = SELECT domain FROM domain WHERE domain='%s' AND active = '1'
#query = SELECT domain FROM domain WHERE domain='%s'
#optional query to use when relaying for backup MX
#query = SELECT domain FROM domain WHERE domain='%s' AND backupmx = '0' AND active = '1'
#expansion_limit = 100
Create the mysql_virtual_mailbox_maps.cf file.
nano /etc/postfix/sql/mysql_virtual_mailbox_maps.cfAdd the below code block to the /etc/postfix/sql/mysql_virtual_mailbox_maps.cf file.
user = postfixadmin
password = password
hosts = localhost
dbname = postfixadmin
query = SELECT maildir FROM mailbox WHERE username='%s' AND active = '1'
#expansion_limit = 100
So next create the mysql_virtual_alias_domain_mailbox_maps.cf file.
nano /etc/postfix/sql/mysql_virtual_alias_domain_mailbox_maps.cfInside the file append the below code block. Adding your database details again.
user = postfixadmin
password = password
hosts = localhost
dbname = postfixadmin
query = SELECT maildir FROM mailbox,alias_domain WHERE alias_domain.alias_domain = '%d' and mailbox.username = CONCAT('%u', '@', alias_domain.target_domain) AND mailbox.active = 1 AND alias_domain.active='1'
Now it’s on to the /etc/postfix/sql/mysql_virtual_alias_maps.cf file. Create it.
nano /etc/postfix/sql/mysql_virtual_alias_maps.cfAdd the following code block with your database details
user = postfixadmin
password = password
hosts = localhost
dbname = postfixadmin
query = SELECT goto FROM alias WHERE address='%s' AND active = '1'
#expansion_limit = 100
Next, create the /etc/postfix/sql/mysql_virtual_alias_domain_maps.cf file.
nano /etc/postfix/sql/mysql_virtual_alias_domain_maps.cfAdd the following code block and database details.
user = postfixadmin
password = password
hosts = localhost
dbname = postfixadmin
query = SELECT goto FROM alias,alias_domain WHERE alias_domain.alias_domain = '%d' and alias.address = CONCAT('%u', '@', alias_domain.target_domain) AND alias.active = 1 AND alias_domain.active='1'
And finally, create the /etc/postfix/sql/mysql_virtual_alias_domain_catchall_maps.cf file.
nano /etc/postfix/sql/mysql_virtual_alias_domain_catchall_maps.cfPlace the following code block in the file with your database details.
user = postfixadmin
password = password
hosts = localhost
dbname = postfixadmin
query = SELECT goto FROM alias,alias_domain WHERE alias_domain.alias_domain = '%d' and alias.address = CONCAT('@', alias_domain.target_domain) AND alias.active = 1 AND alias_domain.active='1'
Secure the permissions on the /etc/postfix/sql folder so they can only be read by the postfix user.
setfacl -R -m u:postfix:rx /etc/postfix/sql/ && chmod 0640 /etc/postfix/sql/*Postfix Main Configuration
So continuing with our edits, open up the /etc/postfix/main.cf file and paste the below code block to the end of the file. Remember to make these edits in all Postfix servers.
nano /etc/postfix/main.cfvirtual_uid_maps = static:2000
virtual_gid_maps = static:2000
virtual_mailbox_base = /var/vmail
virtual_minimum_uid = 2000Here we are specifying the location of mailboxes, groups and users.
MyDestination Edits
In the first article in this series when we installed Postfix it was configured to use system accounts. In the initial steps, you used the package manager to specify a list of domains that would receive email on the Postfix server. You can see this list with the postconf mydestination command.
mydestination = $myhostname, relay.gb.net, localhost.relay.gb.net, localhostWe are no longer using system accounts on our Postfix cluster so remove your domain name from the mydestination line.
postconf -e "mydestination = \$myhostname, localhost.\$mydomain, localhost"Create the vmail location, user and assign to the correct groups.
mkdir /var/vmail/
chown vmail:vmail /var/vmail/ -R
adduser vmail --system --group --uid 2000 --disabled-login --no-create-home
Restart Postfix.
systemctl restart postfixConfigure Dovecot to use MariaDB
So the next stage is to tell Dovecot we are no longer using system accounts and that it should query our MariaDB database. Install the Dovecot MySQL extension on all Postfix servers.
apt install dovecot-mysqlAnd in the /etc/dovecot/conf.d/10-mail.conf file we need to specify a location for users’ virtual directories. Add the below line to the file.
nano /etc/dovecot/conf.d/10-mail.conf

mail_home = /var/vmail/%d/%n/
Next in the /etc/dovecot/conf.d/10-auth.conf file update the format of usernames. In our first article, we configured Dovecot to ignore anything @domain.com. As system accounts don’t have that format. With virtual accounts, they can have.
nano /etc/dovecot/conf.d/10-auth.confFind the below line.
auth_username_format = %nModify it to reflect the below line.
auth_username_format = %uIn the same file find the line #auth_default_realm = and modify it to reflect;
auth_default_realm = domain.comThis will allow users who just use their username to login. Users will be able to use their username me@domain.com or their full email address [email protected]. Moving on. Find the following line in the same file and uncomment it.
#!include auth-sql.conf.ext

!include auth-sql.conf.ext
Then comment the line above it so it’s deactivated in Dovecot.
#!include auth-system.conf.ext
And finally in the /etc/dovecot/dovecot-sql.conf.ext file add the below code block. You can just paste this to the file and save it. Once you have added your database details.
nano /etc/dovecot/dovecot-sql.conf.ext

driver = mysql
connect = host=localhost dbname=postfixadmin user=postfixadmin password=password
default_pass_scheme = ARGON2I
password_query = SELECT username AS user,password FROM mailbox WHERE username = '%u' AND active='1'
user_query = SELECT maildir, 2000 AS uid, 2000 AS gid FROM mailbox WHERE username = '%u' AND active='1'
iterate_query = SELECT username AS user FROM mailbox
Create Domain and Mailboxes in Postfixadmin
So let’s now create our users and mailboxes in Postfixadmin. Update the URL for your environment.
https://pfadmin.relay.gb.net/main.phpAt the top select Domain List -> Add New Domain.
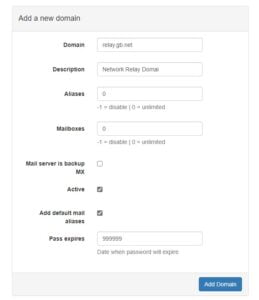
Here specify your domain name at the top. Add a friendly description. If you wish, you can set limits on the number of aliases that the domain can contain and also the number of mailboxes. As this is currently our only Postfix server ensure that the “Active” box is checked. There are no other options to complete on his page unless you want to expire passwords after a certain number of days.
And then from the Virtual List -> Add mailbox you should notice that the domain is already prefilled. On this page, you can create a new mailbox. Go ahead and make a test one.
Test Postfixadmin Configuration
Just like the previous articles we are now in a position to test our new Postfixadmin server. Open up your mail client and add the new account. We’re using Thunderbird. You can use POP3 or IMAP. IMAP is the preferable choice.
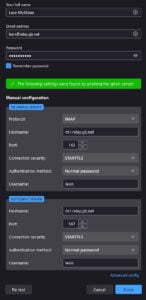
So far so good. Our client was able to add the account we just created. In the image opposite notice how Thunderbird used just the name to login to the server. Usually, that would not work bu thanks to editing the auth_username_format = %n line to auth_username_format = %u users can log in with just their name or their full email address.
Continue testing by sending an email to an external address then reply to that email to ensure mail can be sent and received. We were able to confirm our Postfixadmin server is working correctly.
If you wish you can also use SSL/TLS connections to deploy email accounts to clients. You would choose port 993 for incoming and port 465 for outgoing connections. Do not use port 25 as it is insecure.
Congratulations if you made it this far. You now have a working Postfixadmin Server on Ubuntu managing your email accounts. Check out our High Availability VPS Servers if this article was of use to you.