2 New Ways To Take Automated Proxmox Snapshots of Virtual Machines
Proxmox Snapshots and Backups are an essential function that help to prevent data loss. Contrary to belief, Proxmox Snapshots are not considered backups. That’s because the snapshot of the virtual machine or container resides on the same storage as the server. In this post, we’re going to look at two methods to take automated Snapshots in Proxmox. But first, let’s look at the differences between a Snapshot and a Backup in Proxmox.
Snapshot of a Proxmox Virtual Machine:
- A snapshot is a point-in-time copy of data capturing its current state, allowing for quick recovery or system rollback.
- It captures the state and data of a virtual machine, including the virtual machine’s power state and all files that make up the virtual machine.
- Snapshots are generally used for short-term purposes like testing and development.
- Snapshots are stored on the same storage as the virtual machine.
Backup of a Proxmox Virtual Machine:
- A backup refers to the process of copying data on a virtual machine to prevent data loss.
- It includes the operating system, application files, settings, and user data of the virtual machine.
- Backups are comprehensive and independent copies of data, stored separately from the original data, designed for long-term retention and operational point-in-time restores.
Snapshots are ideal if you are making changes to a server and need a way to revert those changes quickly. However, from the Proxmox GUI. There is no function to take automated Snapshots of Proxmox servers. So, how can we achieve automated Snapshots in Proxmox?
Automated Proxmox Snapshots Using Scripting
So, for a quick and easy way to take an automated Proxmox Snapshot of a virtual machine or container the below script will work. Make a new directory to store the script and create a new file. We’re calling our Proxmox Snapshot script proxmox-snapshot.sh.
mkdir /scripts && nano /scripts/proxmox-snapshot.shCopy the below code into the file and save. Ensure you switch the VMID=”2000″ for the VMID of the virtual machine you would like to Snapshot.
#!/bin/bash

# Specify the Proxmox server details
VMID="2000"

# Create a backup of the VM including RAM
SNAPSHOT_NAME="snapshot_$(date +"%Y%m%d_%H%M%S")"
qm snapshot $VMID $SNAPSHOT_NAME --vmstate 1

# Verify the snapshot creation status
if [ $? -eq 0 ]; then
    echo "Snapshot created successfully: $SNAPSHOT_NAME"
else
    echo "Failed to create snapshot"
fi
Make the script executable.
chmod +x /scripts/proxmox-snapshot.shNow you can run that script and a Snapshot of your virtual machine will be taken.
sh /scripts/proxmox-snapshot.sh
Adding this command into the crontab so its run on a schedule will allow for automated Proxmox Snapshots of that VPS Server. The below cronjob will trigger the scripts at 5 minutes past each hour.
crontab -e

5 * * * * sh /scripts/proxmox-snapshot.sh
Automated Snapshots Using cv4pve-autosnap
The above script will take a Snapshot of our virtual machine each hour but what about removing old Snapshots too? That get’s a bit more complicated and would require another script to sort through the snapshots by date and remove snapshots older than X hours. Luckily, there is a tool that will take automated Snapshots and prune old Snapshots. cv4pve-autosnap has been developed over many years and has some very nice features.
Recent versions allow the use of the PVE API to take Snapshot which is a great security enhancement. cv4pve-autosnap is very easy to install. You simply download the files, create your API user and secret in PVE then, run a command. Let’s install cv4pve-autosnap and take some Snapshots.
Install cv4pve-autosnap
cv4pve-autosnap does not need to run on the same host as the virtual machines to be Snapshotted. It’s best to create a small VM or CT and then install cv4pve-autosnap on that machine. Login as root and download the files.
apt update && apt install unzip wget -y

cd /tmp

wget https://github.com/Corsinvest/cv4pve-autosnap/releases/download/v1.15.0/cv4pve-autosnap-linux-x64.zip

unzip /tmp/cv4pve-autosnap-linux-x64.zip -d /usr/local/bin

rm cv4pve-autosnap-linux-x64.zip

chown root:root /usr/local/bin/cv4pve-autosnap

chmod 750 /usr/local/bin/cv4pve-autosnap
cv4pve-autosnap is now installed.
Create PVE API Details
In Datacentre >> Roles >> Create >> add a new Role. Called it anything you like but make sure you assign the following permissions.
VM.Audit, VM.Snapshot, Datastore.Audit, Pool.Allocate.Next in Datacenter >> Permissions >> Users add a new API token for root@pam. Save the token details. You will need them shortly.
Now in Datacenter >> Permissions >> Add >> API token permissions and assign the Role you created to “root@APIUSER” with “/” as the path.
Test Automated Proxmox Snapshots
This program really is easy to use. All you need to do now is to tell cv4pve-autosnap which host you want to take Snapshots of. There are lots of features that can be used with this program and that warrants another blog post. For this post, we just want to automate Snapshots so let’s give that ago. Let’s take a look at the command we need to run to Snapshot our VPS.
/usr/local/bin/cv4pve-autosnap --max-perc-storage 80 --host=10.210.251.24 --api-token 'root@pam!autosnap=by032s8e-5646-4s11-qk19-ec03d1835c62' --vmid=all --timeout=1800 snap --label='HourlySnap' --keep=3This part of the command tells us where to look for the program. And specifies that if more than 80% of the available space is consumed the backup will not be taken.
- /usr/local/bin/cv4pve-autosnap –max-perc-storage 80 –host=10.210.251.24
The next part specifies our API token and User. You saved these in the steps above. It also tells cv4pve-autosnap to Snapshot all of the VMs on the host.
- –api-token ‘root@pam!autosnap=by032s8e-5646-4s11-qk19-ec03d1835c62’ –vmid=all –timeout=1800 snap
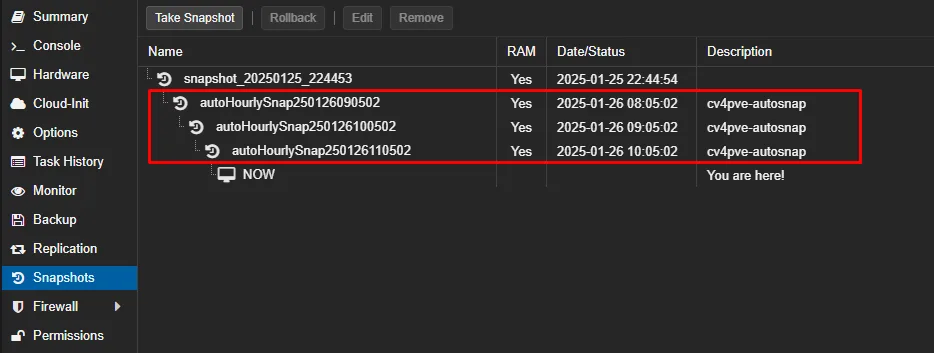
The final section deals with the Snapshot type and retention. In our command we are using –state and this saves the RAM currently in use with the SnapShot. In PVE its called “Include RAM”. You will almost always want to use this for consistency. The final section deals with retention. In our command, we are keeping the last 3 hourly snapshots.
- –state –label=’HourlySnap’ –keep=3
And the end result is automated snapshots of Proxmox virtual machines.

You can now add the command as a cronjob and run it as often as you wish.

