Traditional LVM storage is used to house information. LVM storage is flexible, secure and most of all reliable. When creating KVM guests on LVM storage the downside is that if you create a guest with 100GB of space, that 100GB of space is immediately taken away from the resource pool. It’s an extremely inefficient way to manage resources but has the advantage that you cannot overcommit the space resources. We’re going to create a Proxmox LVM Thinpool which unlike a traditional LVM storage setup allows for overselling on space resources.
LVM Thinpools also have the advantage of being able to support snapshots whereas traditional LVM does not. For a complete list of storage types that Proxmox supports and the available services see https://pve.proxmox.com/wiki/Storage
This guide assumes you have a hard drive in your Dedicated Server spare. We are using a 512GB NVMe. To find the details of your hard drive use the fdisk -l command. Our drive is installed to /dev/nvme1n1p1.
Format Drive
First, format the drive. This will remove ALL data on the drive. Ensure you are formatting the correct drive. Switch the dev/nvme1n1p1 for your drive information.
<span class="has-inline-color has-black-color">dd if=/dev/zero bs=512 count=1 of=/dev/nvme1n1p1 status=progress</span>Now that you have a clean hard drive it’s time to create your tables.
sgdisk -N 1 /dev/nvme1n1p1So In the console, you will now see a message confirming that the tables have been created successfully.
Creating new GPT entries.
Warning: The kernel is still using the old partition table.
The new table will be used at the next reboot or after you
run partprobe(8) or kpartx(8)
The operation has completed successfully.
Now on your hard drive, we create a physical volume.
pvcreate --metadatasize 1024M -y -ff /dev/nvme1n1p1

Wiping gpt signature on /dev/nvme1n1p1.
Wiping gpt signature on /dev/nvme1n1p1.
Wiping PMBR signature on /dev/nvme1n1p1.
Physical volume "/dev/nvme1n1p1" successfully created.
At this point, you could use the GUI to automatically create your LVM Thinpool. To manually do this continue reading.
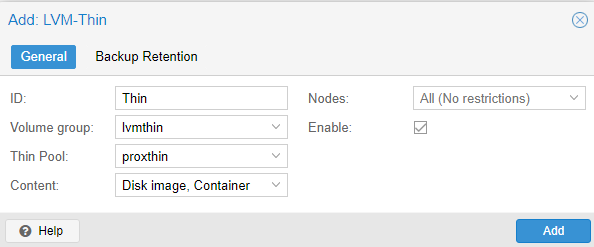
Finally, create your volume group and LVM which will be used to store containers and images. We are naming our volume group lvmthin but, you can use any name. So, switch the areas in bold text for your required information and after this step, reboot your host.
vgcreate --metadatasize 1024M lvmthin /dev/nvme1n1p1
lvcreate -l 100%FREE --poolmetadatasize 1024M --chunksize 256 -T -n proxthin lvmthin
Create LVM Thinpool To Proxmox
Now you are ready to add your new storage to Proxmox. This is done in the Proxmox GUI. Access Datacentre > Disks > LVM-Thin and click “Create Thinpool” at the top.