

How To Create Proxmox Operating System Cloud-init Templates

A Proxmox Operating System or OS template is used to quickly create new virtual servers and there are some cool things you can do to customize your Proxmox OS images and templates. From editing how users log into the server to ensuring specific packages are installed when the template is cloned. Proxmox Cloud templates are Operating System templates with Cloud-init deployed to them. You can then use snippets to configure things like the networking inside new virtual machines. Here, we will create a Proxmox cloud template based on Debian.
- Before creating a cloud template you may want to edit the cloud image to include files or folders, install new packages in apt and update existing packages.
Download Proxmox Cloud Templates
The process is exactly the same for each distribution. We are using a daily Debian template but you could use a CentOS or even a Ubuntu template. Some links to these are;
- https://cdimage.debian.org/cdimage/openstack/current/debian-10-openstack-amd64.qcow2
- https://cloud.debian.org/images/cloud/buster/daily/20210608-662/debian-10-genericcloud-amd64-daily-20210608-662.qcow2
- https://cloud.centos.org/centos/7/images/CentOS-7-x86_64-GenericCloud.qcow2c
Simply use wget to get download the template;
cd /root

wget https://cloud.debian.org/images/cloud/buster/daily/20210608-662/debian-10-genericcloud-amd64-daily-20210608-662.qcow2
Install Proxmox OS Image Tools
Now it’s time to ensure we have the correct tools installed on the Dedicated Server so we can create our Proxmox OS Image. First, we ensure libguestfs-tools is installed, set our editor to nano then open up the files we want to edit in the image.
# Install libguestfs
apt-get install libguestfs-tools

# Use nano as editor
export EDITOR=nano

# Mount VM Image
 virt-edit -a debian-10-genericcloud-amd64-daily-20210608-662.qcow2 /etc/cloud/cloud.cfg
Mount Distribution Image
Now we are ready to start editing the images files. A good place to start is the Cloud-init configuration. On all distributions this is located at /etc/cloud/cloud.cfg so, let’s open up that file and start editing.
virt-edit -a debian-10-genericcloud-amd64-daily-20210608-662.qcow2 /etc/cloud/cloud.cfg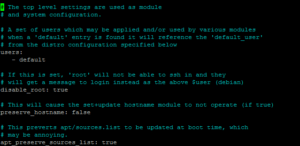
In this file, all of the options related to the setup on servers. Most users will want to achieve things like enabling root logins and installing additional applications on newly created VMs. The statements are either true or false. For example, to enable root logins switch the disable_root: true statement to disable_root: false. You would also need to switch the lock_passwd: section to true.
Install New Packages
This file can also be used to install packages to newly created VMs. This is great to ensure any new VMs that are created using this image have the same packages installed. At the end of the cloud.cfg file add the required packages you want to install. Just list the required packages on a new line.
At this point, you could review our Cloud-init Modules post which shows some additional Cloud-init modules you can use to perform tasks like automatically setup apache virtual hosts and edit system files during boot.
packages:
 - nano
 - qemu-guest-agent
 - curl
 - net-tools
 - wget
 - htop
Changing SSH Settings
Save and close that file. Now, you could also edit other files like the default SSH settings. The process is exactly the same as above. Open up that file and change any required values. The default SSH file is always in the same location so just specify the path.
virt-edit -a debian-10-genericcloud-amd64-daily-20210608-662.qcow2 /etc/ssh/sshd_configCreate Proxmox Operating System Template & VM
Now we have the image sorted with all of the edits we want, it is time to create the template and a VM. So next we need to create a VM and import the image to the VMs disk. We are using the settings that are the default ones on Proxmox setups. If you use a different bridge ensure you correct it in the code below.
# Create VM
qm create 10000 --memory 2048 --net0 virtio,bridge=vmbr0

# Import the image
qm importdisk 10000 debian-10-genericcloud-amd64-daily-20210608-662.qcow2 local

# Attach disk to VM
qm set 10000 --scsihw virtio-scsi-pci --scsi0 local:10000/vm-118-disk-0.raw

# Attach a cloud-init drive. This will get our network settings
qm set 10000 --ide2 local:cloudinit

# Set boot device
qm set 10000 --boot c --bootdisk scsi0

# Attach a serial console
qm set 10000 --serial0 socket --vga serial0

# Create template
qm template 10000
Now you have a template based on the custom edits you made. You can now use this to clone new VMs. This image will be in .raw format. In some cases you may want the hard drive to be in .qcow format. You can use the “move disk” feature to convert the template from .raw to .qcow format.
That’s the process complete. You have edited a cloud image and configured it to install custom packages on boot for new VMs.