How to edit Cloud-init images before creating a VPS template

When creating templates for platforms like Proxmox you may need to edit the cloud images you get off the distribution sites. It’s possible to add files and folders to cloud-init images before creating a template. It’s also possible to update the packages in the cloud template and even create new services. On the F2H network, we have a dedicated service called the f2h.service. This configures our NVMe instances with information like a route to the gateway on ubuntu instances. We’re going to create a new Ubuntu 20 LTS template from the stock Ubuntu server 20.04 LTS cloud image. We’re also going to edit the cloud-init image to configure our f2h.service to run on each boot.
Download Cloud Image
Download a cloud image. We are going to use the Ubuntu 20.04 LTS image from https://cloud-images.ubuntu.com/focal/20210702/. This guide will work on any Ubuntu cloud image. Next, install libguestfs and ensure you set your editor to nano for ease.
# Install libguestfs
apt-get install libguestfs-tools

# Use nano as editor
export EDITOR=nano
Edit Cloud Images
Here is where the magic starts! We are going to add some files and folders to this image. First, our systemd service, f2h.service then a simple bash script that runs on each instance boot. These files should be available in your current ssh session. Our files are located in the /root folder. We are creating a new systemd service that is enabled and run at startup. To learn how to create a new service see the How to run scripts at startup post.
Add Files And Folders To Cloud Image
Our systemd service is called f2h.service so we need to copy that file to our cloud image. Our f2h.service is located in our /root folder so we specify the path to the file we want to copy to the image followed by the path to where the file should be placed in the image. We use virt-copy-in -a to copy files to images.
virt-copy-in -a focal-server-cloudimg-amd64.img /root/f2h.service /etc/systemd/system/Enable SystemD Service
Now we need to chmod the file to 644 and enable our new systemd service so that it runs on startup. By using virt-customize -a we can chmod the file and simulate that the image is running to enable our service.
# Chmod file to 644
virt-customize -a focal-server-cloudimg-amd64.img --run-command 'chmod 644 /etc/systemd/system/f2h.service'
# Enable f2h.service
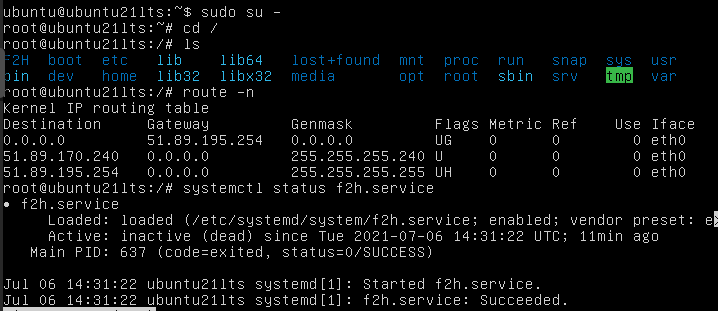
virt-customize -a focal-server-cloudimg-amd64.img --run-command 'systemctl enable f2h.service'You should see all green in the console. If you see any red you have made a mistake. Our service is now enabled. Our service is running a bash script on startup to provide a route to the gateway. Next, we add our bash script to the image.
Create A New Folder In Cloud Image
Our script is going to be located in the F2H folder so first, we need to create this folder in our image. Again we use virt-customize -a to run the mkdir command inside the image.
# Create new folder inside image
virt-customize -a focal-server-cloudimg-amd64.img --run-command 'mkdir /F2H'
Now we need to copy our bash script the image and chmod it 744. Just like above, we use virt-copy-in -a copy our script. Our bash script is located at /F2H/routes.sh so let’s copy that to the image and chmod it.
# Copy file to image
virt-copy-in -a focal-server-cloudimg-amd64.img /F2H/routes.sh /F2H/

# Chmod file 744
virt-customize -a focal-server-cloudimg-amd64.img --run-command 'chmod 744 /F2H/routes.sh'
Again, you should see all green in the console. At this point, we have a new service that will run at boot time to configure static routes. We want to update the packages in this image and install some new ones before moving on to the template creation part. We can use the –run-command function to do this too.
Update Package On Cloud Images
Now we are going to install the qemu-guest-agent and update the packages on the image. Let’s first update the packages to ensure apt is up-to-date.
# Update packages inside image
virt-customize -a focal-server-cloudimg-amd64.img --run-command 'apt-get update && apt-get upgrade -y'
Install New Packages On Cloud Images
Now we are going to install some new packages inside our cloud image using virt-customize -a command.
# Install new packages inside image

virt-customize -a focal-server-cloudimg-amd64.img --run-command 'apt-get install qemu-guest-agent nano wget -y'
That’s it. We have edited the stock Ubuntu 20 LTS image to include a new service that runs at startup. The new service calls a bash script that adds static routes to the gateway. We learnt how to create new folders inside a cloud image. How to copy files to a cloud image and how to install new packages in a cloud image and update existing packages. This image is now ready to be turned into a template. See how to create proxmox cloud templates to learn how to achieve this.