


phpIPAM is a great tool for managing IP address space. It’s a free bit of software that will manage IPv4 and IPv6 address blocks. For free software, it also includes some advanced features like the ability to import blocks from RIPE, NAT support and PowerDNS integration. This guide will show you how to install phpIPAM on an Ubuntu High Availability VPS Server but will also work on Debian servers.
phpIPAM Features
phpIPAM includes enterprise features on an OpenSource basis. That means it’s free and you can modify the code. Included in the software are the following features;
- IPv4/IPv6 IP address management
- Section / Subnet management
- Automatic free space display for subnets
- Visual subnet display
- Automatic subnet scanning / IP status checks
- PowerDNS integration
- NAT support
- RACK management
- Domain authentication (AD, LDAP, Radius)
- Per-group section/subnet permissions
- Device/device types management
- RIPE subnets import
- XLS / CVS subnets import
- IP request module
- REST API
- Locations module
- VLAN management
- VRF management
- IPv4 / IPv6 calculator
- IP database search
- E-mail notifications
- Custom fields support
- Translations
- Changelogs
Install phpIPAM Debian / Ubuntu
To get our phpIPAM instance working we need to provision a small VPS Server. In that server, we are going to be installing MySQL, PHP and NGINX and finally phpIPAM. Let’s build.
Install MySQL, PHP and NGINX
Using the OneShot code below, install the required dependencies. This will install MySQL 8, Apache, NGINX, PHP and all PHP dependencies.
apt install -y mysql-server-8.0 apache2 git php php-{mysql,curl,gd,intl,pear,imap,memcache,pspell,tidy,xmlrpc,mbstring,gmp,json,xml,fpm}Now we have our required software we need to make some configuration changes. Let’s start with MySQL. We need to secure our MySQL installation and create a database for phpIPAM to use.
Secure MySQL and create MySQL User + Database
First, we need to set a MySQL root password. This needs to be done before you secure MySQL. Log in as root to MySQL and use the ALTER statement to create a MySQL root password.
mysql -u root
ALTER USER 'root'@'localhost' IDENTIFIED BY 'MYSQLPASWORD';
Next, we need to create a database and user for phpIPAM to use. Switch the statements below to reflect your database username, password and user.
CREATE DATABASE phpIPAM;
CREATE USER 'ipamusr'@'%' IDENTIFIED BY 'Ha6!8Mdie#3';
GRANT ALL PRIVILEGES ON *.* TO 'ipamusr'@'%' WITH GRANT OPTION;
exit
Great. We now have a MySQL database and user to utilize. Now let’s move on to phpIPAM.
Install phpIPAM In Ubuntu
In the first step, we included GIT in the OneShot install command. We’re going to use GIT to grab the latest version of phpIPAM.
git clone --recursive https://github.com/phpipam/phpipam.git /var/www/html/phpipam && cd /var/www/html/phpipamSo to recap. We have our Ubuntu server installed with phpIPAM, PHP 8.x and MySQL 8.x. We have a database and user but this is not yet configured in the phpIPAM server. Let’s get that configured. In the last command, we changed to the clone directory. Let’s add our database details. A basic configuration file is included. Let’s copy that and edit it.
cp config.dist.php config.php && nano config.phpAt the top of the file. Enter the database details. These will be used to create the database tables.
Configure Apache
Because we are using phpIPAM with a domain name we need to create an Apache configuration file. We’re going to be using a Cloudflare SSL certificate too. Create the configuration file and copy the code to the file. Find out how to generate a Cloudflare Origin certificate.
nano /etc/apache2/sites-available/phpipam.conf# Optional. Required if using an SSL
<VirtualHost *:443>
ServerAdmin webmaster@localhost
ServerName ipam.f2h.cloud
ServerAlias www.f2h.cloud
DocumentRoot /var/www/html/phpipam
ErrorLog ${APACHE_LOG_DIR}/error.log
CustomLog ${APACHE_LOG_DIR}/access.log combined
# Certificate Locations
SSLEngine on
SSLCertificateFile /network/cert.pem
SSLCertificateKeyFile /network/key.pem
SSLCertificateChainFile /network/origin.pem
<Directory /home/f2hcloud/>
Options Indexes FollowSymLinks
AllowOverride All
Require all granted
</Directory>
</VirtualHost>
# Configure traffic on port 80, insecure.
<VirtualHost *:80>
ServerAdmin webmaster@localhost
ServerName f2h.cloud
ServerAlias www.f2h.cloud
DocumentRoot /var/www/html/phpipam
ErrorLog ${APACHE_LOG_DIR}/error.log
CustomLog ${APACHE_LOG_DIR}/access.log combined
</VirtualHost>
# Disallow View site by server IP
<VirtualHost IPv4:80>
DocumentRoot /var/www/blank
</VirtualHost>Finally, we need to enable our new configuration and disable some old ones.
nano /etc/apache2/apache2.conf

# Find the section below and ensure it says REQUIRE ALL GRANTED.

<Directory />
        Options FollowSymLinks
        AllowOverride All
        Require all granted
</Directory>

# Finally enable configuration

chown -R www-data:www-data /var/www/html/
a2enmod headers ssl rewrite php8.1
a2dissite 000-default.conf
a2ensite phpipam.conf
systemctl restart apache2
When visiting your domain name you now should see the phpIPAM initial configuration page. For most people, you will be choosing option 1 and entering the database details you created at the start of this guide.
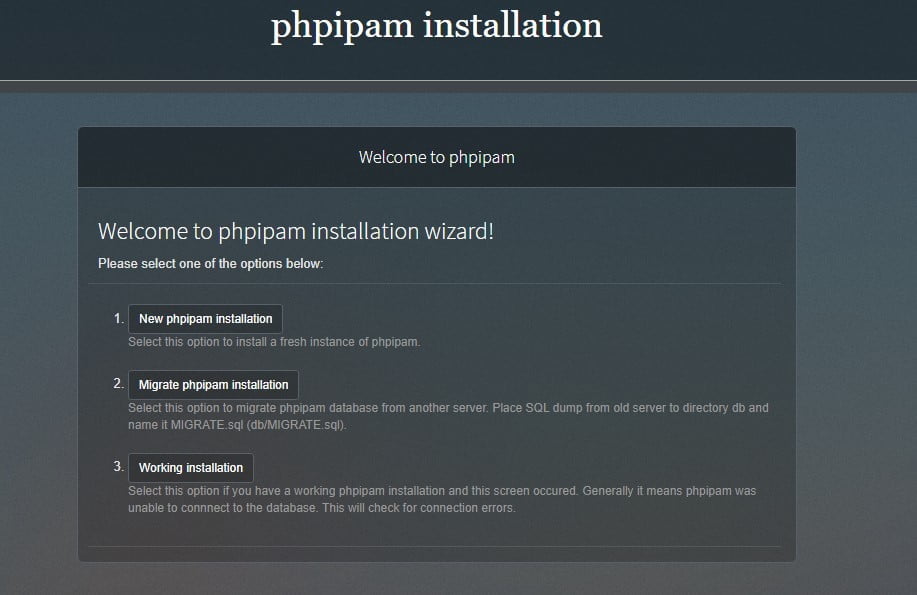
You may need to select “Advanced” and drop the database to recreate it. Once done, set an admin password and access phpIPAM via the URL you have configured.