

Install MariaDB Database Replication. MariaDB Galera Database Cluster

Buckle up. We’re going to take another look at replicating MariaDB databases. Previously we’ve looked at MySQL Replication using the older MySQL Master-Salve (Binary) Replication and the newer Master-Master (Transaction-based) MySQL Replication. Both of these types of replication have their drawbacks as we found. In the case of MySQL Master-Master replication and MariaDB Galera, your database needs to meet the requirements of the Group Replication plugin. Even today, many developers have not modified their code to include simple things like a primary key which is vital for this type of replication. In this article, we will Install MariaDB Database Replication on a cluster of NVMe VPS Servers.
Required Infrastructure
To Install MariaDB Database Replication successfully and configure MariaDB Galera Database Replication with a working website you will need a total of 4 servers running Ubuntu. We have created a bundle of 4 servers for users to purchase. These will be delivered with 100GB NAS storage already mounted to /nas in each backend server. Order Here or Contact Us.
- 3x NVMe VPS Servers (Backends)
- 50GB HDD
- 4 vCore
- 5GB Ram
- 100GB NAS Storage (mounted at /nas in each server)
- 1x Cloud VPS (Balancer)
- 10GB HDD
- 2 vCore
- 2 GB Ram
Save 15% off each server with the promotional code BPIBQ69YH6
HyperDB with MySQL Master-Slave Replication
In the article WordPress HyperDB Cluster with MySQL Replication we created a messy high availability platform for a WordPress website. In that guide, we used HyperDB to route connections to specific backends and MySQL Master-Slave replication to replicate the database. It was messy because we used LSYNCD to replicate data over the cluster and HyperDB isn’t the best way to achieve high availability. That’s because you create a single point of failure on the HyperDB Master. But it gets worse. Because it’s Master-Slave replication if you ever needed to promote a Slave server to a Master. For example, to fix MySQL on the original master your database would be out of sync. This means you would have to reset the replication and resync the database over the cluster. It’s a messy and dirty way of making something highly available.
For this guide, we have used a test domain which is nvme-vps.com. The nvme-vps.com website is powered by the infrastructure used to create this guide.
MariaDB Galera Cluster
So let’s look at one way to do this. We’re going to use three NVMe VPS Servers to create a Cluster with MariaDB Galera replicating database changes to the other nodes of the cluster. MariaDB Galera uses Master-Master Replication or Active-Active Replication if you want to be politically correct. But the major change we are going to make here is the addition of shared storage. In each VPS Server, we are going to mount a 100GB network share. In the share, we are going to store our website files. This removes the need for LSYNCD.
But wait. Some people reading this will rightly think I am creating a single point of failure by using a file share. Ordinarily, that would of course be correct. If the NAS was ever offline the website files would not be accessible. In our case, the First2Host NAS is triple replicated with automatic failover. We are mounting the NAS in our three servers using a load-balancing IP to remove the SPoF (Single Point of Failure).
Optional SSH Keys
Our VPS Servers are installed with Ubuntu 22. We can see our NAS partition is mounted at /nas. We will come back to this later on. Before continuing make sure each backend in your cluster is configured with an SSH key and that key is installed on each backend. You should be able to log in to each backend from another without the need for a password.
Filesystem                          Size  Used Avail Use% Mounted on
tmpfs                               499M  1.1M  498M   1% /run
/dev/sda1                            49G  2.1G   47G   5% /
tmpfs                               2.5G     0  2.5G   0% /dev/shm
tmpfs                               5.0M     0  5.0M   0% /run/lock
/dev/sda15                          105M  6.1M   99M   6% /boot/efi
10.210.19.178:/zpool-128976/HACloud  100G     0  100G   0% /nas
tmpfs                               499M  4.0K  499M   1% /run/user/0
Install MariaDB Database Replication
So let’s build. First, we need to install MariaDB Database Replication on Each backend NVMe VPS Server in our cluster will be installed with MariaDB and the Galera plugin. The Galera cluster plugin has been bundled into MariaDB since v10.1. From here on, each backend VPS server is referenced as a Galera cluster node. So let’s get started with MariaDB Database Replication and install MariaDB on each node in your cluster.
apt install mariadb-serverSecure MariaDB
On each node run the mysql_secure_installation script. Use the below settings to secure MariaDB.
Switch to unix_socket authentication: N
Change the root password: N
Remove anonymous users: Y
Disallow root login remotely: N
Remove test database and access to it: Y
Reload privilege tables now: Y
Configure MariaDB Galera Cluster Nodes
So now we have three backend nodes each install has MariaDB Database Replication. We need them to work together. Open up the /etc/mysql/mariadb.conf.d/60-galera.cnf file.
nano /etc/mysql/mariadb.conf.d/60-galera.cnfHere we are going to configure the basics of our cluster. The default file will look like this.
[galera]
# Mandatory settings
#wsrep_on                 = ON
#wsrep_cluster_name       = "MariaDB Galera Cluster"
#wsrep_cluster_address    = gcomm://
#binlog_format            = row
#default_storage_engine   = InnoDB
#innodb_autoinc_lock_mode = 2

# Allow server to accept connections on all interfaces.
#bind-address = 0.0.0.0

# Optional settings
#wsrep_slave_threads = 1
#innodb_flush_log_at_trx_commit = 0
Install MariaDB Galera Database Replication
So edit the file to reflect the below. But note that you can use any name for your cluster but IT MUST be the same on each node. We have commented on the file.
[galera]
# Mandatory settings
##
## Enable Write-set replication
wsrep_on                 = ON

## Location of wsrep library
wsrep_provider           = /usr/lib/galera/libgalera_smm.so

## Cluster Name
wsrep_cluster_name       = "F2HCloud VPS Cluster"

## Cluster Node IPs
wsrep_cluster_address    = gcomm://51.xXx.xX.10,193.Xx.xX.218,51.xXx.xXx.24

## Log Format
binlog_format            = row

## Sotrage Engline
default_storage_engine   = InnoDB

## Galera requires mode 2
innodb_autoinc_lock_mode = 2

## The below setting adds a primary key to tables that don't have one.
innodb_force_primary_key = 1

## Double write buffer
innodb_doublewrite       = 1

# Allow server to accept connections on all interfaces.
bind-address = 0.0.0.0

# Optional settings

## Number of threads. Aim for 4x the number of vCores. 4 vCores = 16 Threads.
wsrep_slave_threads = 16

## Write to file once per second. This could cause issues if all nodes go down at the same time
innodb_flush_log_at_trx_commit = 0

## Below settings to identify lines in logs
wsrep_node_name                = FR-N1
wsrep_node_address             = "THIS NODE IPv4"

## Log errors to error_log
log_error = /var/log/mysql/error.log
Save this file but do not start MariaDB. So next we need to copy this configuration to each node in our MariaDB Galera Cluster. Remember at the start we configured SSH Keys. We can use SCP to copy this file to other nodes. On each node you can then just update the wsrep_node_name and wsrep_node_address values.
scp /etc/mysql/mariadb.conf.d/60-galera.cnf root@server.f2hcloud.com:/etc/mysql/mariadb.conf.d/We now have three identical nodes. The 60-galera.cnf exists on each node. So next let’s ensure the Firewall is configured to allow only our cluster IPs. Ideally offloading your Firewall rules to First2Host is the best solution because protection is provided at the PoP (Point of Presence) where connections enter our network. This also protects you from DDoS attacks up to 1.6TBPS. If you want to use a Software firewall like UFW. Use the rules below.
Firewall Rules
Ports that will be required for MariaDB Galera Database Replication are for MariaDB and OpenLiteSpeed which we will install later. We will simply whitelist each node’s IP.
- 3306 (standard MariaDB port)
- 4444 (SST port)
- 4567 (Galera replication port)
- 4568 (IST port)
- 443
- 80 (optional)
- 22
- 7080 (LiteSpeed)
# Replication Rules
ufw allow from 51.xXx.xx.10 proto tcp to any port 3306
ufw allow from 51.xXx.xx.10 proto tcp to any port 4444
ufw allow from 51.xXx.xx.10 proto tcp to any port 4567
ufw allow from 51.xXx.xx.10 proto tcp to any port 4568

# HTTP / HTTPS / SSH / OLS
ufw allow 443
ufw allow 80
ufw allow 22
ufw allow 7080

# Balancer Firewall rules

ufw allow from balancer-IPv4 proto tcp to any port 443
ufw allow from balancer-IPv4 proto tcp to any port 3306
After this step, if you run ufw status the firewall rules should look something like this.
Status: active

To                         Action      From
--                         ------      ----
443                        ALLOW       Anywhere
80                         ALLOW       Anywhere
22                         ALLOW       Anywhere
7080                       ALLOW       Anywhere
3306/tcp                   ALLOW       51.xXx.xXx.24
4444/tcp                   ALLOW       51.xXx.xXx.24
4567/tcp                   ALLOW       51.xXx.xXx.24
4568/tcp                   ALLOW       51.xXx.xXx.24
3306/tcp                   ALLOW       193.xXx.xXx.218
4444/tcp                   ALLOW       193.xXx.xXx.218
4567/tcp                   ALLOW       193.xXx.xXx.218
4568/tcp                   ALLOW       193.xXx.xXx.218
443 (v6)                   ALLOW       Anywhere (v6)
80 (v6)                    ALLOW       Anywhere (v6)
22 (v6)                    ALLOW       Anywhere (v6)
7080 (v6)                  ALLOW       Anywhere (v6)
We’re now almost ready to start our Database cluster. Here is a good time to take a snapshot of each node. If anything goes wrong you won’t have to start again then. So after taking a Snap or backup of your nodes stop the MariaDB service on two of the nodes. We will start the cluster from the remaining node.
systemctl stop mariadbStart MariaDB Galera Cluster
On the remaining node, you can now stop the MariaDB service. To start a Galera Cluster for the first time you use a special script called galera_new_cluster. So enter that into the console.
galera_new_clusterThis command produces no output. To confirm it worked use the below command.
mysql -u root -p -e "SHOW STATUS LIKE 'wsrep_cluster_size'"You should see that the cluster size is 1.
+--------------------+-------+
| Variable_name      | Value |
+--------------------+-------+
| wsrep_cluster_size | 1     |
+--------------------+-------+
Now bring up the MariaDB service on each remaining node. You can check the nodes are joining the cluster with the same command.
mysql -u root -p -e "SHOW STATUS LIKE 'wsrep_cluster_size'"We have a three-node cluster so once all of our nodes are online we see the value set to three.
+--------------------+-------+
| Variable_name      | Value |
+--------------------+-------+
| wsrep_cluster_size | 3     |
+--------------------+-------+
Test MariaDB Galera Database Replication
So now it’s time to test our MariaDB Galera Database Replication. We will create a MariaDB database and add some content to it. That data should be replicated to other nodes. On any node create a database.
CREATE DATABASE CLIENTS;And then add a new table and some dummy information.
CREATE TABLE CLIENTS.data ( id INT NOT NULL AUTO_INCREMENT, prefix VARCHAR(50), doornum INT, name VARCHAR(25), PRIMARY KEY(id));

# Dummy data

INSERT INTO CLIENTS.data(prefix, doornum, name) VALUES ("Mr", 2, "Leon");'
Log in to another node in the cluster and query data in the database. Mr, 2 and Leon.
SELECT * FROM CLIENTS.data;So, in the returned information we can see our data was replicated to this node.
+----+--------+---------+------+
| id | prefix | doornum | name |
+----+--------+---------+------+
|  3 | Mr     |       2 | Leon |
+----+--------+---------+------+
Repeat the process on each node to confirm replication is working. Once you have finished testing you can delete the database.
DROP DATABASE CLIENTS;Create Proxy Health Check User
At the end of this guide, we will be configuring a Load Balancer. Create the below user to use with MySQL health checks from the balancer to your backends. This user will be created in each node. Just run the commands in any node.
# Create HAProxy User

CREATE USER 'haproxy'@'Loadbalancer-IP';

# Grant Privilages

GRANT ALL PRIVILEGES ON wpdatabase.* To 'haproxy'@'loadbalancer-IP' IDENTIFIED BY 'PaSsWoRd';
Prepare Production Database
We want to host and import a WordPress database to this high availability MariaDB cluster. We’re assuming you have already dumped your database and moved it to one of the nodes. Next, we will create a new database and user and then, import the database. Still in the MariaDB console create the database and user.
# Create Database
CREATE DATABASE DATABASE_NAME;

# Create User
CREATE USER 'User-Name'@'localhost';

# Assign Privilages and create password
GRANT ALL PRIVILEGES ON DATABASE_NAME.* To 'User-Name'@'localhost' IDENTIFIED BY '@PaSsWoRd@';
So the MariaDB Galera Database created above has already likely been replicated to the other MariaDB Galera nodes in your cluster and it’s time to import the database. This bit can be a bit tricky. As we mentioned before for MariaDB Galera Database Replication to work, each table should have a primary key. We can bypass this requirement but the best practice is to have a primary key. We have configured the Galera cluster to reject any databases that don’t contain keys in all tables. Next, try to import the database dump to the database you just created.
mysql -u root -p database_name < dump.sqlYou can use the command below to confirm the tables from the SQL dump have been added to the database.
SHOW TABLES FROM DATABASE_NAME;The output should list the tables like in the image below.
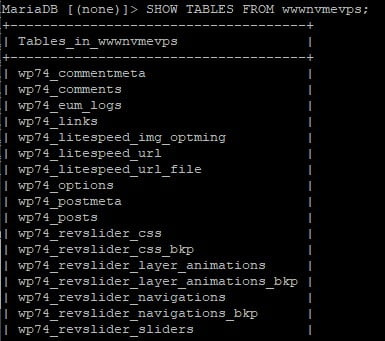
So now is the time to maybe take a break and another Snapshot or backup of each server. We have successfully created our MariaDB Galera Cluster with Master-Master/Active-Active Replication. MariaDB Galera Database Replication is working.
But now we must turn our attention to our web server and install OpenLiteSpeed in each node in the cluster. Then we need to configure a virtual host for our website.
Install OpenLiteSpeed
OpenLiteSpeed or OLS will serve our website files. It’s a fast and secure web server with native caching for free. Thankfully, the people over at OLS have made this step really easy. Run the following command to install OpenLiteSpeed. Just complete the following on one node for now. This command installs OpenLiteSpeed with lsphp version 8.1. You can change the 81 bit for different versions of PHP like 8.2
Install OpenLiteSpeed With PHP
bash <( curl -k https://raw.githubusercontent.com/litespeedtech/ols1clk/master/ols1clk.sh ) --lsphp 81Install OpenLiteSpeed With PHP and WordPress
bash <( curl -k https://raw.githubusercontent.com/litespeedtech/ols1clk/master/ols1clk.sh ) -w --lsphp 81Once the installation has been completed the login information for the LiteSpeed control panel is displayed in the console and in the /usr/local/lsws/password file.
cat /usr/local/lsws/passwordCreate Virtual Host
At this point, we need to create a virtual host for our website. We could do this manually but there is also a script to complete this. So use the command below to create a virtual host for your domain name. For this guide, we are importing the nvme-vps.com website to the cluster.
/bin/bash <( curl -sk https://raw.githubusercontent.com/litespeedtech/ls-cloud-image/master/Setup/vhsetup.sh ) -d www.nvme-vps.comOK. We now have OpenLiteSpeed installed. We need to tell OLS where our website files will be located. This is where our NAS comes into play. In each node, we mounted a 100GB NAS partition at /nas. Let’s finish configuring the vhost. Log in to the OLD control panel.
https://51.255.56.10:7080In the OLS control panel navigate to Virtual Hosts and select the virtual host you created in the previous step.

In the Virtual host configuration notice the Virtual Host Root field. By default, OpenLiteSpeed uses /var/www/www.domain.com. We need to modify this to a folder in our mounded NAS. The command below assumes your NAS is mounted to /nas in your node.
mkdir -p /nas/www/www.nvme-vps.comAnd in the Virtual Host Root we now specify the location we created above.
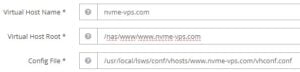
So because we have edited the OLS configuration we must restart the webserver. Use the control panel to perform a Graceful restart. Now we need to place our website files in the /nas/www/www.nvme-vps.com file location.
Migrate Website Data
And now you need to place your website files in the location specified above. /nas/www/www.nvme-vps.com in our case. You could ZIP the files and SCP them to the node. You will only need to complete this once.
zip -r files.zip /var/www/path/to/site

scp files.zip root@IP_node:/nas/www.nvme-vps.com/
Once the files are in place modify the wp-config.php file to reflect the database you created previously.
nano /nas/www/www.nvme-vps.com/wp-config.phpFix Permissions, Groups and Ownership
Finally, ensure the permissions on your files and folders are correct and that the correct user and owner is set. If you miss this step your WordPress may not function.
# To change all the directories to 0755 (drwxr-xr-x):

find /nas/www/www.nvme-vps.com/ -type d -exec chmod 755 {} \;

# To change all the files to 0644 (-rw-r--r--):

find /nas/www/www.nvme-vps.com/ -type f -exec chmod 644 {} \;

# CHOWN all files and folders to www-data

chown -R www-data:www-data /nas/www/www.nvme-vps.com
And at this point, you are almost complete. You just need to think about an SSL and configuring LiteSpeed on the other nodes. We will come back to these. However, we are at a stage where we can see if this first node is working. Update the A record on your domain name to point to this nodes IPv4. All being well you should see your website albeit with a possible SSL error which we will correct soon.
Rinse & Repeat
Now that you have a single node mostly configured it’s time to repeat this process on the rest of the cluster nodes. It should be a lot quicker this time. Install LiteSpeed Web Server and a virtual host for the website on the other nodes.
bash <( curl -k https://raw.githubusercontent.com/litespeedtech/ols1clk/master/ols1clk.sh ) --lsphp 81

/bin/bash <( curl -sk https://raw.githubusercontent.com/litespeedtech/ls-cloud-image/master/Setup/vhsetup.sh ) -d www.nvme-vps.com
Ensure you correct the Virtual Host Root to point to the NAS and double-check each node is working by updating the A record on the website to point to each node.
Configure HAProxy Load Balancer
We’ve left any SSL provision until last. As it stands we are using Cloudflare with a Flexible SSL setting in SSL/TLS > Overview. Because LiteSpeed has generated a self-signed certificate we’re not seeing any errors on our nvme-vps.com domain. Leaving the MariaDB cluster like this would be insecure. So next we will introduce a Load Balancer to distribute https connections over our cluster. We have two options. SSL Passthrough and SSL Termination. The balancer needs to be a Highly Available VPS Server with 2 vCores and at least 2GB RAM. In the balancer set the hostname with the below commands and configure an A record so the hostname resolves to the balancer.
systemctl set-hostname balancer.f2hcloud.comInstall Balancer SSL Certificate
So next we install an SSL Certificate. You can use a Cloudflare Origin Certificate or a Let’s Encrypt one. We’re going to install Certbot and request a certificate that way.
systemctl install certbot -y

certbot certonly -d balancer.f2hcloud.com
Choose option 1 to spin up a webserver. Once complete the SSL certificate will be saved to /etc/letsencrypt/live/your.domain.com/
HAProxy is going to be expecting our SSL certificate to be packaged in a specific way. Combine the certificate using the commands below. We will configure a simple script to take care of renewals later. First, navigate into the directory with your SSL certificate. Then combine the certificate and private key.
cd /etc/letsencrypt/live/your.domain.com/
cat fullchain.pem privkey.pem > balancer.f2hcloud.com.pem
You can name yours anything but it must end in .pem. So the certificate is now located at /etc/letsencrypt/live/your.domain.com/balancer.f2hcloud.com.pem. This is the correct one to use with HAProxy.
Install HAProxy
So next we move on to the actual balancer software. We are going to use HAProxy however you can choose a different balancer if you want.
apt install haproxy -yThe HAProxy configuration file is located at /etc/haproxy/haproxy.cfg but we will create our own configuration file from scratch. So just move the existing file out of the way and create a new one.
mv /etc/haproxy/haproxy.cfg /etc/haproxy/haproxy_original.cfg && nano /etc/haproxy/haproxy.cfgConfigure HAProxy For HTTPS & MySQL Checks
Copy the below configuration to the recreated /etc/haproxy/haproxy.cfg file.
# Frontend connections for HTTPS and MySQL

frontend http_front
   bind :80
   bind :443 ssl crt /etc/letsencrypt/live/balancer.f2hcloud.com/balancer.f2hcloud.com.pem
   default_backend f2h_hacluster

frontend mysql-frontend
    bind *:3306
    mode tcp
    default_backend mysql-backend

# Specify backend nodes. These are https connections

backend f2h_hacluster
   balance leastconn
   server frrbx-bk 193.70.65.218:443 check ssl verify none
   server frgra-bk 51.255.56.10:443 check ssl verify none
   server uklon-bk 51.195.251.24:443 check ssl verify none

backend mysql-backend
    mode tcp
    balance roundrobin
   server frrbx-bk 193.70.65.218:3306 check
   server frgra-bk 51.255.56.10:3306 check
   server uklon-bk 51.195.251.24:3306 check

global
        log /dev/log    local0
        log /dev/log    local1 notice
#       chroot /var/lib/haproxy
        stats socket /run/haproxy/admin.sock mode 660 level admin
        stats timeout 30s
        user haproxy
        group haproxy

defaults
        log     global
        mode    http
        option  httplog
        option  dontlognull
        timeout connect 5000
        timeout client  50000
        timeout server  50000
        errorfile 400 /etc/haproxy/errors/400.http
        errorfile 403 /etc/haproxy/errors/403.http
        errorfile 408 /etc/haproxy/errors/408.http
        errorfile 500 /etc/haproxy/errors/500.http
        errorfile 502 /etc/haproxy/errors/502.http
        errorfile 503 /etc/haproxy/errors/503.http
        errorfile 504 /etc/haproxy/errors/504.http

listen stats
    bind 57.128.122.127:1936 ssl crt /etc/letsencrypt/live/balancer.f2hcloud.com/balancer.f2hcloud.com.pem
    mode http
    stats enable
    stats hide-version
    stats show-node
    stats realm Haproxy\ Statistics
    stats uri /haproxy?stats
    stats admin if TRUE
    stats auth User:Password
Let’s go through this.
- Frontend
- We are binding ports 80 and 443 to our balancers IPv4.
- These we specify the certificate we combined above for the balancer.
- Then we create a default backend which will hold our backend nodes, backend is called f2h_hacluster.
- Backend
- The balancer is set to use leastconn. The server with the least number of connections will receive new connections.
- The specify your backend nodes. It is important to append:443 to each IP
- check – Check port :443 for a response.
- SSL – Use SSL.
- Verify none – Don’t verify the certificate.
- Listen Stats
- Bind port :1936 to the server IP and specify the location to the SSL.
- Stats realm – Location of the HAProxy stats URL. (https://balancer.f2hcloud.com/haproxy?stats).
- Stats auth – Choose a username and password to access the stats. Comment (#) this out for now authtication on the stats page.
OK. Now restart HAProxy.
systemctl restart haproxyTest MariaDB Galera Database Cluster
Get ready. Everything should be working now. Finally, update the A record on your website to point to the balancer’s IPv4. If everything went correctly your connection will be sent to one of the backend servers specified in the HAProxy file. Open up the HAProxy stats page.
https://57.xXx.122.xXx:1936/haproxy?statsSo, if we navigate to our test domain, nvme-vps.com we do not see any certificate warnings and in our HAProxy stats, we can see our connection was forwarded to a backend server.
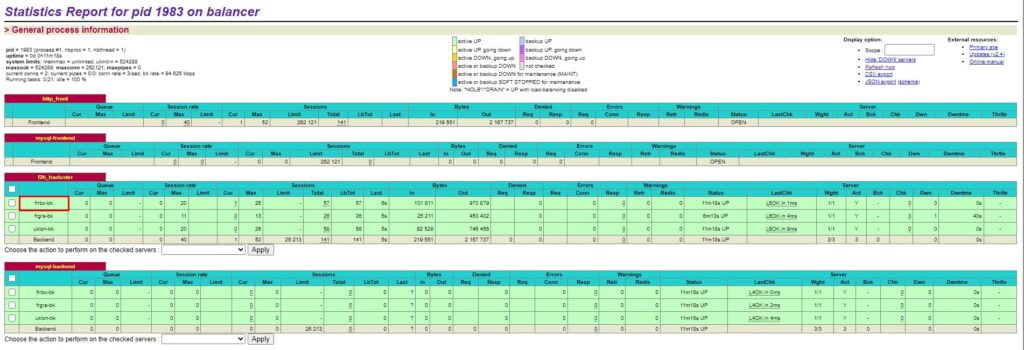
So who has noticed the elephant in the room? Let me know in the comments if you did! You may have noticed the MySQL frontend is reporting no connections. That’s normal because we are only sending HTTPS traffic through the balancer. The purpose of the MySQL section is not to forward MySQL connections but to take out one of the backend nodes if MySQL was to ever fail on it.
Final Thoughts
This is an amazing configuration to have in your toolbox. As with any High Availability Cluster, you do sacrifice some speed. But when you Install MariaDB Database Replication with Active-Active database replication. You also get guaranteed uptime and the nodes are highly scaleable which is perfect for Enterprise users. You can add further backends within 30 minutes and because this cluster is spread over multiple geographical locations it is extremely unlikely it would fail.
Everyone’s High Availability is different. I don’t feel there is a single correct way to provide high availability to a website or application. However, some people may feel that a Cloud that distributes content like Azure or AWS would be a better alternative. Some would then argue that by using a server on AWS or Azure you are creating a single point of failure (SPF). More would then argue that the balancer in this configuration is a SPF and they would be right. However, Load Balancers are so simple they never fail if configured correctly. Do you have a better way of achieving High availability? Would you separate the MariaDB servers into a separate cluster on private IPs? Leave your comments below.