


Now we have our Postfix server sending and receiving emails it’s time to do some tidying up. You should configure DKIM and SPF on your server to ensure your emails are delivered to your recipients. Without SPF some email providers like Gmail will automatically reject your emails. Without DKIM configured on your sending domain fewer emails might land in inboxes and instead, end up in spam boxes. So let’s learn a bit more about SPF and DKIM records then we will configure DKIM in our Postfix server and an SPF record for your sending domain.
Articles In This Series
- Part 1 – Install Postfix in Ubuntu Servers
- Part 2 – Install Dovecot IMAP/POP3 with SSL/TLS
- Part 3 – Configure Postfix DKIM & SPF Records (This Article)
- Part 4 – Install Postfixadmin on Postfix Ubuntu Servers
- Part 5 – Install RoundCube Webmail on Ubuntu Postfix servers
- Part 6 – Configure Multiple Email Domains in Postfix Email Server
- Part 7 – Configure PostFixAdmin and RoundCube High Availability Email Servers
- Part 8 – Configure DKIM, SPF and DMARC on Second (multiple) Postfix Email Servers
- Part 9 – Load Balance PostFixAdmin, RoundCube and Postfix Email
SPF (Sender Policy Framework)
SPF records are a crucial email authentication protocol that helps prevent email spoofing and phishing by verifying the legitimacy of the sender’s domain. When an email server receives a message. It checks the SPF record in the DNS (Domain Name System) for the sender’s domain. If the sending server’s IP address matches the authorized list of IP addresses in the SPF record. The email is considered legitimate. Otherwise, it may be marked as suspicious or rejected. SPF plays a vital role in maintaining email security and ensuring that messages come from valid sources.
DKIM (DomainKeys Identified Mail)
DKIM is an essential email authentication protocol that plays a crucial role in enhancing email security. Here’s how it works:
- Digital Signatures: When an email is sent from a domain, the source email system generates one or more private keys. These keys are used to digitally sign specific parts of the outbound message, including the From, To, Subject, MIME-Version, Content-Type, and other header fields. The message body is also included in the signature.
- DKIM-Signature Header: The digital signature is stored in the DKIM-Signature header field within the message header. As long as intermediate email systems don’t modify the signed parts of the message, the signature remains valid.
- Public Keys in DNS: The corresponding public keys are stored in DNS records for the signing domain. In the case of Microsoft 365, these are CNAME records. Other email systems might use TXT records. Destination email systems use the d= value in the DKIM-Signature header to identify the signing domain. Look up the public key in the DKIM DNS record, and verify the message signature.
- Verification Process: DKIM allows receivers to verify that an email claiming to come from a specific domain was indeed authorized by the owner of that domain. It helps prevent forged sender addresses, commonly used in phishing, email spoofing, and other malicious attacks.
- Multiple Signatures: A message can have multiple DKIM signatures from different domains. Hosted email services often sign the message using their service domain. Then sign it again using the customer’s domain after configuring DKIM signing.
However, DKIM doesn’t require the domain used for signing to match the domain in the MAIL FROM or From addresses. It’s an essential layer of protection to ensure the integrity of email communication.
Configure SPF Records
Creating an SPF record for your sending domain is the easy bit. This is completed where your domain’s DNS is configured. For example, if you have a High Availablity Web Hosting account. The SPF record is added to the DNS Manager. However, if you use a proxy service like Cloudflare then the SPF record is configured and added in Cloudflare -> DNS Records. Generally speaking, you can query your domain name servers and where they point is where the SPF record is configured.
SPF records always start with v=spf1. The next section of the record starts ip4: and is followed by your mail servers IPv4 and finally -all is appended to the end. This is a basic SPF record that is valid. So let’s put that together. In our environment, it would look like this;
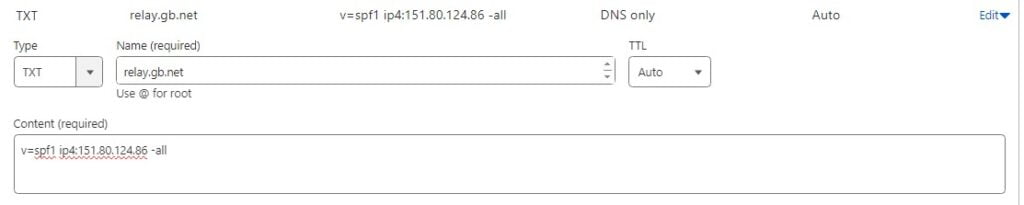
TXT Record
relay.gb.net
v=spf1 ip4:151.80.124.86 -all
The three sections to add are above. You are adding a TXT record for your domain followed by the SPF Record.
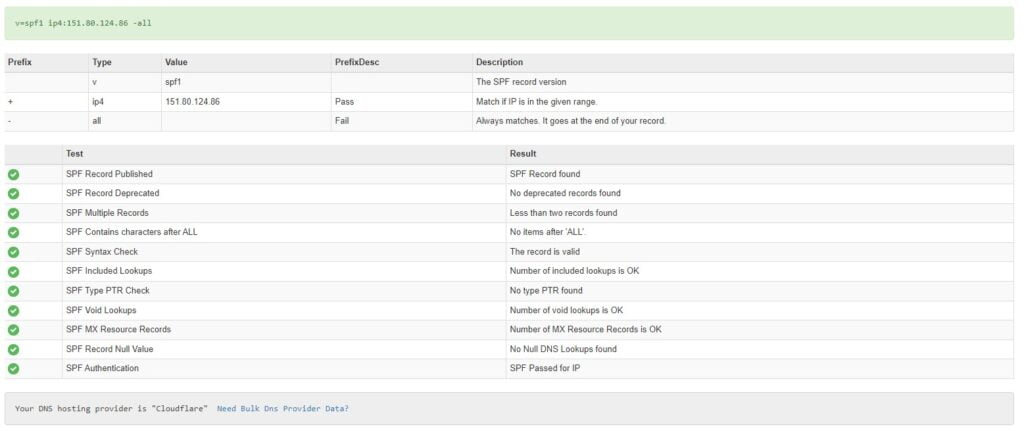
So after you have configured this you can use the SPF checker over at MTtoolbox.
You could also send an email to Outlook or Gmail and inspect the headers.
Authentication-Results: spf=pass (sender IP is 151.80.124.86)
 smtp.mailfrom=relay.gb.net; dkim=none (message not signed)
 header.d=none;dmarc=bestguesspass action=none
 header.from=relay.gb.net;compauth=pass reason=109
Received-SPF: Pass (protection.outlook.com: domain of relay.gb.net designates
 151.80.124.86 as permitted sender) receiver=protection.outlook.com;
 client-ip=151.80.124.86; helo=m1.relay.gb.net; pr=C
Received: from m1.relay.gb.net (151.80.124.86) by
 VE1EUR01FT070.mail.protection.outlook.com (10.152.3.47) with Microsoft SMTP
Configure Postfix SPF Checks
So to help combat spam you can also have your Postfix server check the SPF records of the sending domains that send mail to your Postfix server. When an email is received Postfix will inspect the SPF record and resolve the domain to the listed IP in the SPF record. If they match, the email will be delivered to your inbox. However, If they do not match you can tell your Postfix NVMe VPS Server to discard the message and this greatly helps with received spam. So let’s install the SPF policy agent on our Postfix server and configure this.
apt install postfix-policyd-spf-python && nano /etc/postfix/master.cfIn the console, the /etc/postfix/master.cf file should now be open. So add the below line to tell Postfix to start the policy agent when Postifx starts, add this to the end of the file. Save and close the file.
policyd-spf  unix  -       n       n       -       0       spawn
    user=policyd-spf argv=/usr/bin/policyd-spf
Next, open up the /etc/postfix/main.cf file. Addend the below code block to the end of the file.
nano /etc/postfix/main.cf

policyd-spf_time_limit = 3200
smtpd_recipient_restrictions =
   permit_mynetworks,
   permit_sasl_authenticated,
   reject_unauth_destination,
   check_policy_service unix:private/policyd-spf
The above code block sets a timeout limit on the SPF agent and also rejects unauthorized/failed SPF records. Restart the Postfix server.
systemctl restart postfixWith these edits, you should be able to see the SPF results in the header of received emails. That will look like the below code block.
Received-SPF: Pass (mailfrom) identity=mailfrom; client-ip=40.92.19.36; helo=nam11-dm6-obe.outbound.protection.outlook.comConfigure DKIM Postfix Server
However, DKIM is slightly more complicated because it requires that we install some additional software on our Postfix server. We will use OpenDKIM which is an open-source version of the DKIM sender authentication system.
apt install opendkim opendkim-toolsNext, add the postfix user to the DKIM group and open the opendkim.conf file.
gpasswd -a postfix opendkim && nano /etc/opendkim.confAt the top of the file find the #Logwhy line and remove the comment from the start. Change NO to YES. You can just paste the below line to the file if you wish. This will provide us with more detailed logs.
Logwhy yesStill in the opendkim.conf file, find the lines below.
#Canonicalization   simple
#Mode               sv
#SubDomains         no
Add the code block below #SubDomains
Canonicalization   simple/relaxed
Mode               sv
SubDomains         no
#ADSPAction continue
AutoRestart         yes
AutoRestartRate     10/1M
Background          yes
DNSTimeout          5
SignatureAlgorithm  rsa-sha256
Finally, at the end of the file append the below code block.
# Specify OpenDKIM user

UserID             opendkim

# Map domains in From addresses to keys

KeyTable           refile:/etc/opendkim/key.table
SigningTable       refile:/etc/opendkim/signing.table

# Ignore list
ExternalIgnoreList  /etc/opendkim/trusted.hosts

# Internal hosts whose mail should be signed
InternalHosts       /etc/opendkim/trusted.hosts
Save and close the file.
Create Tables and Hosts Files
Create the required files and assign the correct privileges.
mkdir /etc/opendkim && mkdir /etc/opendkim/keys && chown -R opendkim:opendkim /etc/opendkim && chmod go-rw /etc/opendkim/keys && nano /etc/opendkim/signing.tableSo now in the console, the file /etc/opendkim/signing.table should now be open. Append the below code block to the file. We are telling Postfix to sign messages when they are sent from our domain name or a subdomain. However please remember to switch the relay.gb.net domain for your domain name.
*@relay.gb.net    default._domainkey.relay.gb.net
*@*.relay.gb.net    default._domainkey.relay.gb.net
Save and close the file. Next, create a key table.
nano /etc/opendkim/key.tableAppend the code block below to this file. Remember to make sure that you switch relay.gb.net for your domain name.
default._domainkey.relay.gb.net relay.gb.net:default:/etc/opendkim/keys/relay.gb.net/default.privateSave and close the file. Finally, create a trusted hosts file that stores information about hosts we do not want to perform DKIM checks on.
nano /etc/opendkim/trusted.hostsIn the file append the below code block. Switch relay.gb.net for your domain!
127.0.0.1
localhost
.relay.gb.net
Save and close the file.
Generate Private & Public Keys
DKIM signs outgoing messages with a private key and a public key is published in your DNS records so first create a folder to store the keys in.
mkdir /etc/opendkim/keys/relay.gb.netNext, generate a key pair. Remember to place your domain name in the below code.
opendkim-genkey -b 2048 -d relay.gb.net -D /etc/opendkim/keys/relay.gb.net -s default -vSo your public and private key pairs are saved to the folder you created above. The private key is located in the default.private file and the public key is located in the default.txt file. CHOWN the file so OpenDKIM can access the private key by making it an owner of the file.
chown opendkim:opendkim /etc/opendkim/keys/relay.gb.net/default.private && chmod 600 /etc/opendkim/keys/relay.gb.net/default.privatePublish Your Public Key In DNS
Grab a copy of your public key.
cat /etc/opendkim/keys/relay.gb.net/default.txtThe public key is the string that starts P=

Please take note. The public key is separated into two parts. Notice how in the console I have copied the first part between the ” ” and then the second part of the public key between the ” “. I added the two strings together without the ” ” to make one long string.
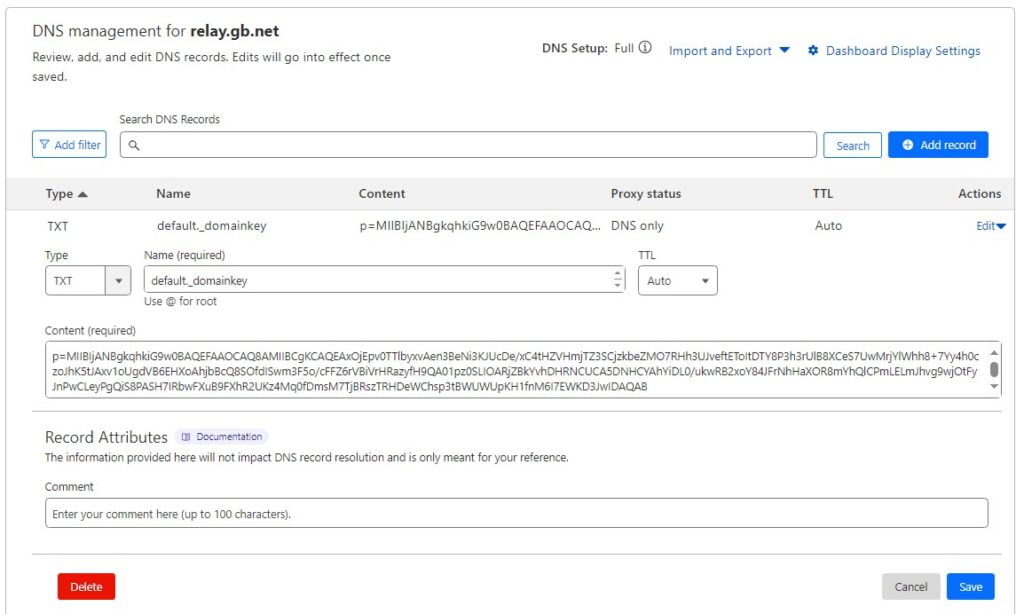
Copy the entire lines as I have. Next in your DNS manager, you need to create a TXT record with the name default._domainkey and in the content the public key you copied above. It will look like this;
Allow Postfix to talk to OpenDKIM
So to allow communication between Postfix and OpenDKIM we must create a socket.
mkdir /var/spool/postfix/opendkim && chown opendkim:postfix /var/spool/postfix/opendkim && nano /etc/opendkim.confIn the console the opendkim.conf will now be open. Locate the below line.
Socket local:/run/opendkim/opendkim.sockComment (#) that line and replace with the below line.
Socket local:/var/spool/postfix/opendkim/opendkim.sockNext in the /etc/default/opendkim file find the below line.
SOCKET=local:$RUNDIR/opendkim.sockComment that (#) to disable it and replace it with the below line.
SOCKET="local:/var/spool/postfix/opendkim/opendkim.sock"Next, it’s on to the Postfix configuration file. Open the file.
nano /etc/postfix/main.cfAppend the below code block to the end of the file.
milter_default_action = accept
milter_protocol = 6
smtpd_milters = local:opendkim/opendkim.sock
non_smtpd_milters = $smtpd_milters
Save and close the file then restart Postfix.
systemctl restart postfixTest DKIM
It’s time to test our work. Use the below command to test your DKIM records. Switch out our domain for your domain name.
opendkim-testkey -d relay.gb.net -s default -vvvIn the console, you should see the returned message.

It’s important to point out here that the line saying Key not secure is perfectly normal. You do not need to worry about this. The only line you need to worry about is the final line saying Key OK. You may need to leave the DNS to update for up to 24 hours. Some providers like Cloudflare provide instant DNS records that do not need any time to propagate. Others it can take a day or two in extreme cases. If your provider is taking longer than a few hours to public records. Find a new provider.
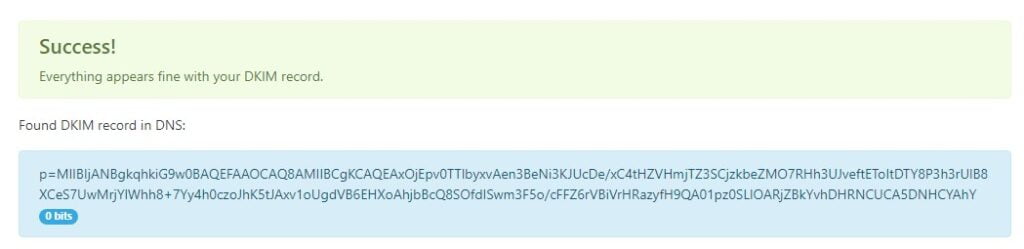
We can further test our DKIM configuration on Postfix with a tool. Enter default as the selector and your domain name. The results should come back all clear.
And finally, send an email to Outlook or Gmail. In the headers of the email, you should notice that DKIM is now a pass.
Authentication-Results: spf=pass (sender IP is 151.80.124.86)
smtp.mailfrom=relay.gb.net; dkim=pass (signature was verified
Magic. We now have DKIM and SPF configured on our Ubuntu Postfix server.