


In the first article, we learnt how to install Postfix on our Ubuntu NVMe VPS Server. We configured Postfix to send a simple email. We’ve completed the basic SMTP configuration but currently, there is no encryption or IMAP server to use. In this article, we will install Dovecot on our Postfix Ubuntu server. Dovecot will allow us to use the IMAP and POP3 protocol with TLS/SSL connections.
Articles In This Series
- Part 1 – Install Postfix on Ubuntu Servers
- Part 2 – Install Dovecot IMAP/POP3 with SSL/TLS (This Article)
- Part 3 – Configure Postfix DKIM & SPF Records
- Part 4 – Install Postfixadmin on Postfix Ubuntu Servers
- Part 5 – Install RoundCube Webmail on Ubuntu Postfix servers
- Part 6 – Configure Multiple Email Domains in Postfix Email Server
- Part 7 – Configure PostFixAdmin and RoundCube High Availability Email Servers
- Part 8 – Configure DKIM, SPF and DMARC on Second (multiple) Postfix Email Servers
- Part 9 – Load Balance PostFixAdmin, RoundCube and Postfix Email
Install Dovecot IMAP Server on Postfix
So let’s build. First, install Dovecot to your Postfix NVMe VPS Server with the command below. These commands install Dovecot IMAP and Dovecot POP3. We will configure Dovecot later on in this article.
apt install dovecot-core dovecot-imapd dovecot-pop3d dovecot-lmtpd -yInstall SSL Certificate
Next, we need to install an SSL Certificate so we can use Dovecot with IMAP TLS authentication with Dovecot. You do not need to install and configure a web server for this. However, you do need to open port 80 and, if you want to use Webmail with your Postfix email server you will need a web server. We will deal with webmail later on in this series. So, for now, let’s get an SSL certificate. In these examples, we use m1.relay.gb.net as this is the hostname of our Postfix server.
ufw allow 80,443,465,587,993,143,110,995/tcp

apt install certbot -y

certbot certonly -d m1.relay.gb.net
Once requested your SSL certificate and private key will be located at /etc/letsencrypt/live/m1.relay.gb.net/.
Configure SSL Certificate in Postfix Email Server
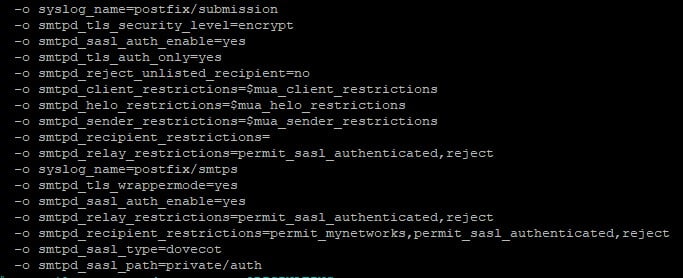
So next we need to tell Postfix we want to use secure settings. Open up the /etc/postfix/master.cf file and paste the below code block to the file. There is supposed to be a space in front of each line. Without the space, Dovecot will think the line above is continuous.
nano /etc/postfix/master.cfsubmission inet n - y - - smtpd
-o syslog_name=postfix/submission
-o smtpd_tls_security_level=encrypt
-o smtpd_tls_wrappermode=no
-o smtpd_sasl_auth_enable=yes
-o smtpd_relay_restrictions=permit_sasl_authenticated,reject
-o smtpd_recipient_restrictions=permit_mynetworks,permit_sasl_authenticated,reject
-o smtpd_sasl_type=dovecot
-o smtpd_sasl_path=private/auth
smtps inet n - y - - smtpd
-o syslog_name=postfix/smtps
-o smtpd_tls_wrappermode=yes
-o smtpd_sasl_auth_enable=yes
-o smtpd_relay_restrictions=permit_sasl_authenticated,reject
-o smtpd_recipient_restrictions=permit_mynetworks,permit_sasl_authenticated,reject
-o smtpd_sasl_type=dovecot
-o smtpd_sasl_path=private/authAfter the edits, the file will look like this.
And next, we need to let Dovecot know the location of our SSL Certificate. This is completed in the /etc/postfix/main.cf file. Open up the file.
nano /etc/postfix/main.cfLocate the #TLS Parameters section. Comment out ALL of the lines underneath this section and paste the below code block to the file. But ensure you modify the location to your SSL certificate.
# TLS parameters
smtpd_tls_cert_file=/etc/letsencrypt/live/m1.relay.gb.net/fullchain.pem
smtpd_tls_key_file=/etc/letsencrypt/live/m1.relay.gb.net/privkey.pem
smtpd_tls_security_level=may
smtpd_tls_loglevel = 1
smtp_tls_session_cache_database = btree:${data_directory}/smtp_scache

# Use TLS Encryption when Postfix sends outgoing emails
smtp_tls_security_level = may
smtp_tls_loglevel = 1
smtp_tls_session_cache_database = btree:${data_directory}/smtp_scache

# Force TLSv1.3 or TLSv1.2
smtpd_tls_mandatory_protocols = !SSLv2, !SSLv3, !TLSv1, !TLSv1.1
smtpd_tls_protocols = !SSLv2, !SSLv3, !TLSv1, !TLSv1.1
smtp_tls_mandatory_protocols = !SSLv2, !SSLv3, !TLSv1, !TLSv1.1
smtp_tls_protocols = !SSLv2, !SSLv3, !TLSv1, !TLSv1.1
Save and close the file then restart Postfix to complete the install of Dovecot
systemctl restart postfixMagic. With the Dovecot install completed, the Postfix email server should be listening on secure ports. Use ss -lnpt | grep master to check. The output will be similar to below.
LISTEN 0      100          0.0.0.0:25        0.0.0.0:*    users:(("master",pid=11530,fd=13))
LISTEN 0      100          0.0.0.0:587       0.0.0.0:*    users:(("master",pid=11530,fd=18))
LISTEN 0      100          0.0.0.0:465       0.0.0.0:*    users:(("master",pid=11530,fd=22))
LISTEN 0      100             [::]:25           [::]:*    users:(("master",pid=11530,fd=14))
LISTEN 0      100             [::]:587          [::]:*    users:(("master",pid=11530,fd=19))
LISTEN 0      100             [::]:465          [::]:*    users:(("master",pid=11530,fd=23))
Configure Dovecot
So next we will configure Dovecot for IMAP and POP3. The first file to edit is the main Dovecot configuration file located at /etc/dovecot/dovecot.conf.
nano /etc/dovecot/dovecot.confAdd the following line in the file.
protocols = imap pop3 lmtpConfigure Mailbox Type & Location
Most mail servers tend to use the mbox email format by default. That means all mail is stored in a file. These days, we tend to use the newer maildir format, Is much more efficient. Open up the /etc/dovecot/conf.d/10-mail.conf file and change the setting from mbox to maildir.
nano /etc/dovecot/conf.d/10-mail.confFind the line;
mail_location = mbox:~/mail:INBOX=/var/mail/%uComment it out and add mail_location = maildir:~/Maildir. The file will look like this;
#mail_location = mbox:~/mail:INBOX=/var/mail/%u
mail_location = maildir:~/Maildir
By default, Postfix will use its local delivery agent (LDA) to deliver messages to folders. This uses the older mbox format. We need to ensure Postfix passes all emails to Dovecot for delivery. To achieve this we installed the Dovecot lmtpd server earlier on in this article. Open up the /etc/dovecot/conf.d/10-master.conf file.
nano /etc/dovecot/conf.d/10-master.confInside the file locate the service lmtp code block. In the default form, it will look like this;
service lmtp {
  unix_listener lmtp {
    #mode = 0666
  }

  # Create inet listener only if you can't use the above UNIX socket
  #inet_listener lmtp {
    # Avoid making LMTP visible for the entire internet
    #address =
    #port =
  #}
}
Change the block to reflect this.
service lmtp {
 unix_listener /var/spool/postfix/private/dovecot-lmtp {
   mode = 0600
   user = postfix
   group = postfix
  }
}
Save and close that file. Next, open up the /etc/postfix/main.cf file.
nano /etc/postfix/main.cfInside the main.cf file. Add the below lines to the end of the file.
mailbox_transport = lmtp:unix:private/dovecot-lmtp
smtputf8_enable = no
Save and close the file. Next, install the Dovecot LMTPD module.
apt install dovecot-lmtpdConfigure Dovecot Authentication
In Dovecot, the /etc/dovecot/conf.d/10-auth.conf file controls authentication. Open up the file.
nano /etc/dovecot/conf.d/10-auth.confUncomment the following line.
disable_plaintext_auth = yesAnd then find the section auth_username_format. Uncomment it and change the end from %Lu to %n. It will look like this after the edits.
auth_username_format = %nBy making these edits you are telling Dovecot to use the username and not the email address to find users. We are using system accounts so if we left this, Dovecot would not be able to find the correct user to deliver mail to.
Next, find the line auth_mechanisms and append login to the end of the line. That will look like this after the edits.
auth_mechanisms = plain loginSave and close the file.
Configure Dovecot SSL/TLS
Dovecot controls SSL/TLS settings in the /etc/dovecot/conf.d/10-ssl.conf file. Open the file.
nano /etc/dovecot/conf.d/10-ssl.confAt the top modify the ssl = yes to ssl = required. Below this line specify the location of your Let’s Encrypt SSL certificate. After the modifications, the file will look similar to the below code block.
# SSL/TLS support: yes, no, required. <doc/wiki/SSL.txt>
ssl = required

# PEM encoded X.509 SSL/TLS certificate and private key. They're opened before
# dropping root privileges, so keep the key file unreadable by anyone but
# root. Included doc/mkcert.sh can be used to easily generate self-signed
# certificate, just make sure to update the domains in dovecot-openssl.cnf

ssl_cert = </etc/letsencrypt/live/m1.relay.gb.net/fullchain.pem
ssl_key = </etc/letsencrypt/live/m1.relay.gb.net/privkey.pem
NOTE: Dovecot is expecting the </ section to be present in the SSL configuration. Do not remove the </ from the two lines.
Also in the same file find the ssl_prefer_server_ciphers line and uncomment it. Remove no from the end and append yes. Next, find the ssl_min_protocol line. We want to disable insecure connections. The minimum TLS version we will use is TLS 1.2. Remove the comment from the ssl_min_protocol line. The file now looks like this.
# Minimum SSL protocol version to use. Potentially recognized values are SSLv3,
# TLSv1, TLSv1.1, TLSv1.2 and TLSv1.3, depending on the OpenSSL version used.
#
# Dovecot also recognizes values ANY and LATEST. ANY matches with any protocol
# version, and LATEST matches with the latest version supported by library.

ssl_min_protocol = TLSv1.2

# SSL ciphers to use, the default is:
#ssl_cipher_list = ALL:!kRSA:!SRP:!kDHd:!DSS:!aNULL:!eNULL:!EXPORT:!DES:!3DES:!MD5:!PSK:!RC4:!ADH:!LOW@STRENGTH
# To disable non-EC DH, use:
#ssl_cipher_list = ALL:!DH:!kRSA:!SRP:!kDHd:!DSS:!aNULL:!eNULL:!EXPORT:!DES:!3DES:!MD5:!PSK:!RC4:!ADH:!LOW@STRENGTH

# Colon separated list of elliptic curves to use. Empty value (the default)
# means use the defaults from the SSL library. P-521:P-384:P-256 would be an
# example of a valid value.
#ssl_curve_list =

# Prefer the server's order of ciphers over client's.

ssl_prefer_server_ciphers = yes
Disable FIPS Providers in OpenSSL
If you are using Ubuntu 22 +, it ships with OpenSSL 3.0 and includes FIPS providers. Dovecot is not currently compatible with FIPS so we must disable it. Open up the /etc/ssl/openssl.cnf file and search (CNTRL +W for nano) for providers = provider_sect. Place a comment in front of this statement to disable it.
#providers = provider_sectConfigure Dovecot SASL Authentication
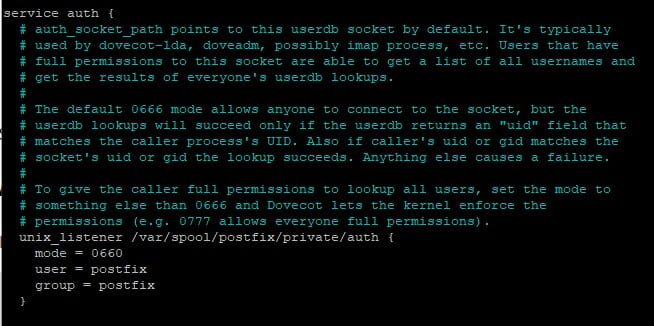
Back in the /etc/dovecot/conf.d/10-master.conf file. Use CNTRL +W to find the service auth section. Modify it to as below.
service auth {
    unix_listener /var/spool/postfix/private/auth {
      mode = 0660
      user = postfix
      group = postfix
    }
}
The file now looks like this.
Automatically Create Mailbox Folders
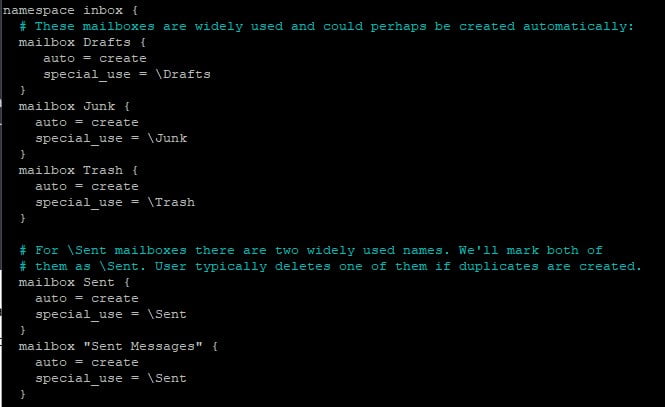
In Dovecot we can control settings related to mailboxes in the /etc/dovecot/conf.d/15-mailboxes.conf file. Open up the file and find the below section. You can’t miss it.
# NOTE: Assumes "namespace inbox" has been defined in 10-mail.conf.
namespace inbox {
  # These mailboxes are widely used and could perhaps be created automatically:
  mailbox Drafts {
    special_use = \Drafts
  }
  mailbox Junk {
    special_use = \Junk
  }
  mailbox Trash {
    special_use = \Trash
  }

  # For \Sent mailboxes there are two widely used names. We'll mark both of
  # them as \Sent. User typically deletes one of them if duplicates are created.
  mailbox Sent {
    special_use = \Sent
  }
  mailbox "Sent Messages" {
    special_use = \Sent
  }
Modify the statements to include auto = create. This will automatically create the Drafts, Junk, Trash and Sent folders for users. The code blocks look like this after the edits.
BOOM. Save and close the file. Then restart Postfix and Dovecot.
systemctl restart dovecot postfixDovecot and Postfix should now have restarted and should also be listening on ports 143 and 994.
ss -lnpt | grep dovecot

LISTEN 0      100          0.0.0.0:993       0.0.0.0:*    users:(("dovecot",pid=14053,fd=42))
LISTEN 0      100          0.0.0.0:995       0.0.0.0:*    users:(("dovecot",pid=14053,fd=23))
LISTEN 0      100          0.0.0.0:110       0.0.0.0:*    users:(("dovecot",pid=14053,fd=21))
LISTEN 0      100          0.0.0.0:143       0.0.0.0:*    users:(("dovecot",pid=14053,fd=40))
LISTEN 0      100             [::]:993          [::]:*    users:(("dovecot",pid=14053,fd=43))
LISTEN 0      100             [::]:995          [::]:*    users:(("dovecot",pid=14053,fd=24))
LISTEN 0      100             [::]:110          [::]:*    users:(("dovecot",pid=14053,fd=22))
LISTEN 0      100             [::]:143          [::]:*    users:(("dovecot",pid=14053,fd=41))
Test Dovecot & Postfix
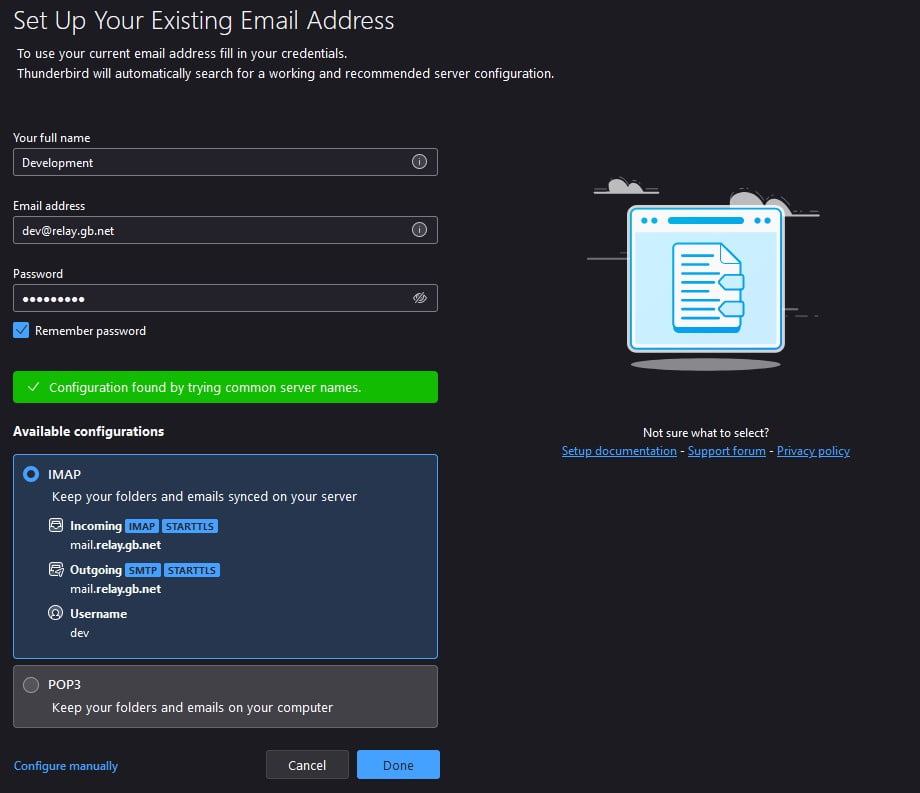
And that’s Dovecot configured for TLS/SSL connections. It’s time to test our work so far. In the edits above we have already made sure Dovecot will work for most email clients like Thunderbird and Outlook. So, create a new user in Linux using adduser. We have created the user Development for this test.
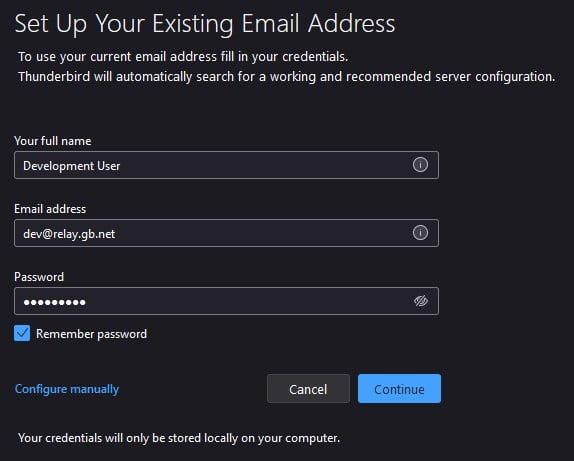
Thunderbird will scan the most common mail settings. You may have noticed our Postfix email server has the hostname m1.relay.gb.net. But in the images below our mail client picked up the mail.relay.gb.net address. We configured an A record for mail.relay.gb.net in the previous article because most modern email clients will scan the mail server for locations like mail.domain.com.
If we wanted to use this, we would need to add a security exception to Thunderbird because our SSL is for m1.relay.gb.net. Assuming you have used a default address like mail.domain.com for your Postfix email server you should not have to worry about this. However, if you used a custom hostname like us, you would need to configure email accounts manually.
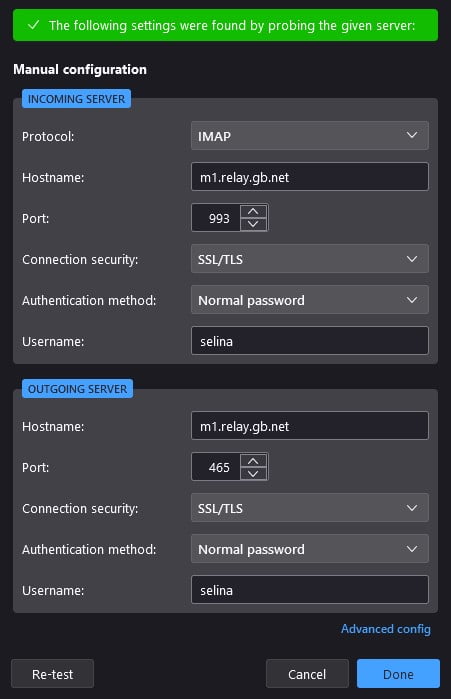
Configure Email Client Manually
For email servers that have a custom hostname, email clients will likely fail automated configuration. To deploy an email account manually use the below settings. But ensure you switch out our user and domain for your own.
STARTTLS
When trying to connect using STARTTLS the following ports apply.
- Hostname – Server Hostname
- Incoming port – 143
- Outgoing port 587
- Normal Password
SSL/TLS
- Hostname – Server Hostname
- Incoming port – 993
- Outgoing port 465
- Normal Password
Configure Automated SSL Renewal
To ensure Certbot renews our SSL we just need to add a cronjob to the crontab. Open up the /etc/crontab file and add the below line. The cron is the same for everyone.
crontab -e

@monthly certbot renew --quiet && systemctl reload dovecot postfix
That’s all for this article. We install Dovecot on our Postfix server. Next, we configured Dovecot to use SSL/TLS authentication and deployed multiple email accounts to an email client. We have confirmed that email can be sent and received from our Postfix NVMe VPS server. In the next article in this series, we will look at PostfixAdmin and how to create a high-availability email platform. See you on the other side.
Next Article – Part 3 – Configure Postfix DKIM & SPF Records