


Memcached is an in-memory caching function that allows fast access and low-latency caching for PHP applications. Used by major companies like Facebook and Slack Memcached is an object caching system that is primarily used to cache results from database queries. The caching of database results allows for fast, repeated access for PHP applications with lower processing costs. We will look to install Memcached and configure Memcached on cPanel.
Memcached isn’t suitable for all types of hosting environments “out of the box”. So, If you plan to use Memcached on a dedicated server there are further prerequisites that need to be addressed. Those are outside the scope of this guide. In this guide, we are installing Memcached on a High Availability cPanel virtual server.
How Does Memcached Work?
So usually, database information is contained on your hard drive. Even if your drive is NVMe-based, the resulting query would still take a lot longer than querying the server’s RAM. So that’s where Memcached comes into play. The first time a query is made, PHP will search the Memcached cache for the resulting answer. So, If the answer is not in the cache, PHP will query the database and store the resulting information in the cache for the next query. When the Memcache cache is full, Memcached will automatically remove the least used results from the cache. But it will also set a time limit on cache results to ensure any stale data is removed.
Install PHP Memcached cPanel
So first, let’s install Memcached in our cPanel NVMe VPS Server. Issue the below command to install and enable Memcached.
yum install memcached && systemctl enable memcachedConfigure Memcached cPanel
So now we have Memcached installed we must make some changes to its default configuration. They help prevent DDoS attacks and disable UDP. It’s a common target. We also need to bind Memchaced to the server’s local address to prevent abuse.
nano /etc/sysconfig/memcachedChange the last line in the Memcached file so it reads this;
OPTIONS="-l 127.0.0.1 -U 0"But it’s also a good idea to increase the capacity of the cache. It’s a good idea to put this at 128MB. So to increase the cache size, just modify the value in the CACHESIZE=”128″. The file should look like this.

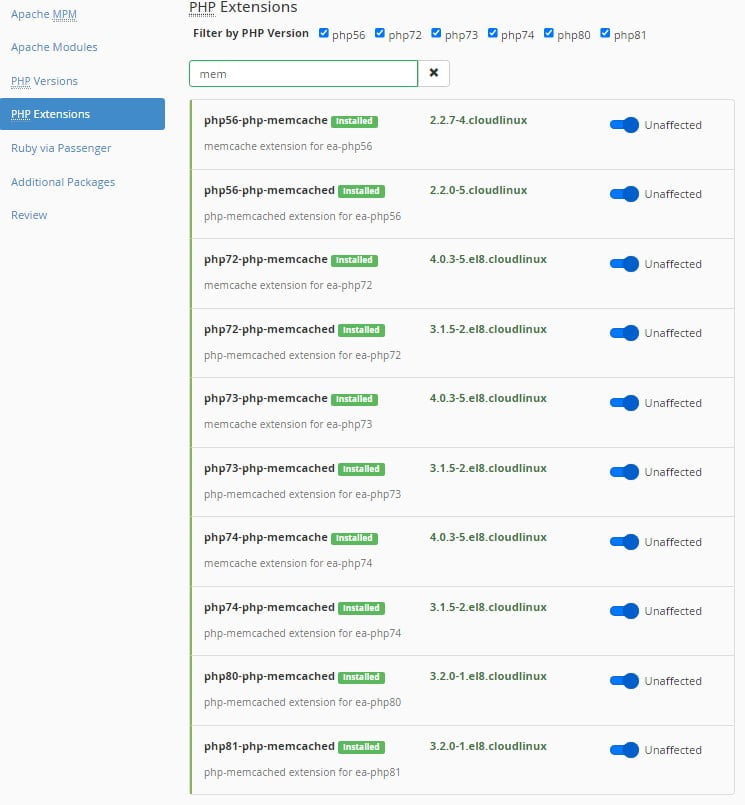
Save and close the file. Now we need to install the Memcached PHP modules, this is completed in Easy Apache 4. From WHM select Easy Apache 4 then Customize, from the PHP Extensions page select Memcache and Memcached.
Confirming This Worked
To confirm this has worked and PHP Memcached is now installed and working. Query Easy Apache. So to confirm Memcached is working for PHP 8.1 the command would be as follows;
ea-php81 -i | grep "memcached"
So the returned information will look a lot like the below output.
/opt/cpanel/ea-php81/root/etc/php.d/memcached.ini,
memcached
memcached support => enabled
libmemcached version => 1.0.18
memcached.compression_factor => 1.3 => 1.3
memcached.compression_threshold => 2000 => 2000
memcached.compression_type => fastlz => fastlz
memcached.default_binary_protocol => Off => Off
memcached.default_connect_timeout => 0 => 0
memcached.default_consistent_hash => Off => Off
memcached.serializer => php => php
memcached.sess_binary_protocol => On => On
memcached.sess_connect_timeout => 0 => 0
memcached.sess_consistent_hash => On => On
memcached.sess_consistent_hash_type => ketama => ketama
memcached.sess_lock_expire => 0 => 0
memcached.sess_lock_max_wait => not set => not set
memcached.sess_lock_retries => 5 => 5
memcached.sess_lock_wait => not set => not set
memcached.sess_lock_wait_max => 150 => 150
memcached.sess_lock_wait_min => 150 => 150
memcached.sess_locking => On => On
memcached.sess_number_of_replicas => 0 => 0
memcached.sess_persistent => Off => Off
memcached.sess_prefix => memc.sess.key. => memc.sess.key.
memcached.sess_randomize_replica_read => Off => Off
memcached.sess_remove_failed_servers => Off => Off
memcached.sess_sasl_password => no value => no value
memcached.sess_sasl_username => no value => no value
memcached.sess_server_failure_limit => 0 => 0
memcached.store_retry_count => 0 => 0
Registered save handlers => files user memcached
An that’s it, Memcached has now been installed and configured on your cPanel VPS server.