


Exim is a mail server that deals with the sending and receiving of email. It allows users to send mail from clients like Outlook or Webmail applications. We’re going to set up a CentOS Exim email server and configure it to allow the sending of mail from specific domains and IPs. We’re using an NVMe VPS with a 10GB hard drive and 2GB RAM. Your email server doesn’t have to be large or powerful to set up Exim. This is going to take a while. At least an hour. If you want to use Debian or Ubuntu see how to Install Exim Email in Ubuntu/Debian Servers.
This article is part of a series of articles about setting up an Exim Email Server on CentOS. It will also work on Rocky Linux and AlmaLinux.
- Set up a CentOS Exim Email Server (This article)
- Set up Exim Email Aliases
- Install RoundCube To Access Webmail
- Use your Exim Email Server as a SmartHost Relay
Setting The DNS Records
The first thing to configure is the DNS records. Each company has a different way to do this. If you are using a domain name you have just purchased from First2Host you can add these DNS records in your client area. Add the entries below switching the 192.168.0.1 IP for your server IP and yourdomain.com for your domain name.
A Record	mail	192.168.0.1	Auto
A Record	@	    192.168.0.1	Auto
TXT Record	@	v=spf1 a a:mail.yourdomain.com -all	Auto
MX Record	@	mail.youdomain.com	Auto
Next, ensure you have a reverse DNS entry setup. Contact the support team for this from your client area.
Activate And Configure Firewall
We’re going to secure the email server with firewalld. Closing all ports except the email ports. We will also change the SSH port for increased security. You could install CSF if you didn’t want to use FirewallD.
systemctl start firewalld
systemctl enable firewalld
Disable SeLinux by changing enforcing to disabled in the SeLinux configuration file.
nano /etc/selinux/configChange SSH Port
Using nano or another editor open up the sshd_config file and change the port to a custom number. Just remove the # in front of 22 and replace the 22 with your port number. You must open this port in your firewall. See open a port in firewalld
nano /etc/ssh/sshd_configNow restart SSH.
systemctl restart sshdWhitelist Your IP
It’s a good idea to whitelist your IP. You can whitelist as many IPs as you like.
firewall-cmd --zone=trusted --add-source=54.52.68.74 --permanentOpen Email Ports
Open up the email ports so you can communicate with another mail server. These are the only ports we are going to open apart from SSH. These firewall commands keep the email ports open on reboot.
firewall-cmd --zone=public --add-service=pop3 --permanent
firewall-cmd --zone=public --add-service=pop3s --permanent
firewall-cmd --zone=public --add-service=smtp --permanent
firewall-cmd --zone=public --add-service=smtps --permanent
firewall-cmd --zone=public --add-service=imap --permanent
firewall-cmd --zone=public --add-service=imaps --permanent
Set Hostname & Update Server
Now you need to ensure your hostname is correctly set. We already set up A records for this at the beginning. We set an A record for mail.yourdomain.com so your hostname should also be mail.yourdomain.com.
hostnamectl set-hostname mail.yourdomain.com
domainname domainname mail.yourdomain.com
In the /etc/hosts file ensure you have the correct IP and your hostname. It will look something like this;
nano /etc/hosts192.168.0.1 mail.yourdomain.comNow install the EPEL repo and update the server
yum -y install epel-release
yum -y update
You should now be able to ping your hostname and get a response from your server. Assuming your hostname is resolving to your server next we need to get a certificate for your hostname.
Generate SSL Certificate
Let’s Encrypt makes this super easy. We will install Certbot to get a certificate for our email server. First, stop the firewall using systemctl. Then generate a certificate for your hostname and set the correct permissions. Remember to start the firewall again.
systemctl stop firewalld

yum -y install certbot
certbot certonly -d mail.yourdomain.com

chmod a+rx /etc/letsencrypt/live
chmod a+rx /etc/letsencrypt/archive
chmod 0644 /etc/letsencrypt/live/mail.yourdomain.com/privkey.pem

systemctl start firewalld
Install CentOS Exim Mail Server & Configure
Now let’s get the mail server installed and set up. Theirs a few edits we need to make to Exim to get our email server working right. We have also included our exim.conf file with notations.
yum -y install eximnano /etc/exim/exim.confChange the following sections
# Add the following section to the top of the exim.conf file. This stops exim from rewriting thee sender address which would fail the SPF check

untrusted_set_sender = *
no_local_from_check

# Change the following sections
primary_hostname = mail.yourdomain.com

domainlist local_domains = @ : localhost : localhost.localdomain : smarthost.email : mail.yourdomain.com

hostlist relay_from_hosts = localhost : IP-YOU-SEND-FROM

# Add your SSL
tls_certificate = /etc/letsencrypt/live/mail.example.com/fullchain.pem

tls_privatekey  =
/etc/letsencrypt/live/mail.example.com/privkey.pem

# Remove the comments from the following lines

auth_advertise_hosts = ${if eq {$tls_cipher}{}{}{*}}
auth_advertise_hosts =

# Under the Local Delivery, change it to reflect the below

local_delivery:
driver = appendfile
directory = $home/Maildir
maildir_format
maildir_use_size_file
delivery_date_add
envelope_to_add
return_path_add

# Under the authenticator's section, add these two blocks

dovecot_login:
 driver = dovecot
 public_name = LOGIN
 server_socket = /var/run/dovecot/auth-client
 server_set_id = $auth1

dovecot_plain:
 driver = dovecot
 public_name = PLAIN
 server_socket = /var/run/dovecot/auth-client
 server_set_id = $auth1
Save and close the Exim.conf file. Next, we tell Linux that we are using Exim to send mail
alternatives --set mta /usr/sbin/sendmail.eximTest Exim.conf File
Test your Exim configuration to ensure you have made no mistakes. If there are errors these need to be corrected. You must edit the right sections.
exim -C /etc/exim/exim.conf -bVIf all is well, start Exim and enable it so it starts on boot.
systemctl start exim
systemctl enable exim
Install & Configure Dovecot
Dovecot is going to be authenticating users to use the mail server. We set this under the authenticator’s section in the exim.conf file.
yum -y install dovecotNow set the certificate paths for Dovecot to use.
nano /etc/dovecot/conf.d/10-ssl.confssl_cert = </etc/letsencrypt/live/mail.example.com/fullchain.pem
ssl_key = </etc/letsencrypt/live/mail.example.com/privkey.pemNext, ensure your SSL Key can be read
chmod 0644 /etc/letsencrypt/live/mail.example.com/privkey.pemNext, set the authentication rules. We’re authenticating over SSL with plain text.
nano /etc/dovecot/conf.d/10-auth.confdisable_plaintext_auth=no
auth_mechanisms = plain loginNow we need to set the mailbox locations.
nano /etc/dovecot/conf.d/10-mail.confmail_location = maildir:~/MaildirAnd finally, we need to allow Exim to talk to Dovecot so it can authenticate. You must add this to the service block.
nano /etc/dovecot/conf.d/10-master.confservice auth {
#...
#...
unix_listener auth-client {
mode = 0660
user = exim
}
#...
#...
}Enable Dovecot and set Dovecot to start on boot.
systemctl start dovecot
systemctl enable dovecot
That’s the main setup of your CentOS Exim email server completed. Right now we have installed Exim, configured Exim to authenticate using Dovecot, and only allow relaying from a specific IP. So now we need to create an email account and test our mail server. In the exim.conf file earlier we uncommented the auth_advertise_hosts = ${if eq {$tls_cipher}{}{}{*}} line. This tells Exim we’re using Linux accounts to authenticate users so we need to add a Linux user.
Adding An Email Account & Managing Users
To add an email account create a Linux user. Assign that user to the Exim group and ensure SSH logins are disabled. To create the email account [email protected] and set a password
Create Email Account
adduser -g exim -s /usr/sbin/nologin server
passwd server
Delete Email Account
userdel -r serverSend Your First Email
Now you are ready to try and send an email. Assuming you copied the instructions here exactly you should have no problems. We have attached the setting we have used to connect to our email account. Remember to tick the option “My outgoing server requires authentication” on the “Outgoing” tab.
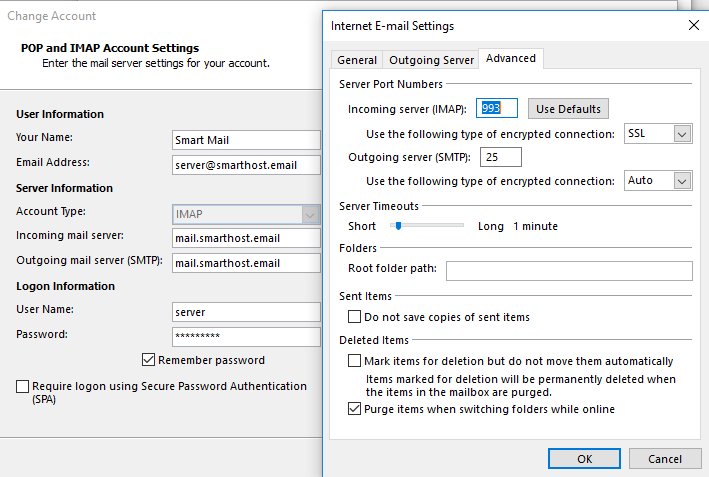
Here we have set up an Exim email server and configured Exim to use Dovecot to authenticate users. We have added the required DNS entries and created an email account. We have been able to send a test email and receive mail to our new account.