


We’re helping customers to increase the security of their F2H instances in a number of ways. First, we disable the root account on all instances by default. Next, during the instance install and reinstall we configure a user account. Finally, customers can also choose to use a Linux SSH key to access their instance. We’re going to set up SSH keys in a Linux Server and use these keys to access instances without a password. This guide covers how to provide your SSH key in the Discovery control panel which will be installed when you reinstall your instance. And also how to set up SSH keys and add your SSH keys to an already running instance.
Generate An SSH Keypair
SSH keys in Linux Servers consist of a public key and a private key. You give out the public SSH key and keep the private SSH key secure. We advise you to store your SSH keys in an external USB key or a service like Onedrive where you can sync the key over multiple devices. Do not lose your private SSH key. If you do, you could lose access to your instance. To generate your keypair. Login to your server and issue the ssh-keygen command.
ssh-keygen -t rsaYou will now be asked a number of questions;
- Enter the file in which to save the key (/root/.ssh/id_rsa)
- Press enter to store the key at the default location
- Enter passphrase (empty for no passphrase)
- If you want to enter a password each time you use your key. Enter it now.
Your public key has been saved in /root/.ssh/id_rsa.pub.
 The key fingerprint is:
 SHA256:MXLkhd/TKyX89UB4TmM6iXLaAKvILFNsFb1ZhipNuJM f2h@f2h-fr-x26.first2host.co.uk
 The key's randomart image is:
 +---[RSA 3072]----+
 |   ..o ….  .   |
 |  . o +G+.  . *  |
 | . % ..B=. + Z . |
 |  C o -ooo+ O = .|
 | = + .  Z*   * +.|
 |o - .   . . . o .|
 | o           .   |
 |                 |
 |                 |
 +----[SHA256]-----+
You will see the Linux SSH key has been generated. In our example the default location /root/.ssh/ stores both the private SSH key and the public SSH key. To list your public key issue the below command. Remember to update the location if you choose a custom one above.
cat /root/.ssh/id_rsa.pubSet Up Linux SSH Keys On New Instances
If you are ordering a new NVMe VPS or reinstalling your current instance, you can supply your public key so it can be configured during setup. To supply your SSH key on a new order just enter your public SSH key on the order form.
Add SSH Key To Existing Discovery Instance
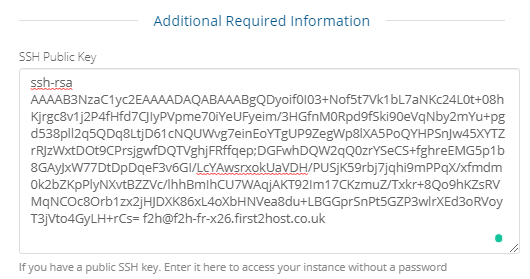
If you already have a discovery instance, you can install your SSH key in a number of ways. If you are reinstalling your instance, add your public ssh key to the Discovery control panel.
- Under Instance Information click the pencil icon to the right.

- Add your SSH key at the bottom and click save.
Now if you reinstall your instance the SSH key will be set up in your server automatically.
Add SSH Public Key To Existing Server
You can add your public key to existing servers by using the ssh-copy-id command. So, just specify the location of your public key and the server that you want to install the key on.
ssh-copy-id -i /root/.ssh/id_rsa.pub root@177.23.7.330And now, you can log in to your server without a password by issuing the ssh root@server-ip command.