

Install AutoMySQLBackup to Backup Databases In Linux Servers

With the very nature of MySQL databases, they tend to hold precious information. That’s why you must have a backup policy to keep this information safe. You have several options to backup MySQL databases on Linux servers. You can write a quick bash script to dump the databases to a secure storage server. Or you can use a free MySQL Backup program called AutoMySQLBackup. If you are using this program you will likely want to store any backups generated off the server. See our article on how to sync files and folders from Linux servers to OneDrive. Let’s install AutoMySQLBackup and configure a database backup.
Install AutoMySQLBackup
Issue the commands that relate to your OS Distribution. On CentOS, RHEL and AlamLinux you need to download the packages to your server and unzip them.
# Debian / Ubuntu

apt install automysqlbackup

# CentOS / Red Hat / Fedora /

mkdir -p /var/mysqlbackup

wget https://cdn.f2h.cloud/servers/automysqlbackup-v3.0_rc6.tar.gz

tar zxvf automysqlbackup-v3.0_rc6.tar.gz -C /var/mysqlbackup
Configure AutoMySQLBackup
Now that you have AutoMySQLBackup installed on your VPS Server it’s time to configure it. It’s really simple. If you installed using apt the configuration file is located /etc/default/automysqlbackup. Otherwise, it’s located in the folder you just downloaded.
nano /etc/default/automysqlbackup

nano /var/mysqlbackup/automysqlbackup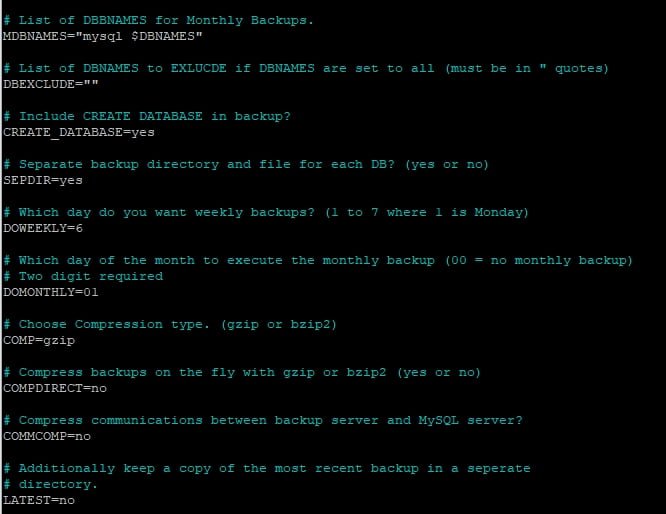
So, the defaults in this file should be fine for most people and most use cases. AutoMySQLBackup will dump the required databases every day at the specified time. In the file, you will want to change the following sections. But don’t save your backups to the same server. What would be the point? Use a remote location like an NFS Server. You can create one for a few pounds from an NVMe VPS.
# Set backup directory

BACKUPDIR="/backup/mysql"
The configuration file for AutoMySQLBackup is well-commented and self-explanatory. Enable the options you require. On RHEL-based solutions, you must specify database details. This is not required on Ubuntu or Debian systems.
Take First Backup of MySQL Databases
So now let’s take our first backup. Our backup will be stored on a mounted NFS server that is attached to our cluster. Issue the command to start. You may want to run this in a separate screen if you have a large database.
automysqlbackupAfter the backup is complete, if we inspect the backup location we can see our MySQL Database Backups located there.
ls -ltr /backup/mysql/daily/dbcom
total 2501632
-rw------- 1 nobody nogroup 853738066 Jun 22 23:27 dbcom_2022-06-22_23h25m.Wednesday.sql.gz
-rw------- 1 nobody nogroup 853962503 Jun 23 19:28 dbcom_2022-06-23_19h26m.Thursday.sql.gz
-rw------- 1 nobody nogroup 853952900 Jun 24 04:16 dbcom_2022-06-24_04h15m.Friday.sql.gz
AutoMySQLBackup will store backups in the daily, weekly and monthly folders. So what about restoring an AutoMySQLBackup?
Restore AutoMySQL Database Backup
Restoring a MySQL Database Backup taken using AutoMySQL is as simple as a few commands. Or, it’s supposed to be. This is free software so we can’t complain too much. In the example above. We can see our latest backup is dbcom_2022-06-24_04h15m.Friday.sql.gz. The instructions state we can import this to MySQL. Let’s try.
mysql -u root -p blogrep < /backups/mysql/daily/dbcom_2022-06-24_04h15m.Friday.sql.gzHowever, this produces an error because the file is compressed. So first to restore an AutoMySQLBackup you may need to decompress it and then import it to MySQL. After decompressing the file you will see your .SQL dump. Move into the backup folder containing the database and decompress the SQL file. Then just import it to MySQL.
cd /backups/mysql/daily/

gzip -d /backups/mysql/daily/<strong>dbcom_2022-06-24_04h15m.Friday.sql.gz

mysql -u root -p blogrep < /backups/mysql/daily/dbcom_2022-06-24_04h15m.Friday.sql
Schedule MySQL Database Backup
To automate AutoMySQLBackups just add a corn entry to run the automysqlbackup command. The following cron would run every day at 19:06.
nano /etc/crontab

6 19 * * * automysqlbackup >/dev/null 2>&1
That’s it. You are now taking backups of your MySQL Databases with AutoMySQLBackup and we have learnt how to restore AutoMySQLBackups to our MySQL Server. AutoMySQLBackup uses the cron.daily, cron.weekly and cron.monthly jobs to run. You can change the time of these in the /etc/crontab file