


Since the demise of CentOS, many people are looking towards Ubuntu and Debian to take advantage of their LTS versions. LTS versions of software provide server administrators will a guarantee that an Operating System will receive critical updates for a set period. This reduces the need of having to perform risky Operating System updates. We’ve covered how to install Exim in CentOS servers so let’s look at how to install Exim email in Ubuntu and Debian Servers. We will go through the basic configuration to allow us to send mail via our NVMe VPS Server. We’re going to use the package manager to configure Exim and we will also install DoveCot in Ubuntu/Debian to handle secure authentications.
Configure Exim DNS Records
Before we start, ensure your server’s hostname resolves to your server. Configure your server’s hostname and set the DNS records below. In this guide, we are using the first2host.com domain name as an example.
hostnamectl set-hostname mail.first2host.com

A Record	mail	192.168.0.1	Auto
A Record	@	    192.168.0.1	Auto
TXT Record	@	v=spf1 a a:mail.first2host.com -all	Auto
MX Record	@	mail.first2host.com	Auto
Install SSL Certificate
Next, generate an SSL certificate for the hostname of the Ubuntu/Debian Exim email server. Your hostname should be resolving to the IP of the server assuming you have configured the correct DNS entries. Later on, we will install Dovecot in Ubuntu/Debian and configure Dovecot to use this SSL.
apt install certbot -y

certbot certonly -d mail.firs2thost.com
Choose option 1 to spin up a webserver. Once generated the SSL is stored in the default location which is always /etc/letsencrypt/live/mail.domain.com. CHMOD the folders and certificates as below.
chmod a+rx /etc/letsencrypt/live
chmod a+rx /etc/letsencrypt/archive
chmod 0644 /etc/letsencrypt/live/mail.yourdomain.com/privkey.pem
chmod 0644 /etc/letsencrypt/live/mail.yourdomain.com/fullchain.pem
Install Exim Ubuntu/Debian
To install Exim on Ubuntu and Debian servers, ensure your server is fully updated. Then, install Exim in Ubuntu/Debian using the commands below.
apt update && apt upgrade -y

apt install exim4
Install Dovecot Ubuntu/Debian
Dovecot will handle logins to our email server. Install Dovecot in Ubuntu/Debian with the IMAPD and POP3D modules.
apt install dovecot-imapd dovecot-pop3dConfigure Exim Ubuntu/Debian
Now it’s time to start configuring your Ubuntu/Debian Exim email server. This is going to take some time. First, start the Exim package manager.
dpkg-reconfigure exim4-config
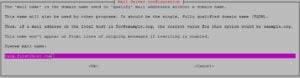
Since we want to send mail via this Exim email server we select “Internet Site”. We’re assuming you don’t want to set up a SmartHost. This server will send and receive email for us.
On the next page configure the hostname of the server. Your hostname should already be resolving to your server. Our Exim mail server will be called mail.first2host.com.

This listening address for Exim stipulates what interfaces Exim will listen on. The default is to listen on 127.0.0.1 which will allow you to send mail from only local IP addresses. We want Exim to listen on all interfaces so you can remove the default 127.0.0.1 address and leave this blank. Exim will listen on IPv4 and IPv6.
Local Domains

Local domains are domains that will be used to send mail on this server. We are using first2host.com in these examples. Enter the domain which you will use to send email in this box.
Relay Domains
Relay domains are domains that are allowed to send mail to the Exim email VPS server from anywhere on the internet. So, if you want to send and receive mail from other domains enter them here or skip this section. But do not enter local domains here.
SmartHost
SmartHosts deal with email from other email servers. As we are setting up a standalone Exim email server you can skip this section.
DNS Configuration
Exim in Ubuntu and Debian servers can perform DNS lookups on demand. This is useful if your email server doesn’t always have an active connection. “Dial Up”. This setting is not relevant in our environment so you can skip this step. Choose no.
Email Format

Exim can use two types of mail formats. The older mbox format stores mail in one large file and the newer Maildir format splits mail into multiple files. The latter is considered faster and can better handle large mailboxes and even clustering. Choose Maildir.
So now it’s time to decide how you would like the Exim configuration to be built. You can choose to split the configuration files into smaller files or keep one large configuration file. The default is to choose NO to keep one large file. On the next screen. Enter an email that will receive mail for system accounts. You are now back at the command line.
Configure Exim Secure Ports
We want Exim to use the SSL Certificate we generated above. This will allow TLS logins to be used. Without following this section you will only be able to use insecure ports to send and receive email. First, tell Exim to listen on secure ports.
nano /etc/exim4/update-exim4.conf.confLocate the dc_local_interfaces= line and modify it so it reflects the below.
dc_local_interfaces='<; [0.0.0.0]:465; [0.0.0.0]:587; [0.0.0.0]:25'You can add more ports on IPv4 and IPv4. This section can be configured at the start with the package manager if required. Later on in this article, we will send test emails. To send email we need to whitelist our IP. If you do not allow your IP to connect to the server you won’t be able to send any mail. Locate the dc_relay_nets= section and enter the IPs you will send mail from. For example, if you plan to use a desktop client like Outlook or Thunderbird but use a VPN. You will need to whitelist your VPN IP.
Our update-exim4.conf.conf file looks like this after the modifications.
dc_eximconfig_configtype='internet'
dc_other_hostnames='first2host.com:mail.first2host.com'
dc_local_interfaces='<; [0.0.0.0]:465; [0.0.0.0]:587; [0.0.0.0]:25'
dc_readhost=''
dc_relay_domains='first2host.com'
dc_minimaldns='false'
dc_relay_nets='51.xXx.251.20/32'
dc_smarthost=''
CFILEMODE='644'
dc_use_split_config='false'
dc_hide_mailname=''
dc_mailname_in_oh='true'
dc_localdelivery='maildir_home'
Configure Exim SSL Certificate
In Exim’s default form, Exim is expecting the certificates to be located at /etc/exim4/exim.crt and /etc/exim4/exim.key. So we can copy our Let’s Encrypt certificate to these locations.
cp /etc/letsencrypt/live/mail.first2host.com/fullchain.pem /etc/exim4/exim.crt
cp /etc/letsencrypt/live/mail.first2host.com/privkey.pem /etc/exim4/exim.key
And in the /etc/exim4/conf.d/main/03_exim4-config_tlsoptions file we need to make some minor adjustments. Add the below line to the file.
nano /etc/exim4/conf.d/main/03_exim4-config_tlsoptionsMAIN_TLS_ENABLE = yesThe following lines should also be in this file by default. If they are not in the file. Add them.
tls_certificate = MAIN_TLS_CERTKEY
MAIN_TLS_CERTIFICATE = CONFDIR/exim.crt
MAIN_TLS_PRIVATEKEY = CONFDIR/exim.key
Next, update the Exim configuration files.
update-exim4.conf && systemctl restart exim4Configure Dovecot Ubuntu/Debian
We want to authenticate on our Ubuntu Exim email server with IMAPS and POP3S. We already generated an SSL Certificate so it’s time to tell Dovecot to use that SSL. Open up the /etc/dovecot/conf.d/10-ssl.conf file and specify the location of the SSL certificate generated above at the top of the file.
nano /etc/dovecot/conf.d/10-ssl.conf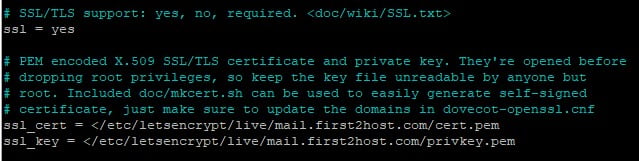
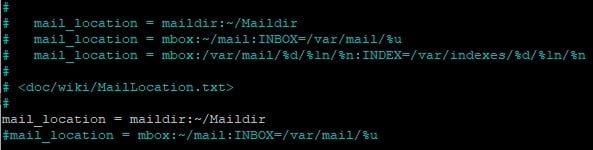
In the /etc/dovecot/conf.d/10-mail.conf file comment the line mail_location = mbox:~/mail:INBOX=/var/mail/%u and replace with mail_location = maildir:~/Maildir
nano /etc/dovecot/conf.d/10-mail.confmail_location = maildir:~/Maildir
#mail_location = mbox:~/mail:INBOX=/var/mail/%u
The /etc/dovecot/conf.d/10-mail.conf file will now look like this.
And finally, we need to ensure Dovecot is using PAM authentication. This will allow us to use system accounts. In the /etc/dovecot/conf.d/auth-system.conf.ext file change the passdb and userdb sections to reflect the below.
passdb {
  driver = pam
  # [session=yes] [setcred=yes] [failure_show_msg=yes] [max_requests=<n>]
  # [cache_key=<key>] [<service name>]
  args = session=yes dovecot
}

userdb {
  # <doc/wiki/AuthDatabase.Passwd.txt>
  driver = passwd
  # [blocking=no]
  #args =

  # Override fields from passwd
  #override_fields = home=/home/virtual/%u
}
So we have Install Dovecot in Ubuntu/Debian and configured it successfully. Restart Dovecot.
service dovecot restartTest Configuration
If you telnet to your NVMe VPS server’s hostname or “localhost” using IMAP or POP3, you should be connected.
telnet mail.first2host.com pop3telnet mail.first2host.com pop3
Trying 147.xXx.151.74...
Connected to mail.first2host.com.OK, that’s the insecure test complete. So now let’s make sure we can connect over secure ports. We can use swaks to test a TLS connection on ports 465 and 587.
apt install swaks

swaks -a -tls -q HELO -s mail.first2host.com:465 -au test -ap '<>'
=== Trying mail.first2host.com:465...
=== Connected to mail.first2host.com.
<- 220 mail.first2host.com ESMTP Exim 4.95 Ubuntu Mon, 26 Feb 2024 19:51:48 +0000
-> EHLO mail.first2host.com
<- 250-mail.first2host.com Hello mail.first2host.com [147.xXx.151.74]
<- 250-SIZE 52428800
<- 250-8BITMIME
<- 250-PIPELINING
<- 250-PIPE_CONNECT
<- 250-CHUNKING
<- 250-STARTTLS
<- 250-PRDR
<- 250 HELP
-> STARTTLS
<- 220 TLS go ahead
=== TLS started with cipher TLSv1.3:TLS_AES_256_GCM_SHA384:256
=== TLS no local certificate set
=== TLS peer DN="/C=UK/O=Exim Developers/CN=mail.first2host.com"
~> EHLO mail.first2host.com
<~ 250-mail.first2host.com Hello mail.first2host.com [147.xXx.151.74]
<~ 250-SIZE 52428800
<~ 250-8BITMIME
<~ 250-PIPELINING
<~ 250-PIPE_CONNECT
<~ 250-CHUNKING
<~ 250-PRDR
<~ 250 HELP
~> QUIT
<~ 221 mail.first2host.com closing connection
=== Connection closed with remote host.
This confirms we have configured an Exim email server running on an Ubuntu/Debian VPS. And we can see from some basic tests that we can connect to Exim on insecure and secure ports. So let’s try and add a new email account to an email client like Thunderbird.
Create an Exim Email Account
Remember at the start of this guide we specified what domain we would use with the server. We chose first2host.com so by adding a system user we also create an email address for that system user. Let’s try and create a new email address called [email protected].
adduser defaultComplete the required fields and create a password for the postmaster user. But the account isn’t ready just yet. So we still need to tell Exim that the new user exists. There is a handy Exim script to complete this. Run the following command in the console.
/usr/share/doc/exim4-base/examples/exim-adduserFill out the new email address. We just added the system user postmaster so the email we need to specify is [email protected]. Enter the password for this user.
Configure Exim Alias
But when you add a new email address you must use the /etc/aliases file to configure what you want to do with the email sent to the new address. In the /etc/aliases file you can choose to deliver mail to the account you have created or to another account on the server. We want to deliver mail for the [email protected] email to its inbox. Open up the /etc/aliases file.
nano /etc/aliasesSo, in the file, we specify the username which is postmaster and the email address for that user which is [email protected]. But notice how in this file we can also specify the location for root mail to be delivered. Save and close the file then restart exim.
# /etc/aliases
mailer-daemon: postmaster
postmaster: postmaster@first2host.com
nobody: root
hostmaster: root
usenet: root
news: root
webmaster: root
www: root
ftp: root
abuse: root
noc: root
security: root
root: postmaster@first2host.com
To learn more about Exim Aliases and how to create and manage them, see the Exim Aliases guide.
Add Exim Email To Thunderbird
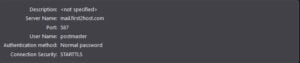
Finally, we need to add this account to our Email client. We are using Thunderbird but this should also work for Outlook and other applications. When you add this account to your email client. The client will search for the most common protocols for you. In some cases, this doesn’t always work flawlessly. The correct settings should be the hostname of your mail server for incoming and outgoing connections. Port 587 with STARTTLS encryption.
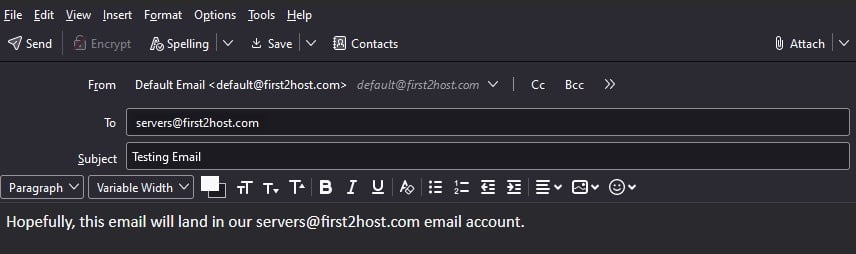
Send Test Email
Assuming everything went well our email account is now ready to use. So send a test email. Our email from [email protected] to [email protected] was received.

The above is an internal test. Mail never leaves the server because both accounts are local. So now try to send an email to an external address. By inspecting the headers of the received email we can confirm our Exim email server running on Ubuntu/Debian is configured correctly with TLS encryption.
Email Headers
Return-Path: <default@first2host.com>
Delivered-To: XxX@f2h.cloud
Received: from litespeed.f2hcloud.com
	by litespeed.f2hcloud.com with LMTP
	id MEiMHi683WV+kBUAjwovew
	(envelope-from <default@first2host.com>)
	for <XxX@f2h.cloud>; Tue, 27 Feb 2024 10:40:46 +0000
Return-path: <default@first2host.com>
Envelope-to: XxX@f2h.cloud
Delivery-date: Tue, 27 Feb 2024 10:40:46 +0000
Received: from mail.first2host.com ([147.135.151.74]:40058)
	by litespeed.f2hcloud.com with esmtps  (TLS1.3) tls TLS_AES_256_GCM_SHA384
	(Exim 4.96.2)
	(envelope-from <default@first2host.com>)
	id 1reut9-005woK-0D
	for XxX@f2h.cloud;
	Tue, 27 Feb 2024 10:40:46 +0000
Received: from [51.195.251.20] (helo=[10.8.0.4])
	by mail.first2host.com with esmtps  (TLS1.3) tls TLS_ECDHE_RSA_WITH_AES_128_GCM_SHA256
	(Exim 4.95)
	(envelope-from <default@first2host.com>)
	id 1reusP-0000sn-VP
	for XxX@f2h.cloud;
	Tue, 27 Feb 2024 10:39:58 +0000
Message-ID: <a1561b16-4938-4f28-a71a-12506ef7250b@first2host.com>
Date: Tue, 27 Feb 2024 10:39:57 +0000
MIME-Version: 1.0
User-Agent: Mozilla Thunderbird
Content-Language: en-US
To: XxX@f2h.cloud
From: Default Email <default@first2host.com>
Subject: External Mail Test
Content-Type: text/plain; charset=UTF-8; format=flowed
Content-Transfer-Encoding: 7bit
X-Spam-Status: No, score=0.0
X-Spam-Score: 0
X-Spam-Bar: /
X-Ham-Report: Spam detection software, running on the system "litespeed.f2hcloud.com",
 has NOT identified this incoming email as spam.  The original
 message has been attached to this so you can view it or label
 similar future email.  If you have any questions, see
 root\@localhost for details.
 Content preview:  Test external email delivery.
 Content analysis details:   (0.0 points, 4.0 required)
  pts rule name              description
 ---- ---------------------- --------------------------------------------------
  0.0 T_SPF_TEMPERROR        SPF: test of record failed (temperror)
 -0.0 T_SCC_BODY_TEXT_LINE   No description available.
  0.0 KAM_DMARC_STATUS       Test Rule for DKIM or SPF Failure with Strict
                             Alignment
X-Spam-Flag: NO
BOOM! You now have an Exim NVMe VPS Server running on Ubuntu or Debian with Dovecot and TLS authentications. This was a long set-up. Some would argue that Postfix would be a better alternative to Exim due to its simplicity.