


So far in our Exim mail server series, we have Set up an Exim mail server and then used that server as a smarthost. We connected a cPanel server to the smarthost and used it as a mail server, sending all emails from our cPanel server to the smarthost for sending. We’re going to now use our Exim server and Install RoundCube on Rocky Linux so we have a webmail application. This guide will take about an hour to complete. The guide will also work if you want to install RoundCube on AlmaLinux or Red Hat.
Other RoundCube Articles
Apache Virtual Hosts
We are going to use Apache virtual hosts to get Roundcube working. You should have Apache installed already but if not install it with the command below
yum -y install httpd nano
systemctl enable httpd.service
Now we need to create directories for Roudcube to live in. Create a document root folder
mkdir -p /var/www/smarthost.email/public_htmlOnce that is created we need to ensure the correct user and permissions are assigned to the directories. We’re doing all this as the root user and we want 755 permissions.
chown -R root:root /var/www/smarthost.email/public_html/
chmod -R 755 /var/www
So we know that our server is working correctly we will create a simple page to display. In the file just write hello and save.
nano /var/www/smarthost.email/public_html/index.htmlNow we need to create directories for our virtual host files
mkdir /etc/httpd/sites-available
mkdir /etc/httpd/sites-enabled
And tell Apache where to look for our hosts. Just add the line of code at the top of the file
nano /etc/httpd/conf/httpd.confIncludeOptional sites-enabled/*.confSo now is the time to create the actual virtual hosts. This will tell Apache to load your website. Create the config file and add the code located here to the file. Ensure you switch the domain for your domain name.
nano /etc/httpd/sites-available/smarthost.email.confAnd finally, we create a symbolic link which tells Apache to load our configuration.
ln -s /etc/httpd/sites-available/smarthost.email.conf /etc/httpd/sites-enabled/smarthost.email.confTo activate the new configuration restart Apache.
systemctl enable httpd
systemctl restart httpd
At this point, you should now be able to see the test text by navigating to your website. Next, it’s time to install PHP.
Install PHP And MariaDB
For the next part, we need to install PHP and MariaDB.
yum -y install epel-release
yum -y install http://rpms.remirepo.net/enterprise/remi-release-7.rpm
yum -y install yum-utils
yum-config-manager --enable remi-php74
yum -y install php php-xml php-fpm php-cli php-mcrypt php-gd php-curl php-mysql php-pspell php-mbstring php-imagick php-zip mariadb-server
Next, ensure we have the right PHP settings. Open up the php.ini file and modify the following lines.
nano /etc/php.ini# Change the following line
;cgi.fix_pathinfo=1
# To
cgi.fix_pathinfo=1
# Remove the comment and set your time and date
;date.timezone = "Africa/Kampala"
# To
date.timezone = "Europe/London"Save and close the file then enable and restart PHP-FPM
systemctl start php-fpm && systemctl enable php-fpm && systemctl status php-fpm Configure MySQL
Before we can download the Roundcube files we need to now set up MySQL, create a database and user then import the default Roundcube tables. Start and enable MySQL then run through the MySQL secure script. If you make a mistake you can delete the MySQL Database and start again.
systemctl start mariadb && systemctl enable mariadb && systemctl status mariadbNow run through the secure script. It’s self-explanatory so we won’t go through this here. Remember to set a root password.
mysql_secure_installationCreate MySQL Database & User
Now create a database and user. Remember to set a strong password. Replace @Change12 with your strong password. Learn how to delete MySQL users if you make a mistake.
mysql -u root -p
CREATE DATABASE webmaildb /*!40101 CHARACTER SET utf8 COLLATE utf8_general_ci */;
CREATE USER 'roundcube'@'localhost' IDENTIFIED BY '@Change12';
GRANT ALL PRIVILEGES ON webmaildb.* TO 'roundcube'@'localhost';
FLUSH PRIVILEGES;
exit
Download Roundcube
Move to the home directory of your website. In this example, we used /var/www/smarthost.email/public_html
# Move to the home DIR
cd /var/www/smarthost.email/public_html

# Grab the Roundcube files
wget https://github.com/roundcube/roundcubemail/releases/download/1.4.11/roundcubemail-1.4.11-complete.tar.gz

# Untar package
tar xvf roundcubemail-1.4.11-complete.tar.gz

# Move files to home DIR
mv roundcubemail-1.4.11<code>/* .</code>
Import The RoundCube SQL Tables
Located in the SQL folder is the Roundcube SQL tables. These need to be imported to your database. Navigate to your SQL directory. Ours will be in /var/www/smarthost.email/public_html/SQL and import the tables to the MySQL database you created. Ensure you use the correct database name.
mysql -u root -p <strong>webmaildb </strong>< mysql.initial.sqlConfigure Roundcube
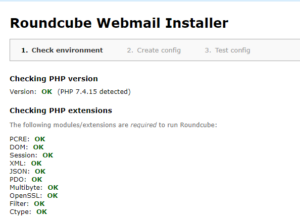
Finally, it’s time to configure Roundcube. Navigate to the installer directory at www.youdomain.com/installer and follow the instructions.
Install Roundcube – Step 2
Once you get to step 2 of the Roundcube installer STOP. You are displayed with a file called config.inc.php and asked to upload this file to the /config/config.inc.php location. We found when using the default file Roundcube would not send mail. We had to specify the SMTP information in the file. Download the generated code to your desktop and add the following lines to it
# Your servers hostname
$config['smtp_server'] = 'tls://your.domain.tld';


# Port 110 or 587 Should work
$config['smtp_port'] = 587;

$config['smtp_user'] = '%u';

$config['smtp_pass'] = '%p';

$config['smtp_auth_type'] = 'PLAIN';

$config['smtp_auth_cid'] = null;

$config['smtp_auth_pw'] = null;

$config['smtp_helo_host'] = '';

$config['smtp_timeout'] = 0;


# Your certificate is located in the /etc/letsencrypt/live/you.domain.com/cert.pem
$config['smtp_conn_options'] = array(    'ssl'         => array(      'verify_peer'  => false,      'verify_depth' => 3,      'cafile'       => '/path/to/certificate/your_certificate.crt',    ),  );
Should you need to, you can check the config-inc.php file we used to get everything working.
Conclusion
Although Roundcube isn’t the easiest application to install with a bit of tweaking and changing of settings it is possible to install Roundcube with a minimal amount of trouble. So now we have created an Exim server from scratch, we have used that server as a smart host relay to send emails from our cPanel server and we have learnt how to create Exim aliases. Now we have also learnt how to install Roundcube on our Rocky Linux 8 NVME VPS using Apache virtual hosts with PHP and MariaDB.