


Taking backups of your data in Linux is likely one of the most important things you can do. No one can guarantee that a problem will not affect the service or network, even in a Cloud environment where content is distributed to other hosts. There are situations where you could lose your data. Usually, a Cloud solution is located in the same data centre. What would happen if that data centre went on fire? Before you say that’s not going to happen. It already has. A few years ago, a well-known data centre in Europe caught fire after a fault on a server. Thousands of servers were lost and, many people lost data. Here we look at Linux backups with a focus on how to install Rdiff-Backup and specifically, take and restore incremental backups.
Paid Linux Backup Solutions
Taking backups of your NVMe VPS Server doesn’t have to be complicated. There are some great free and paid programs out there to complete backups. Some of the popular paid solutions are R1backups and Jetbackup. Jetbackup is a great little program that now works on Linux distributions without a control panel. Jetbackup has several advanced features like Snapshots and Incremental Backups. It’s currently priced at about $10 a month and is well worth the price tag if you want an Enterprise solution with great support.
For more advanced setups, one that I use is to mix OneDrive for Linux into the backup solution. You can use Rdiff-Backup to take the backup of your data and then sync the backup folder to OneDrive from your Linux server. This will help if you are trying to achieve the standard 3-2-1 backup profile.
Install Rdiff-Backup on Linux Servers
To install Rdiff-Backup, issue the commands below to get started and then we will take a look at using Rdiff-Backup.
# Install rdiff-backup

# Debian / Ubuntu
apt install rdiff-backup

# CentOS 7 / RHEL
yum install yum-plugin-copr epel-release
yum copr enable frankcrawford/rdiff-backup
yum install rdiff-backup

# CentOS 8 / AlmaLinux
yum install dnf-plugins-core epel-release -y
dnf copr enable frankcrawford/rdiff-backup
yum install rdiff-backup
Now that Rdiff-Backup is installed we will take a quick look at the commands. Because this is a free piece of software, the documentation is not the best. Let’s imagine we have a production site in our NVMe VPS located at /home/website. So we want to make sure we have a copy of our data. We also have an NFS server mounted at /backup.
Local Rdiff-Backup
We can use Rdiff-Backup to take a copy of the data at /home/website and store it at /backup. This is the best solution if you then want to sync the backup files to OneDrive.
rdiff-backup /home/website /backupRemote Rdiff-Backup
We can also use Rdiff-backup to send our files to a remote location. This is not as fast as an NFS solution.
rdiff-backup user@f2h.cloud::/home/website /backupList Incremental Backups
After taking Linux backups, Rdiff-Backup stores the data in a folder called rdiff-backup-data. So you can see a full list of all increments using the –list-increments switch or just -l.
rdiff-backup -l /backup/rdiff-backup-data/increments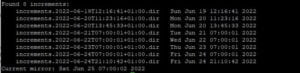
Notice the final line. Current mirror. This is the latest backup which is always stored in the /backup location. Older backups are moved to the /rdiff-backup-data/increments folder.
Restore Rdiff-Backups
Rdiff-Backup can automatically restore data. If you need to restore your whole site you can simply use the cp -R command to move the data from the /backup directory back to the /home/website location. You can also use the -r now switch.
rdiff-backup -r /backup/rdiff-backup-data/increments /home/websiteWe can also tell rdiff-backup to restore our website back to how it was x days ago. We just specify the number of days to roll back to in the command.
rdiff-backup -r 5D /backup/rdiff-backup-data/increments /home/websiteSo that command would restore our website back to how it was 5 days ago. Finally, we can automate backups using a quick bash script and we can also tell rdiff-backups to remove backups older than x days.
Automate Backups & Remove Backups
So because you don’t want to be running the backup commands manually every day we can automate that. Let’s create a quick bash script.
nano /var/backup.sh

#!/bin/bash
rdiff-backup --force --print-statistics /home/website/ /backup/ 2>&1 > /var/log/backup.log
rdiff-backup --remove-older-than 1W /backup/rdiff-backup-data/increments 2>&1 > /var/log/remove-backup.log
Save and close the file and chmod it to 755.
chmod /var/backup.shSo at this point, you could run the script to confirm it works. Just call it in the command line with sh /var/backup.sh. But to automate it, just add a line to your crontab.
crontab -e

0 7 * * * sh /var/backup.sh > /dev/null 2>&1
And that cron would run backups at 7AM each morning. The backups would be incremental so, only the content that has changed will be copied to the backup location. Rdiff-Backup is a great tool for Linux Incremental backups. Its simple commands and powerful features will ensure your data security.