

Set up a website on Ubuntu using Apache Virtual Hosts
Use your server and Apache to host a website.

In this guide, we will show you how to configure a website using Apache virtual hosts. The configuration of Apache virtual hosts over the different operating system versions like CentOS, Ubuntu and Debian is much the same. This guide assumes that you have access to a managed DNS service. Most domain registrars provide a service where you can configure A records and DNS records when using their DNS servers. You can ask your registrar to add these A records for you or if you have access to the domain names DNS zone file you can add or edit the A entry as required. Our development server for this guide is 151.80.124.86 so our A records look like this;

Update Server
To begin, if your server does not have Apache, install it but first ensure the server is fully up-to-date;
sudo apt-get update
sudo apt-get upgrade
Install Apache On an Ubuntu server
sudo apt-get install apache2So after you have installed Apache you should be able to visit your server’s IP address in a browser. You should see the Apache test page. This confirms you have installed Apache on your Ubuntu server and Apache is ready for configuration.

Now we need to configure Apache to resolve our domain name. But first, we are going to create a directory where Apache will look for our website files. You need to create a folder for each website that will be hosted on the server. Our first website will be first2host.com.
sudo mkdir -p /var/www/html/first2hostcom/public_html/And a directory for the second website, we are using first2host.net
sudo mkdir -p /var/www/html/first2hostnet/public_html/Both of these folders will be owned by the root user. We need to change this to a regular user. Create a user using the adduser command. Switch first2host for your username.
addusr first2hostNow, add a password for that user. Again, switch first2host for the username you picked above.
passwd first2hostNow assign the two folders you created to this user. We use CHOWN to do this
sudo chown -R first2host:first2host /var/www/html/first2hostcom/public_htmland the second folder, remember to CHROW the right username
sudo chown -R first2host:first2host /var/www/html/first2hostnet/public_htmlNow set the correct permissions on the Apache root directory.
sudo chmod -R 755 /var/www/html/We set the Apache directory to read-only because we are going to be configuring Apache to access our website’s files via the directories we created above.
Create Demo Website Pages
Now we are going to create demo pages for our websites so we know they are resolving and loading correctly. These will be called index.html and will be placed in the respective website home directory.
nano /var/www/html/first2hostcom/public_html/index.htmlIn this new file paste the below lines and save the file
<html>
<head>
<title>First2Host</title>
</head>
<body>
<h1>Great, you have a working website running off an Ubuntu server with Apache.</h1>
</body>
</html>
Repeat the above step for each directory you created above saving the demo index.html file into each website’s public_html directory.
nano /var/www/html/first2hostnet/public_html/index.html<html>
<head>
<title>First2Host</title>
</head>
<body>
<h1>Great, you have a working website running off an Ubuntu server with Apache.</h1>
</body>
</html>Configure your Apache Virtual Hosts
Next, we’re going to modify the files in Apache to accommodate our websites. You can use different IP addresses for different websites if you wish and we’re going to show you how to also use just one IP for multiple websites. We can copy the default Apache virtual host file and modify this to meet our needs.
sudo cp /etc/apache2/sites-available/000-default.conf /etc/apache2/sites-available/first2hostcom.confAnd for our second domain name, just repeat if you have more domain names.
sudo cp /etc/apache2/sites-available/000-default.conf /etc/apache2/sites-available/first2hostnet.confYou must save your virtual host files ending .conf or this will not work. Now let’s edit the files to work from your website
nano /etc/apache2/sites-available/first2hostnet.confThe only things that need to be changed in this file are the following lines;
ServerAdmin server@first2host.com
ServerName server.first2host.com
ServerAlias www.first2host.com
DocumentRoot /var/www/html/first2hostcom/public_html
Post-Apache File Update
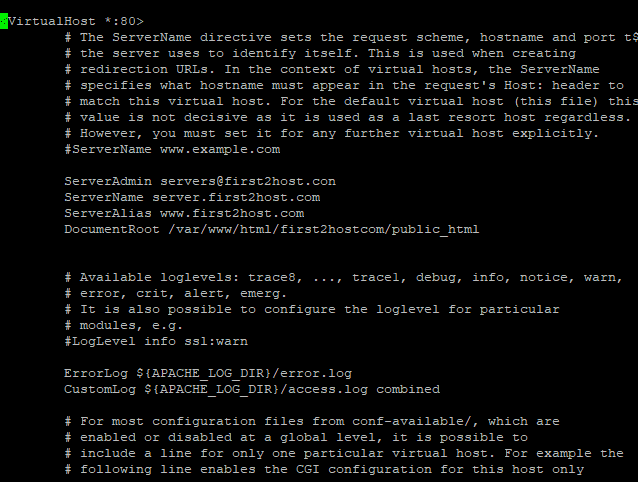
After you have changed the information to reflect your domain name the file should look like this;
Repeat the process for the second domain name, in our example the first2host.net domain name;
nano /etc/apache2/sites-available/first2hostnet.conf
Save and close the file. That is the Apache virtual hosts setup completed. Next, let’s disable the default virtual hosts file and enable the virtual hosts files we just created
sudo a2ensite first2hostcom.conf
sudo a2ensite first2hostnet.conf
sudo a2dissite 000-default.conf
Now, restart Apache
sudo systemctl restart apache2Finally, let’s open up the hosts file and specify what IPs are going to be used for our website. We are just using a single IP, the server’s main IP
nano /etc/hostsYou can list all domain names in this file and specify the main server IP. The file should look like this.
ff02::1 ip6-allnodes
ff02::2 ip6-allrouters
151.80.124.86 first2host.com
151.80.124.86 first2host.net
127.0.0.1 localhost.localdomain localhost
151.80.124.86 server.apache.com server
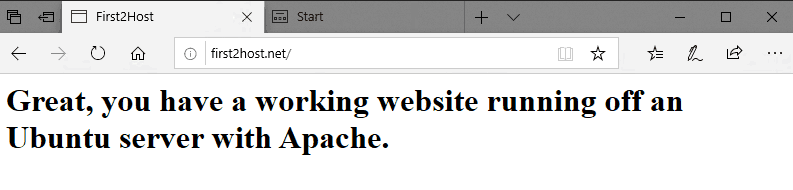
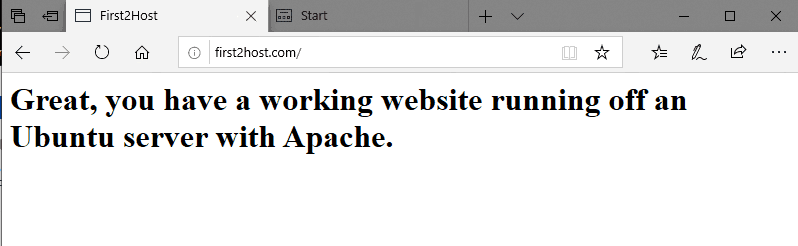
::1 localhost ip6-localhost ip6-loopbackYou should now be able to visit each site in a browser. Here are our Apache Virtual Hosts working;;
That’s the complete guide on configuring a website to run off an Apache server using a single IP. That’s called name-based hosting. If you are unable to see your website at this point ensure you have configured the A records correctly. Ask your domain name registrar or hosting provider to check this for you.