


First2Host uses Failover IP blocks. To use additional IPs in CentOS servers you have to configure the IPs in your server. A Failover IP block is an IP block that can be routed to different servers. If you have Failover IPs and multiple dedicated servers or NVMe VPS Server you can change the routing of your whole IP block to point to a different dedicated server. This is useful if you are upgrading your dedicated server to a larger one or if you want to use the IP block on a different server.
Copy Network Interface
First, log in to your dedicated server and take a copy of the existing eth0 interface. We will use this as a template to create interfaces for each IP in the block.
cp /etc/sysconfig/network-scripts/ifcfg-eth0 /etc/sysconfig/network-scripts/ifcfg-eth0:0Next, edit the copied file using your favourite text editor and delete all of the text in the file. Replace the text with the below code
cd/etc/sysconfig/network-scripts/ ; nano ifcfg-eth0:0Configure CentOS Additional IPs
To configure your additional CentOS IPs, copy the below code to the eth0:0 file. Replace FAILOVER IP with the first IP in your block so, if your subnet was 192.168.0.1/29 you would put 192.168.0.1 in the APADDR and BROADCAST fields. Save and close the file.
#NM_CONTROLLED="no"
DEVICE=eth0:0
BOOTPRONTO=static
ONBOOT=yes
IPADDR=FAILOVER IP
BROADCAST=FAILOVER IP
NETMASK=255.255.255.255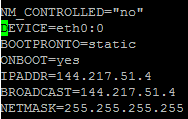
Restart IP Interface
Next, we need to take down any existing interface and bring it back up. We do this with the ifdown and ifup commands.
ifdown eth0:0 && ifup eth0:0At this point, you should now be able to ping the IP address you just configured. If you cannot ping the IP please submit a ticket to our product support team. We will double-check the routing of the IP block for you.
Repeat the steps above to configure the rest of your IP block on your server. For the next IP, you can open up the existing interface, change the APADDR and BROADCAST fields to represent the next IP and save the file as eth0:1. The video below will show you how to do this.