A common issue when trying to introduce High Availability is what do to with your database. There are multiple options. The most common would be to load balance over a database cluster and other more far out there solutions include dumping the database in a bash script, moving it and restoring it. To be fair, there are no wrongs here. It’s all about your setup and what you need. We’re going to Replicate a MySQL Database to slaves based upon NVMe VPS Servers. MySQL offers two types of replication.
- Master-Slave Replication (This guide)
- Master-Master MySQL Replication.
Replicate MySQL Database
The concept for this is simple. When changes are made to a centralized (Master) database server, those changes are replicated instantly to slave servers. The resolve the single point of failure, you can duplicate the master server and use a Failover IP. The master needs to run on a highly available service like a High Availability VPS Server.

In this image, we can see some common network topologies. A MySQL Master-Slave configuration would be a Line or Bus. A single master sits at the end of the topology and replicates its changes down the line to the slaves.
To get started you will require at least two MySQL servers, set up exactly the same. We’re going to go through the whole setup. It’s going to take about an hour. You can use an NVMe VPS or Business Dedicated Server for this guide.
Master MySQL Server Setup
We have already covered How To Install MySQL 8 on Ubuntu 22 LTS in another blog post so before you follow this guide. Follow that guide. You need to create a Master and as many slaves as you require. Follow the guide exactly. Creating the same database and user on all servers. But remember when running the mysql_secure_installation script, do not disable remote logins. You should also set up SSH Keys so your master can replicate MySQL databases to your slaves without the need for a password.
Configure Master For MySQL Replication
Now that you have your MySQL cluster online we need to configure the master to allow replication of the database you have created to your slaves. MySQL offers two types of replication. The older, binary log file position-based replication and the newer transaction-based replication method where each transaction is assigned a GTID. With the latter, If a slave comes across a transaction that has already been processed, it will skip it. So in this guide, we will be configuring binary log file position-based replication.
In your master, open up the mysqld.cnf file. We need to make the following changes.
nano /etc/mysql/mysql.conf.d/mysqld.cnf

bind-address            = IPv4 Address
server_id               = 1
log_bin                 = /var/log/mysql/mysql-bin.log
binlog_do_db            = Example
Here you are telling MySQL to use the server’s IPv4 address to allow connections. That’s so slaves can log in to get a list of transactions. You are setting a server-id which must be unique. Use 1. You also specify a location to the bin-log, this should be correct. And lastly, you specify the database name you created when setting up the MySQL server. Save and close the file. Then, restart MySQL.
systemctl restart mysqlWhen creating the MySQL master you likely created a user and database. That user would be assigned to “localhost” We need to create a new user that specifies the slave IPv4. We then need to grant it replication privileges. Log in as the root user to MySQL and issue the commands. Here you specify the database user and the IP of your slave. You are allowing the database user to connect to the master from the slave IP.
mysql -u root -p

CREATE USER 'dbuser'@'Slave-IPv4' IDENTIFIED WITH mysql_native_password BY 'Password';

GRANT ALL ON *.* TO 'dbuser'@'Slave-IPv4';

# You might be able to just grant replication privilages depending on what you
# require.

GRANT REPLICATION SLAVE ON *.* TO 'dbuser'@'Slave-IPv4';

FLUSH PRIVILEGES;
Setting Binary Log Coordinates
The Binary log is where your slave will get new entries to replicate to its local MySQL database. You can configure this to import existing data in the database to your slaves. But this is outside the scope of this article so we are assuming you have an empty database. So, still, in the MySQL console, issue the commands to retrieve the binary log coordinates.
FLUSH TABLES WITH READ LOCK;

SHOW MASTER STATUS;

UNLOCK TABLES;
Here is our Binary log information.
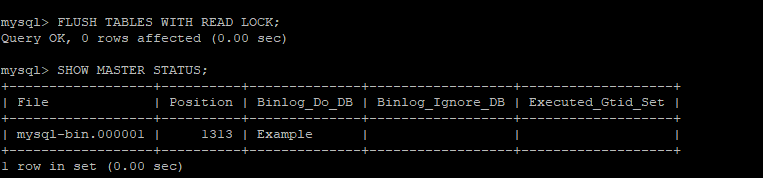
So from this, we can disseminate that our log position is 1313. This is the position in the log our slaves will start copying data from. Make a note of the file name (mysql-bin.000001) and the position.
Configure MySQL Slave
Finally, we need to configure the slave. Login as root and open up the mysqld.cnf file. This is the file where we specified the MySQL servers IPv4.
nano /etc/mysql/mysql.conf.d/mysqld.cnfAgain, specify the information. You should just change the IPv4 and the server-id to 2 and the database you are replicating. The database and log-bin would be the same as in the master mysqld.cnf file. The ID must be unique. You must set a relay-log on all slaves.
bind-address            = IPv4 Address
server-id               = 2
log_bin                 = /var/log/mysql/mysql-bin.log
binlog_do_db            = Example
relay-log               = /var/log/mysql/mysql-relay-bin.log
Finally, restart the MySQL service.
systemctl restart mysqlOK. That should be the process of configuring MySQL replication. We have configured a master to allow slaves to log in and read the binary log file. MySQL Replication will replicate the database to the slaves. Let’s test our work!
Testing MySQL Database Replication
Still in the slave, let’s tell it the master IP and some additional settings. Run each command on its own!! You are specifying the master IPv4, the user that we created (dbuser) and the password and the binary log coordinates.
mysql

CHANGE REPLICATION SOURCE TO
SOURCE_HOST='master_server_ip',
SOURCE_USER='dbuser',
SOURCE_PASSWORD='password',
SOURCE_LOG_FILE='mysql-bin.000001',
SOURCE_LOG_POS=1313 ;
And now we can start MySQL replication.
START REPLICA;
SHOW REPLICA STATUS\G;
You should see a message that confirms replication has started. Query OK, 0 rows affected (0.04 sec) Assuming all went well, you should see something like this.
*************************** 1. row ***************************
             Replica_IO_State: Waiting for source to send event
                  Source_Host: 192.250.0.1
                  Source_User: dbuser
                  Source_Port: 3306
                Connect_Retry: 60
              Source_Log_File: mysql-bin.000002
          Read_Source_Log_Pos: 157
               Relay_Log_File: mysql-relay-bin.000003
                Relay_Log_Pos: 373
        Relay_Source_Log_File: mysql-bin.000002
           Replica_IO_Running: Yes
          Replica_SQL_Running: Yes
The important bits are Replica_IO_Running and Replica_SQL_Running. Both of these should be yes and your slave should be waiting for the master to update the binary log file. Let’s add some data to the master and see if it’s replicated to the slave.
Add Test Tables To Master Database
On the Master. Log in to MySQL and select the replication database. Switch Example for your replication database.
mysql -u root -p

USE Example
Now create a table. This should then be replicated to the slave.
CREATE TABLE dev_table (
example_column varchar(30)
);
Check Slave For Replicated MySQL Database Table
Now log back into the slave. Login as root and switch to the replication database. Issue the show tables command and you should see the table we just created in the master.
mysql -u root -p

USE Example

SHOW TABLES;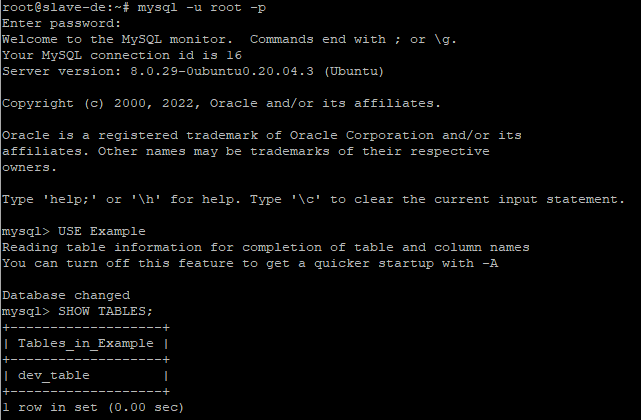
That’s it. We are now replicating MySQL databases to a slave. You can replicate to as many slaves as you like and if you are setting up a cluster, you can add High Availability to that cluster by Installing HAproxy on a High Availability Server.