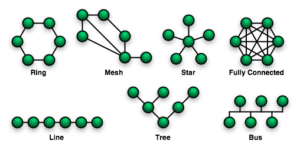
MySQL Master-Master replication evolved from the binary MySQL Master-Slave Replication. In a Master and Slave environment, database changes are made on a centralized master server. In turn, those changes are propagated to the slave servers. The problem here is that if the master is down, no changes can be propagated to the slaves. So, when you configure MySQL Master-Master Replication, changes made on the masters are propagated to other masters. This is great for fault tolerance. Using the network topology images below. This guide details how to set up a fully connected MySQL cluster. Each MySQL server will replicate any changes in its database to the other MySQL servers in the cluster.
Why Master-Master MySQL Replication?
So, why would want to configure MySQL Replication? The answer is one word. Redundancy. There are different ways of providing redundancy. You could use a load balancer, a High Availability Database Cluster with automatic failover or configure MySQL replication. Master-Master replication can provide you with redundancy at a great price. You just need a few VPS Servers and Install HAProxy to balance the load over the cluster.
In this guide, we are going to be creating a cluster of MySQL Masters. Transactions will be dealt with the newer UUID processing. This is a long setup. If you don’t have an hour don’t start the process because if you stop. You will likely forget where you are in the process.
Initial MySQL Master Replication Set up
So first, we need to create our cluster. We are using a cluster of NVMe VPS servers in the UK, France, Germany, Canada and the USA. First, follow the guide Install MySQL 8 On Ubuntu 22 LTS. Once you have MySQL installed on each server. Come back here and follow the rest of the guide. You can install Ubuntu 20 or Ubuntu 22 from the Discovery Control Panel.
When running the mysql_secure_installation script. Do not disable remote logins
Create UUID
First, we need to create a group UUID. This will be used in our my.cnf configuration on each master replicating the database. Issue the command and make a note of the returned UUID. You only need to do this on one server.
uuidgenEdit MySQL Configuration
So now we need to tell MySQL what we are doing. Open up the /etc/mysql/my.cnf and add the following lines;
nano /etc/mysql/my.cnf

[mysqld]

# Replication settings
gtid_mode = ON
enforce_gtid_consistency = ON
master_info_repository = TABLE
relay_log_info_repository = TABLE
binlog_checksum = NONE
log_slave_updates = ON
log_bin = binlog
binlog_format = ROW
transaction_write_set_extraction = XXHASH64
loose-group_replication_bootstrap_group = OFF
loose-group_replication_start_on_boot = OFF
loose-group_replication_ssl_mode = REQUIRED
loose-group_replication_recovery_use_ssl = 1

# Replication group configuration
loose-group_replication_group_name = "UUID"
loose-group_replication_ip_whitelist = "Master-IP, Master-IP,Master-IP"
loose-group_replication_group_seeds = "Master-IP:33061, Master-IP:33061, Master-IP:33061"

# Single or Multi-primary mode? Uncomment these two lines
# for multi-primary mode, where any host can accept writes
loose-group_replication_single_primary_mode = OFF
loose-group_replication_enforce_update_everywhere_checks = ON

# Host specific replication configuration
server_id = 1
bind-address = "LOCAL_MASTER_IP"
report_host = "LOCAL_MASTER_IP"
loose-group_replication_local_address = "LOCAL_MASTER_IP:33061"

# Disable SQL Strict Mode. Will help if following our MySQL/HAProxy guide
sql_mode=""
You only need to edit the following lines.
- You got the UUID in the previous step. This is the same on all servers in the cluster.
- For the whitelist, specify all of your server’s IPv4.
- Do the same in the seeds section but append the port 33061.
- Server_id – This should be unique on each master. Increase the value by 1 on each server.
- Report_host – Local IPv4 address.
- loose-group_replication_local_address – Local IPv4 with 33061 appended.
loose-group_replication_group_name = "UUID"
loose-group_replication_ip_whitelist = "Master-IP, Master-IP,Master-IP"
loose-group_replication_group_seeds = "Master-IP:33061, Master-IP:33061, Master-IP:33061"
server_id = 1
report_host = "LOCAL_MASTER_IP"
loose-group_replication_local_address = "LOCAL_MASTER_IP:33061"
Next, ensure you have the MySQL Replication ports open. We are using 3306 and 33061.
ufw allow 3306
ufw allow 33061
Create MySQL Replication User
So now we are ready to create our users. So far, the setup has been the same on all servers. Apart from minor changes in the previous step. You can set up the same user on each master. Login to MySQL as the root user for the next section. Issue the commands one by one. Make sure you specify a password for the user.
mysql -u root -p

SET SQL_LOG_BIN=0;
CREATE USER 'replicator1'@'%' IDENTIFIED BY 'password' REQUIRE SSL;
GRANT REPLICATION SLAVE ON *.* TO 'replicator1'@'%';
FLUSH PRIVILEGES;
SET SQL_LOG_BIN=1;
Let’s recap. So far you have a cluster of MySQL servers. You have created the same user on each master and granted replication rights to that user. You have edited the my.cnf file to specify the UUID of the group, and IPs of the masters. Each master has a unique server ID.
So next we change the replication user on each master. As root in MySQL issue the command below changes the user details for the ones we created in the previous step. We then install the group replication plugin. You can verify the plugin is installed with the SHOW PLUGINS; command.
CHANGE MASTER TO MASTER_USER='replicator1', MASTER_PASSWORD='password' FOR CHANNEL 'group_replication_recovery';

INSTALL PLUGIN group_replication SONAME 'group_replication.so';
Activate MySQL Master-Master Replication Cluster
We are now ready to start bringing up the MySQL Master-Master cluster. When we first start the replication group, there will be no active members. So, when we join our first master to the group it will be expecting to receive information like transaction IDs. Because of this, we need to add our first master to the group a bit differently. Issue the commands in one of your MySQL masters.
SET GLOBAL group_replication_bootstrap_group=ON;
START GROUP_REPLICATION;
SET GLOBAL group_replication_bootstrap_group=OFF;
Verify that the master is added to the replication group with the following command.
SELECT * FROM performance_schema.replication_group_members;The returned information should look like this with one master in the replication group.

Before adding our remaining masters to the cluster, let’s create a database and table so we know replication is working.
CREATE DATABASE f2hcloud;
CREATE TABLE f2hcloud.cloud ( id INT NOT NULL AUTO_INCREMENT, type VARCHAR(50), quant INT, color VARCHAR(25), PRIMARY KEY(id));
INSERT INTO f2hcloud.cloud (ram, nic, hdd) VALUES ("128", 1000, "1920");
OK. Let’s start replication. On Each master issue the start command;
START GROUP_REPLICATION;Now on each node, you should have a list of MySQL servers when running the SELECT * FROM performance_schema.replication_group_members; command. If you run the command SHOW DATABASES; on any node, you should see the database you created in the above command.

If you remove that database it will be removed from all masters in the cluster. If any of the masters show as RECOVERING that indicates there is a problem. You can check the /var/log/mysql/error.log file for more information.
You have successfully configured a cluster of MySQL Master-Master Replication servers but, a MySQL cluster is not much help without an SSL and High Availability. Learn how to Load balance and set up HTTPS with HAProxy.