


If like us, you utilize different hardware then you may need to add custom drivers to your Windows ISO. For example, if you use VIRTIO in a virtualized environment, those drivers are missing from the standard Windows ISO which means you will be unable to see the hard drives in your Windows VPS Server to install Windows. You could mount a second CD-ROM with the drivers located in there but this is time-consuming. By using the Windows utility DISM you can inject the drivers for Windows Server into the Windows ISO which, will then support your hardware out of the box. Please be aware. This guide will not work on Windows 11. To inject Drivers to a Windows 11 ISO see the link.
Before we start it’s important to understand the structure of the Windows ISO. It’s the same for Windows Desktop and Windows Server versions. Open the ISO with a file utility program like 7zip. Located the folder called “Sources”. This folder contains two important files, boot.wim and install.wim. The Windows installation will mount a small setup OS which allows you to install Windows using a graphical user interface (GUI). This OS information is located in boot.wim and the actual Windows installation details are in install.wim. If you are injecting Windows Server 22 drivers to see storage like VIRTIO drivers. You must add them to both the setup OS and the install OS. We will inject the VIRTIO drivers into both Windows images.
Create Folder Structure & Unpack ISO
Create a new folder on your desktop called “image” and inside this folder create the following folders. ISO, Mount, Drivers. Open the Windows ISO in 7zip and extract the files to the “ISO” folder you just created in the image folder on your desktop. If you navigate to the ISO folder now, it should look like this:-
Collect Drivers To Inject To Windows ISO
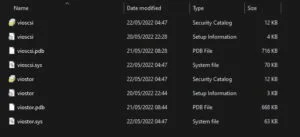
In the “Drivers” folder place all of the drivers you want to inject into the ISO. You can place different drivers in different folders if you have many. In our example, we just have the VIRTIO drivers in the folder.
Get Windows OS Information
For this section, we need to use PowerShell. Open PowerShell and run as Administrator. We’re going to query the boot.wim and install.wim files to see what Windows OS exist. In PowerShell issue the below command substituting the path to your boot.wim file which should be located at C:\Users\user\Desktop\Image\ISO\sources\boot.wim if you followed our directory structure.
# Windows Boot OS

Get-WindowsImage -ImagePath C:\Users\user\Desktop\Image\ISO\sources\boot.wim

# Windows Install OS

Get-WindowsImage -ImagePath C:\Users\user\Desktop\Image\ISO\sources\install.wim
In the boot.wim file we see the Windows PE and Windows Setup programs located at index 1 and 2 respectively. We need to add our drivers to these so we can detect the storage we are using.
In Install.wim we see our 4 Windows VL OS versions. At Index 1 we have the core version of Windows Server 22 At Index 2 we have our GUI version of Windows Server 22. Index 3 holds the core data centre versions and 4 holds the Datacentre GUI version of Windows Server 22. We’re going to inject the VIRTIO drivers into both boot.wim Windows versions and into Index 2, Windows Server 22 Graphical Interface. Let’s get started.
Mount OS to ISO Folder
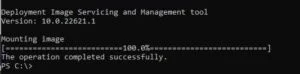
Next, we’re going to use PowerShell and the Dism utility to mount the Boot and Setup images listed in boot.wim. Let’s start with Microsoft Windows PE at index 1. In the command below we are specifying the location of the boot.wim file and the “Mount” directory.
Dism /Mount-Image /ImageFile:C:\Users\user\Desktop\Image\ISO\sources\boot.wim /Index:1 /MountDir:C:\Users\kjones\Desktop\Image\MountAfter running this command you should see the following message in the console.
Inject Drivers to Windows Server 22
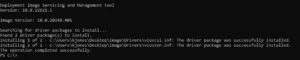
Now it’s time to inject the drivers we have in the “Drivers” folder to the mounted Windows version. We’re just mounting the setup utility at the moment. To inject our drivers we use the /Add-Driver cmdlet. In the command below we are specifying the location to the mounted Windows OS and the location of the “Drivers” folder containing our VIRTIO drivers. The command runs reclusivly, it will search any folders you have created within the Drivers folder.
Dism /Image:C:\Users\user\Desktop\Image\Mount /Add-Driver /Driver:C:\Users\user\Desktop\Image\Drivers /Recurse So after running the command above you should see a message in the console confirming the drivers were found and installed to the OS Image. It will look like this.

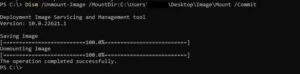
You now have your drivers in the image. We need to save these changes or “commit” them to the image. Using the command below unmount the image with the /Commit flag.
Dism /Unmount-Image /MountDir:C:\Users\user\Desktop\Image\Mount /CommitTo confirm the image was unmounted and the drivers saved you will see the following message in the console.
That’s one image now injected with your drivers. If you’re injecting VIRTIO drivers to see storage you will need to repeat the process for the OS located at index 2 in the boot.wim file. It’s much quicker now the commands are in the history in PowerShell. Press the UP arrow until you come to the first command to mount the Windows PE image and change the index value to “2”. The use the same command to inject the driver to this version of Windows.
# Mount image at Index 2

Dism /Mount-Image /ImageFile:C:\Users\user\Desktop\Image\ISO\sources\boot.wim /Index:2 /MountDir:C:\Users\kjones\Desktop\Image\Mount

# Inject Drivers to OS

Dism /Image:C:\Users\user\Desktop\Image\Mount /Add-Driver /Driver:C:\Users\user\Desktop\Image\Drivers /Recurse

# Unmount OS and Commit Changes

Dism /Unmount-Image /MountDir:C:\Users\user\Desktop\Image\Mount /Commit
Notice how only the first command changes. The rest are the same. Next you will want to inject your drivers into the OS that is deployed to the target system. Remember that OS is located in the install.wim file at Index 2 in our example so the command would be;
Dism /Mount-Image /ImageFile:C:\Users\user\Desktop\Image\ISO\sources\install.wim /Index:2 /MountDir:C:\Users\user\Desktop\Image\MountQuick Recap
So far we have mounted the Windows setup utility and OS. We have injected our drivers into that program which should allow us to see our VIRTIO storage when we run the Windows Setup program. When that program installs Windows Server 2022 GUI it will also contain the VIRTIO drivers. Now we need to package up our files into an ISO we can boot from.
Create a New Windows Server ISO
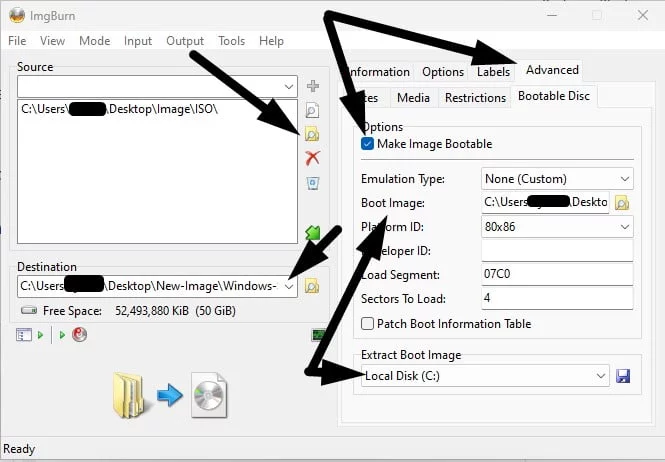
So to create an ISO file we are going to use Imgburn. There are many programs out there that create ISO files but this one is free and easy to use. Direct download provided by F2H (v2.5.8.0). Install Imgburn but do not start it. Located the Windows ISO file you originally extracted to the “ISO” folder. You need to mount the UNMODIFIED ISO using Windows. Select the ISO and click “Mount” in the top of the folder bar. Now open Imgburn and run as Administrator.
- Click Create image file from files/folders
- In the box on the left select the ISO folder where your boot and install files are located.
- Select a location to save the ISO too.
- Under the “Advanced” tab on the right select “Make Disk Bootable”.
- In Extract Boot Image select the original Windows ISO and click the save icon to save the boot information.
- Open the saved boot image in the previous step under “Boot Image” in imgburn. This will populate details for you.
- Finally, burn the files to an ISO
You now have a new Windows Server 2022 OS in ISO format with custom drivers. You can mount this OS and use it to deploy further Windows VPS Servers.